Willow Leaf Crochet Crossbody Bag
A small crochet bag can add just enough handmade detail to an everyday outfit. This Willow Leaf Crossbody Bag pairs a sage green body with an oatmeal flap and a little golden leaf. It has the quiet woodland feeling I love, with a simple rectangular shape that works with jeans, linen dresses, and soft autumn layers. There is room for a phone and a few small essentials, without the bulk of a large tote.
The construction is pleasantly straightforward: crochet one long strip, fold the green section into a pouch, and seam its sides. The cream section becomes the flap. Add a narrow strap and a small leaf applique, and the pieces come together into an understated accessory.
Pattern status: This is a newly drafted, untested pattern. Stitch counts and measurements have been checked mathematically, but a physical sample has not been made. Yarn quantities, fit, capacity, and durability need sample testing. The photographs are AI-generated design and process concepts; use the written instructions for stitch placement and construction.

About This Design
The supplied reference features a sculptural mushroom purse. This new design takes a broad woodland mood into a different project: a flat cotton crossbody with a rectangular flap and a leaf motif. It uses rows, a folded panel, side seams, and a separately crocheted strap. There is no mushroom cap, cylindrical stem, plush chenille, or drawstring.
The flap is intentionally unfastened in the base pattern. It rests over the front, so this is an everyday light-carry accessory rather than a secure travel bag. A lining is optional and described below.
| Project detail | Draft specification |
|---|---|
| Skill level | Confident beginner; small leaf uses taller stitches |
| Main stitch | Single crochet in turned rows, through both loops |
| Finished body | Approximately 22 cm wide x 18 cm high before seam allowance |
| Flap depth | Approximately 11 cm |
| Strap | Approximately 2.5 cm wide; adjustable length |
| Construction | One folded body-and-flap strip, two side seams, separate strap |
| Terminology | US crochet terms |
Materials and Yarn
Choose a smooth cotton yarn that makes a firm, flexible fabric at the stated gauge. A light worsted or substantial DK cotton is a reasonable starting point, but the swatch matters more than the label. Soft, loosely spun yarn may stretch too much for this particular shape.
- Sage green main color: approximately 250–320 m, including the strap.
- Oatmeal cream contrast: approximately 55–80 m for the flap.
- Golden ochre scrap: approximately 5–10 m for one leaf and its vein.
- A 4 mm crochet hook, or the size needed to match gauge.
- Blunt yarn needle, scissors, removable stitch markers, and measuring tape.
- Optional lightweight woven lining fabric and matching sewing thread.
The yardage ranges are provisional allowances rather than measured consumption. Buy compatible yarn from the same product line for the two large sections. Keep a little spare green yarn for stronger strap attachments and seam repairs.
Gauge and Finished Measurements
Aim for 20 single crochet stitches and 22 rows per 10 cm, measured after washing and drying a swatch according to the yarn label. Make a swatch larger than 10 cm so you can measure its center without counting distorted edge stitches.
At this gauge, 44 stitches measure 22 cm across. Forty rows measure approximately 18.2 cm, giving the front and back their height. The 24-row flap measures approximately 10.9 cm. Side seams will take up a little width, so the usable inside measurements will be slightly smaller.
If your swatch is too wide, try a smaller hook. If it is too narrow, try a larger hook. When the fabric feels too open even at gauge, choose a fuller cotton rather than pulling every stitch tight. A firm fabric should still let the hook move comfortably.
Abbreviations and Stitch Notes
| Term | Meaning |
|---|---|
| ch | Chain |
| sc | Single crochet |
| hdc | Half double crochet |
| dc | Double crochet |
| tr | Treble crochet: yarn over twice before inserting hook |
| sl st | Slip stitch |
| st / sts | Stitch / stitches |
| RS / WS | Right side / wrong side |
The turning chain does not count as a stitch. Work the first sc into the first actual stitch, and work through both top loops unless instructed otherwise. Every body and strap row ends with ch 1 and a turn, except the final row before fastening off.
Place a marker in the first and last stitch while you learn the edges. Move the markers after every row. Counting 44 stitches regularly is quicker than discovering a gradually narrowing panel at the seaming stage.
How to Make the Crochet Crossbody Bag
Step 1: Crochet the Green Front and Back
With sage green, ch 45 loosely.
Row 1: Sc in the second chain from the hook and in each remaining chain. You have 44 sc. Ch 1, turn.
Rows 2–40: Sc in each of the 44 stitches. Ch 1, turn after each row. At the end of Row 40, place a removable marker in each side edge. These markers identify the bottom fold between the front and back, not the top opening.
Rows 41–80: Continue in sc across all 44 stitches. The whole green section should now measure approximately 36.4 cm from foundation to working edge, with the Row 40 markers halfway along its length.
At the final stitch of Row 80, complete its last yarn-over with oatmeal cream. Cut the green yarn, leaving a tail to weave in. Ch 1 with cream and turn.
The foundation edge will become the top of the bag’s front. Rows 1–40 form the front, Rows 41–80 form the back, and the cream rows added next will continue beyond the back to form the flap.

Step 2: Add the Oatmeal Flap
Rows 81–104: With oatmeal cream, sc in each stitch across: 44 sc per row. Ch 1 and turn after Rows 81–103. At the end of Row 104, fasten off without adding a turning chain.
You now have one rectangular panel with 80 green rows and 24 cream rows. Its total draft dimensions are approximately 22 cm wide and 47.3 cm long. There is no shaping or decrease at the flap end.
Weave in the color-change tails on the side that will face inside. Do not knot them together into a hard lump at the hinge. Gently wash or dampen the panel according to the yarn label and lay it flat, squared to its intended dimensions, without stretching.
Step 3: Fold the Pouch and Sew the Sides
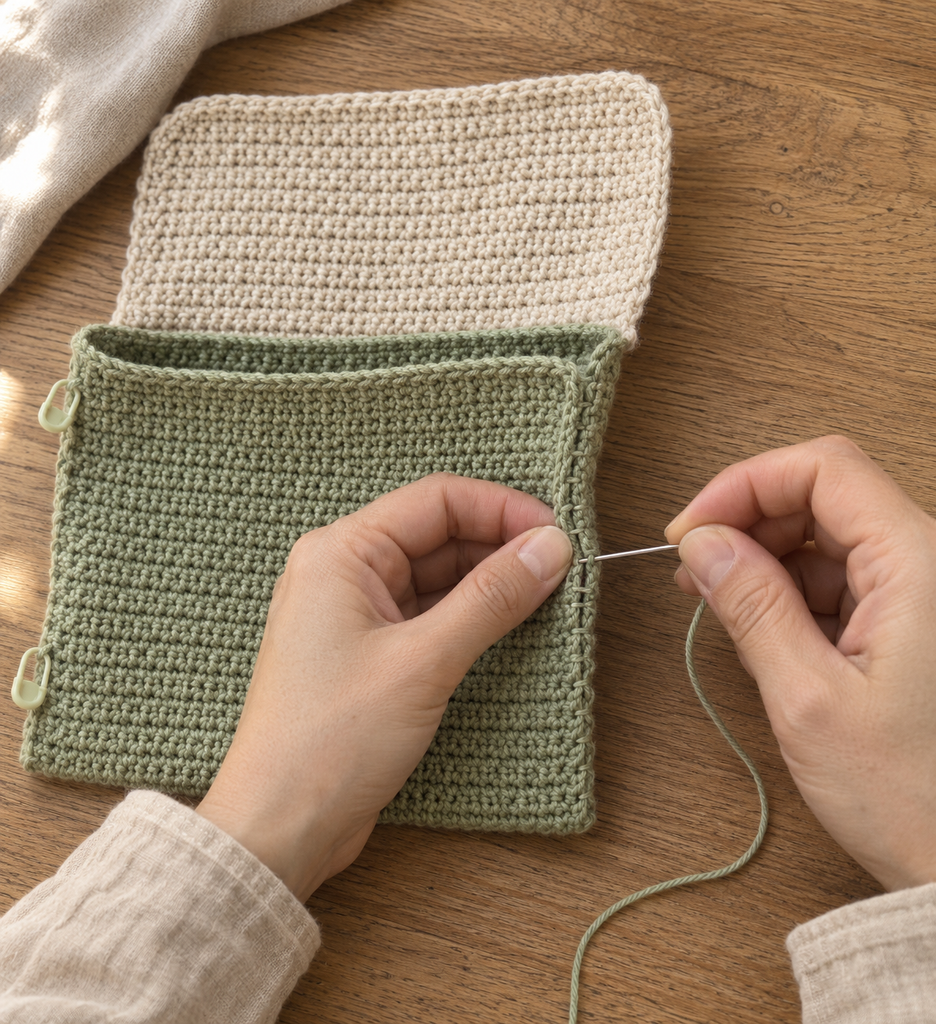
Choose a preferred RS and mark it. With the RS facing upward, lift the foundation edge and fold the first 40 green rows onto Rows 41–80. This places right sides together inside the fold. The foundation edge meets the green-to-cream color boundary, while the cream flap remains extended beyond it.
Match the two Row 40 fold markers. Clip each pair of green side edges together, matching corresponding row ends. The front has 40 row ends and the back has 40 row ends on each side, so these seams can be worked evenly one pair at a time.
With green yarn, sew each side from the bottom fold toward the opening using small whipstitches through the matched edge loops. Secure the top neatly, but stop at the opening. Do not sew the foundation edge to the back, and do not sew the cream flap edges to the pouch sides.
Turn the pouch right side out. The cream section should fold forward from the back and rest over the upper front. The finished body is approximately 18 cm high, with an open interior and a simple rectangular flap.
Step 4: Crochet a Strap to Your Preferred Length
With green yarn, ch 6.
Row 1: Sc in the second chain from the hook and each remaining chain: 5 sc. Ch 1, turn.
Following rows: Sc in all 5 stitches, ch 1, and turn. Keep the width constant. At the main gauge, the strap is approximately 2.5 cm wide.
As a starting point, make 229 rows total, giving approximately 104 cm before attachment. About 2 cm of each end will overlap the inside of the bag, leaving roughly 100 cm exposed. Narrow strips can have a different row gauge, and cotton stretches under load, so measure the actual strap rather than relying on the row total alone.
Before fastening off, pin the ends inside the bag and try it on empty. Adjust the length until the bag rests comfortably at your preferred height. For a different length, estimate total rows as desired total strap length in centimeters multiplied by 2.2, then confirm by measurement.
Step 5: Attach the Strap Securely
Place one strap end inside each upper side seam, with approximately 2 cm of overlap below the opening. Check that the long strap lies flat without a twist. Keep the cream flap free to move and the pouch opening unobstructed.
With matching green yarn, sew the perimeter of each overlapped end to the inside of its side seam area, then add several horizontal passes through the overlap. Catch sound edge loops and distribute the stitches across the strap width. Avoid fastening the strap with only one small knot or a single stitch.
Weave the tails back through the attachment area in more than one direction. Test gently with a few light items before everyday use. If the strap lengthens noticeably, shorten it or add a woven backing using sewing thread.
Step 6: Crochet the Golden Leaf
With ochre, ch 11. Work around both sides of the foundation chain; this is one continuous outline, not a series of joined rounds.
First side: Beginning in the second chain from the hook, work sc in the next chain, hdc in the next, dc in the next, tr in each of the next 3 chains, dc in the next, hdc in the next, sc in the next, and 3 sc in the last chain. All 10 available chains have now been used, with 3 sc sharing the far tip.
Return side: Rotate the work and use the unused loops on the opposite side of the foundation. Skip the far-tip chain that already holds 3 sc. Across the remaining 9 chains, work sc, hdc, dc, tr, tr, tr, dc, hdc, sc. Sl st to the first sc to close. There are 21 worked stitches around the leaf, excluding the joining slip stitch.
Fasten off with a sewing tail. The shape may need gentle finger shaping. For a short stem, join ochre at the starting end, ch 3, sl st into the second chain from the hook and the next chain, then fasten off. Add a subtle running-stitch vein down the leaf center with a separate strand if you like.
Step 7: Sew on the Leaf and Finish
Lay the bag flat with the flap closed. Position the leaf vertically at the center of the cream flap, leaving space around all edges. Pin it, open the flap, and sew the leaf perimeter to the cream fabric only. Do not stitch through the green front or accidentally close the pouch.
Secure the stem and any loose tips. Weave in all remaining tails and smooth the flap. The base design is now complete without a button, magnetic snap, or drawstring.

More Information: Lining, Styling, and Adjustments
Add a Simple Fabric Lining
A lining helps prevent small items from catching on stitches. Measure the actual inside width and height after seaming. Cut two fabric rectangles to those measurements plus your chosen seam allowance on both sides and enough allowance for a folded top hem. Sew the sides and bottom, test the fit, and turn the top edge inward.
Place the lining inside with its wrong side against the crochet’s inside. Hand sew its top edge just below the opening, catching crochet loops without drawing the fabric tight. Keep the strap attachments and flap hinge clear. A lining reduces snagging, but it does not make the bag waterproof or secure the unfastened flap.
Change the Size Without Losing the Fold
To change the width, choose a new body stitch count and chain one more than that number. Every row keeps the same stitch count. For a taller body, work equal numbers of green rows for the front and back; the fold always sits halfway through the green section.
Choose flap depth separately, keeping it shorter than the finished body unless you deliberately want a full-length flap. Recalculate yardage and lining dimensions whenever you change size. A larger bag also puts more strain on a narrow strap.
Keep the Shape Looking Neat
Carry light essentials and avoid overfilling the pouch. Dense cotton can still stretch, particularly at the strap and opening. Reshape the empty bag after washing and support the strap while it dries. Follow the yarn label for cleaning and check the leaf’s colorfastness before washing contrasting colors together.
For styling, let the golden leaf stand out against a plain blouse or knit. A warm cream and caramel version would work well too. The same plain construction can also be made without the applique for a simpler everyday purse.
Frequently Asked Questions
Can a beginner make this crochet bag?
The main bag and strap use chains and single crochet, making them approachable once you can keep straight edges. The leaf includes treble crochet and working around a chain. Practice it separately or omit it while learning.
Is the flap fastened shut?
No. The written base pattern has a freely hanging flap. If you add a closure, plan its placement on your actual sample and reinforce the fabric where needed. The generated images show the unfastened version.
Can I use plush blanket yarn from the reference project?
It would produce a different size, texture, and level of stretch. This draft is calculated for a smooth cotton fabric at 20 sc per 10 cm. To use another yarn, swatch first and recalculate the dimensions rather than following the counts unchanged.
Why is my bag narrower at the top?
A missed first or last stitch can gradually reduce the width. Count 44 stitches on every body row and remember that the turning chain is not a stitch. Undo to the last correct row before continuing.
Why does the strap seem longer after wearing?
Crochet stretches under weight, and a long narrow strap can stretch more visibly than a broad panel. Keep the load light, check the attachment stitches, and consider a woven backing. Final strap length needs testing with your yarn and tension.