Twilight Crochet Pocket Shawl
A pocket shawl is the sort of handmade layer that feels useful as soon as you put it on. This Twilight version combines a midnight navy body, warm ochre pockets, and soft cream ends. The colors have a cozy evening feel, while the plain fabric keeps the finished look easy to wear with a blouse, a sweater, or a simple long-sleeved tee. I especially like the small contrast of the pockets against the dark background.
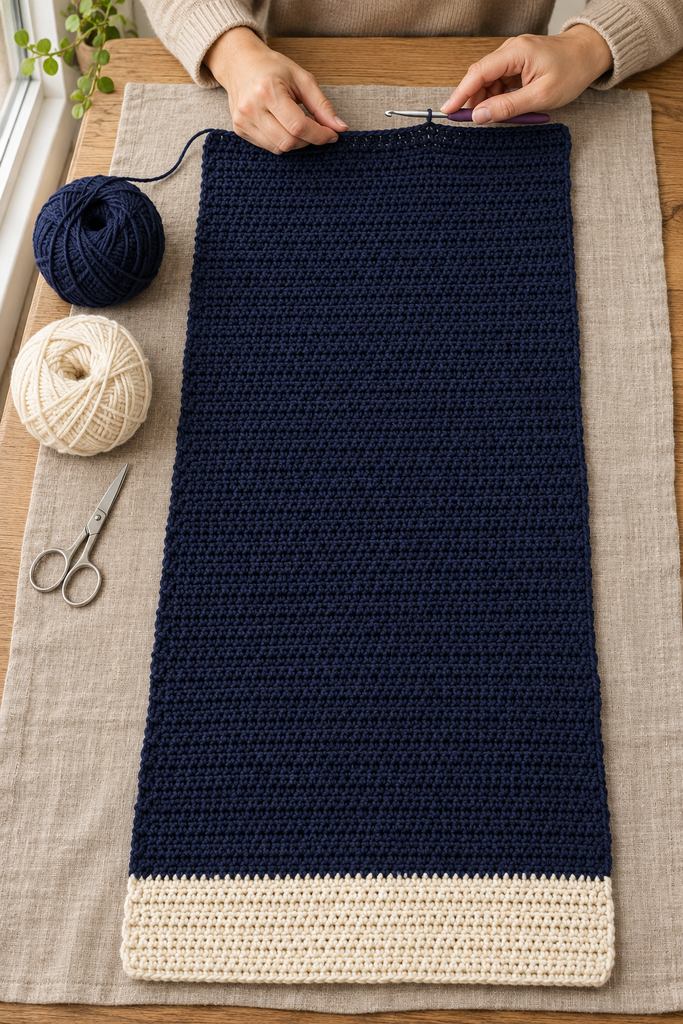
The project is built from three rectangles: one long shawl and two square patch pockets. Work the shawl from one cream end to the other, add a light border, and sew the pockets onto the two hanging ends. There is no motif joining or picture chart, so the main fabric is a comfortable stretch of familiar half double crochet.
Pattern status: This is a newly drafted, untested pattern. Stitch arithmetic and proposed measurements have been reviewed, but a physical sample has not been made. Yarn quantities, wearing length, pocket placement, drape, and durability require testing. The four images are AI-generated concepts; texture, scale, and folds are illustrative. Follow the written draft for counts and construction.

About This New Design
The supplied reference is a large pictorial blanket with a feline silhouette, a crescent, and star motifs. This project takes a broad dark-and-gold color mood into a different item: a wearable rectangular pocket shawl with cream ends and plain ochre pockets. The reference’s picture chart, star motif, blanket construction, and photographs are not reproduced.
The wrap has no sleeves, hood, closure, or sewn back seam. Its midpoint rests across the back of the shoulders, and the two ends hang forward. The pockets are light patch pockets for resting the hands or holding a very small item; they are not designed to support a heavy phone or a loaded set of keys.
| Project detail | Draft specification |
|---|---|
| Skill level | Confident beginner comfortable with straight rows and sewing |
| Terminology | US crochet terms |
| Main rectangle | Approximately 35 cm wide x 160 cm long before edging |
| Each cream end band | Approximately 6.7 cm deep |
| Pockets | Two, approximately 20 cm square before sewing |
| Main stitch | Half double crochet through both loops |
| Construction | One shawl rectangle, two separate pockets, light border |
Materials and Gauge
Choose a smooth DK or light worsted yarn with a soft drape at the stated gauge. A wool blend or a suitable acrylic blend can work, provided the fabric feels comfortable over the shoulders. A very heavy cotton may pull down at the pockets, so swatch and assess the weight before starting.
- Midnight navy: approximately 900–1150 m as a provisional allowance.
- Oatmeal cream: approximately 130–180 m for the end bands and border.
- Ochre or mustard: approximately 120–170 m for two pockets and sewing tails.
- A 4.5 mm hook, or the size required for gauge.
- Blunt yarn needle, scissors, measuring tape, and removable stitch markers.
These quantities have not been measured from a sample. Select compatible yarns from the same range where possible, and keep extra ochre for the pocket attachments.
Aim for 16 hdc stitches and 12 rows per 10 cm, measured after washing and drying according to the yarn label. Work through both top loops with a ch 1 turn. Make a generous swatch and measure its center rather than including uneven edge stitches.
At this gauge, 56 stitches measure 35 cm across. A total of 192 rows measures 160 cm in length. Each 8-row cream band measures approximately 6.7 cm, and each 32-stitch, 24-row pocket measures approximately 20 cm square.
Check how the washed swatch hangs vertically. Stretch under its own weight can affect the finished length and where the pockets sit. The proposed measurements are a starting point rather than a guarantee of the same wearing length for every yarn or body.
Abbreviations and Working Notes
US terms are used throughout. Ch means chain, hdc means half double crochet, sc means single crochet, sl st means slip stitch, and st/sts means stitch/stitches. RS refers to the preferred outside face and WS to the inside.
For hdc, yarn over, insert the hook, yarn over and draw up a loop, then yarn over and pull through all three loops. The turning ch 1 does not count as a stitch. Work into the first actual stitch and finish in the final actual stitch of every row.
There is no shaping in the main rectangle or pockets. Place markers in the first and last stitches if you tend to lose them. Move those markers after every row and check the count regularly, especially when changing colors.
How to Crochet the Pocket Shawl
Step 1: Make the First Cream End Band
With cream, ch 57 loosely.
Row 1: Hdc in the second chain from the hook and in every remaining chain: 56 hdc. Ch 1 and turn.
Rows 2–8: Hdc in every stitch across, keeping 56 hdc per row. Ch 1 and turn after each row. On the final stitch of Row 8, complete the last yarn-over with navy, then ch 1 with navy and turn.
Cut the cream yarn with a suitable tail for weaving. This first cream section forms one hanging end of the shawl. It is not folded into a cuff or sewn into a pocket.
Step 2: Work the Navy Center
Row 9: With navy, hdc across all 56 stitches. Ch 1 and turn.
Rows 10–184: Repeat the same plain hdc row, retaining 56 stitches. From Row 9 through Row 184 inclusive, there are 176 navy rows.
Mark every 12 or 24 completed rows if that helps you track progress. Keep both side edges straight. There are no center increases, armhole openings, or neckline shaping hidden in this section.
At the final stitch of Row 184, use cream for the last yarn-over. Ch 1 with cream and turn. Cut navy with a tail long enough to weave securely.
Step 3: Make the Second Cream End Band
Rows 185–192: With cream, hdc in each stitch across: 56 hdc per row. Ch 1 and turn after Rows 185–191. Fasten off after Row 192 without adding another turning chain.
The main piece now contains 8 cream rows, 176 navy rows, and 8 cream rows. At gauge it is approximately 35 x 160 cm before the outer border. The two cream ends should match in depth and width.
Weave the color-change tails into matching sections on the inside. Avoid pulling them into tight knots along the edge, since that can draw one side inward.
Step 4: Crochet Two Ochre Pockets
With ochre, ch 33.
Pocket Row 1: Hdc in the second chain from the hook and each remaining chain: 32 hdc. Ch 1 and turn.
Pocket Rows 2–24: Hdc in every stitch across, retaining 32 stitches. Ch 1 and turn after every row except the last. Fasten off after Row 24, leaving a generous tail for sewing.
Make a second pocket exactly the same. Each one is approximately 20 cm wide and 20 cm high at the proposed gauge. The final row will be its open upper edge, and the foundation edge will be its bottom.
The base draft uses plain ochre pockets without a separate contrast trim. If the top edges feel loose, first check the tension and washed measurements rather than adding a tight border that could narrow the opening.
Step 5: Wash and Compare All Three Pieces
Wash or dampen the shawl and pockets according to the yarn label and dry them flat. Smooth their natural shapes without stretching hard to compensate for a large gauge error.
Compare the two pocket widths and heights. They should match before sewing. Mark a preferred RS on the shawl and each pocket. The outside face needs to be the same face on both hanging ends, so lay the entire shawl flat instead of attaching one pocket while the wrap is folded over itself.
Find the shawl’s midpoint between Rows 96 and 97 and mark it temporarily. Drape that midpoint across the back of the shoulders and let the two ends hang forward. Check the overall length before deciding on the pocket position.
Step 6: Add a Light Cream Border
With the RS facing, join cream at a corner of the main rectangle. Work one sc round around all four sides. Along the short stitch edges, start with approximately one sc per stitch; add evenly spaced extra stitches if the sc edging draws the fabric inward.
Along the long hdc row-end edges, begin with approximately 3 sc across every 2 row ends, distributing them evenly. Work about 3 sc at each outer corner to turn smoothly. Join to the first sc with a sl st and fasten off.
This is an untested finishing distribution, not a fixed total stitch count. Lay the border flat frequently. If it gathers, undo the affected section and add stitches; if it ripples, use fewer. The border should follow the rectangle without changing its shape or making the cream ends flare outward.
Step 7: Position the Pockets Symmetrically
Lay the shawl RS up. Center a pocket across each end, leaving approximately 7.5 cm of navy fabric on either side. Before edging take-up, that corresponds to leaving 12 shawl stitches free on each side of the pocket’s 32-stitch width.
At the first end, place the pocket bottom at the navy-to-cream boundary after the first 8 cream rows. The pocket extends inward toward the center, covering approximately the region of Rows 9–32. Its open top faces toward the shawl midpoint.
At the opposite end, mirror that placement. The bottom sits at the boundary before the final 8 cream rows, and the pocket extends inward over approximately Rows 161–184. Its open top again faces toward the midpoint, not toward the cream end.
Pin or baste both pockets and try the wrap on. The row ranges are calculated placement guides; the washed fabric and your arm reach should determine the final position. Move both pockets equally if a different height feels more natural, and check that they still sit on the same outside face.
Step 8: Sew Three Sides of Each Pocket
With matching ochre yarn, sew one side, the bottom, and the other side of the first pocket to the shawl. Keep the top edge completely open. Use small, relaxed stitches through sound loops, catching the navy fabric without pulling the pocket into a gathered shape.
At the bottom edge, the 32 pocket stitches can align with a centered 32-stitch section of the shawl. Along the pocket sides, match corresponding row heights as closely as the actual washed fabric allows. Do not force an uneven pocket into place by stretching one corner.
Reinforce the two upper attachment corners with a few additional small stitches spread across adjacent loops. Avoid a single bulky knot. Repeat for the second pocket, then weave all sewing tails securely through the inside of the ochre fabric.
Check the openings by slipping a hand gently into each pocket. The sewing should hold the edges without pulling the shawl sideways. Keep the contents light so the pockets do not drag the ends down.

Step 9: Finish and Wear the Wrap
Remove the temporary markers, inspect the pocket corners, and smooth the outer border. Give the finished piece another gentle wash only if needed, following the yarn label. Support the whole wrap when wet and dry it flat.
Wear the midpoint across the back of your shoulders with the two pockets facing outward and their openings upward. The wrap remains open at the front; there is no hidden join, hood, or sleeve seam. Let the fabric drape naturally rather than pulling the ends to make them perfectly rigid.

More Information and Personalization
Adjust the Wearing Length
At gauge, adding 12 navy rows adds approximately 10 cm to the full length, giving roughly 5 cm more hanging length on each side when centered. Remove 12 navy rows for the opposite change.
Keep both cream end bands at 8 rows. If the total row count changes, locate the pockets by their distance from each end rather than using the original second-end row numbers. Recheck the overall drape and arm reach before sewing.
For example, a 172 cm version would require a revised calculation; do not assume that any chosen centimeter length will correspond to a whole number of rows at your actual gauge. Measure the washed fabric and record the final row count.
Change Width or Pocket Size
At the proposed stitch gauge, every 8 stitches add approximately 5 cm to the shawl width. Chain one more than your chosen stitch count for the foundation. A wider wrap may feel more like a shoulder layer, but it also uses more yarn and adds weight.
To center the existing pockets on a custom width, subtract 32 from the new shawl stitch count and divide the remainder equally between the two side margins. A 64-stitch shawl, for example, leaves 16 stitches on each side of a 32-stitch pocket.
Changing pocket depth can make the hands sit differently and can increase sagging. Test an altered pocket with the actual fabric rather than assuming a larger pocket is automatically more useful.
Choose Colors and Care for the Pockets
Navy, ochre, and cream give a clear contrast, but charcoal with rust pockets or forest green with oatmeal pockets would also suit the simple construction. Keep the pocket yarn similar in weight to the body so the patches do not behave like heavy panels sewn onto a light wrap.
Store the shawl folded and empty the pockets before washing. Avoid leaving it hanging for long periods, particularly with objects inside. Check the upper pocket corners after wearing and repair a loose attachment stitch before it becomes a larger pull.
Frequently Asked Questions
Is this the same blanket as the supplied PDF?
No. This is a wearable rectangular pocket shawl made from plain hdc fabric and separate patch pockets. It does not use the source blanket’s feline picture, crescent, star motifs, or blanket assembly.
Can a beginner make it?
The rectangles are approachable once you can maintain a steady stitch count. The finishing needs careful measuring, a flat border, and pocket sewing. Baste the pockets and try the wrap on before making the permanent seams.
Which way should the pocket openings face?
Both openings face toward the shawl’s midpoint. When worn over the shoulders, that makes the openings face upward. The foundation edge of each pocket sits toward the nearest cream end band.
Can I put a heavy phone in a pocket?
The draft has not been load-tested, and heavy objects can stretch the pocket or pull the whole shawl off balance. Treat the pockets as light-use patches and assess the real sample before relying on them for carrying items.
Why does the cream border ripple?
It may contain too many stitches for your sc gauge. Undo a short section and reduce the distribution until it follows the rectangle smoothly. Tightening the working yarn while continuing usually makes the fabric harder to assess.
Has this pattern been physically tested?
No. The counts and proposed measurements have been reviewed mathematically, but fit, yarn use, border behavior, and pocket durability still require a physical sample. The generated images are illustrations, not evidence of tested results.