Soft Rain Crochet Cloud
A little cloud can bring a soft, cheerful detail to a quiet corner. This Soft Rain Crochet Cloud pairs an ivory body with a lavender edge and three dangling drops in dusty blue, mustard, and peach. Tiny embroidered crosses add a little color to the cloud without giving it a face.
The supplied Head in the Clouds Knit Pillow PDF suggested the broad cloud theme. This project changes the technique, scale, and use: a small crochet wall decoration replaces the large knitted cushion. Its two panels use single-crochet rows and separate upper lobes, with newly drafted flat drops and hanging cords. The reference’s knitting charts, shaping instructions, facial embroidery, and photograph are not reproduced.
Pattern status: The panel shaping, lobe divisions, and drop counts have been reviewed mathematically. This draft has not been physically crocheted or sample-tested. Dimensions, yarn quantities, filling amount, and hanging behavior remain provisional. The three images are AI-generated concept illustrations; use the written instructions for counts and assembly.
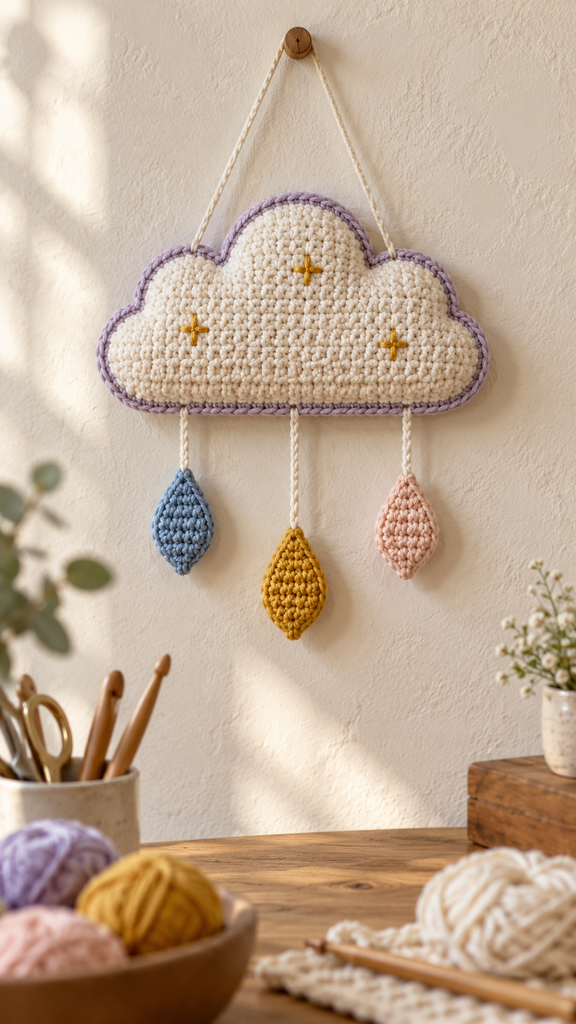
A Small Cloud With a Different Construction
The cloud begins as a shallow panel with a gently widened lower section. Three small lobes are worked separately across its upper edge, with the center lobe slightly taller than the outer two. Make a matching second panel, then join them with lavender single crochet and add a light layer of filling.
The drops are single-layer pieces. Their narrow starting points face downward, while the broader ends attach to short crochet chains beneath the cloud. The middle chain is longer, giving the finished arrangement a simple stepped rhythm.
This is decorative wall art. Choose a display position where the cords can hang freely without being pulled or tangled, and keep it outside the reach of small children and pets. The pieces are not intended as a toy or a cot mobile.
Project Overview
| Feature | Planned specification |
|---|---|
| Project | Small cloud wall hanging with three drops |
| Skill level | Confident beginner with basic sewing experience |
| Terms | US crochet terminology |
| Cloud panels | Two matching pieces, each 30 stitches at its widest body row |
| Upper outline | Three lobes, worked over ten stitches each |
| Approximate cloud size | 18 cm wide and 10–12 cm tall after joining |
| Drops | Three flat pieces, approximately 4–5 cm tall |
| Filling | A thin layer, keeping the cloud softly padded |
Materials and Color Choices
- Smooth DK cotton yarn in ivory A, lavender B, dusty blue C, mustard D, and pale peach E.
- A provisional allowance of 90–120 m / 98–131 yd ivory, 15–25 m / 16–27 yd lavender, and 8–12 m / 9–13 yd of each drop color.
- A 3.5 mm crochet hook as a starting point, with nearby sizes available for adjusting the fabric.
- Approximately 5–10 g of polyester fiberfill as an initial allowance; use only enough for a light padded effect.
- A blunt tapestry needle, scissors, tape measure, and removable stitch markers.
- A suitable wall hook for the final lightweight decoration.
Use compatible yarn weights for the panels and edging. A much thicker joining yarn can make the outline bulky, while very fine yarn may disappear between the ivory stitches. Smooth cotton helps the upper lobe divisions remain easy to see.
The yarn quantities are estimates rather than measured sample usage. Set aside a little extra ivory for the three drop chains and upper hanger. Their final lengths should be measured after they have relaxed, not while pulled tight.
For another palette, use oatmeal for the cloud, dusty blue for the edge, and three cream drops. Keeping all the drops one color makes the piece quieter without changing its construction.
Abbreviations and Working Notes
- ch: chain.
- sc: single crochet.
- inc: work 2 sc in the same stitch.
- sc2tog: single crochet two stitches together; decreases by one stitch.
- sc3tog: single crochet three stitches together; decreases by two stitches.
- sl st: slip stitch.
- st / sts: stitch / stitches.
- RS / WS: right side / wrong side.
For sc2tog, draw up a loop in each of the next two stitches, yarn over, and pull through all three loops. For sc3tog, draw up a loop in each of the next three stitches, yarn over, and pull through all four loops.
The turning ch 1 never counts as a stitch. Work through both top loops, and turn after each flat row unless instructed to fasten off. Mark the first and last actual stitch if the edges are difficult to identify.
When a lobe begins with a fresh strand, join in its first unused stitch, ch 1, and sc in that same stitch. The join and starting chain do not add stitches to the ten-stitch lobe base.
Gauge and Size Planning
The planning gauge is approximately 18 sc and 20 rows per 10 cm / 4 inches, measured after washing and drying. This is a target, not a measured sample result. The fabric should be firm enough to conceal a light layer of filling while remaining comfortable to crochet.
Make a swatch at least 12 cm square. Wash and dry it according to the yarn label and measure a central area without stretching. Adjust the hook if necessary, but check density as well as the stitch count.
At the target stitch gauge, the 30-stitch body is about 16.7 cm wide before the joining edge. The center lobe adds more height than the outer lobes. Blocking, the border, and the amount of filling all influence the final outline, so treat the listed size as approximate.
Both panels must match each other. If one is larger, check the row counts and tension before sewing. Do not stretch a smaller panel hard to meet a larger one.
Crochet Two Cloud Panels
Step 1: Shape the Lower Body
With ivory A, ch 25.
Row 1: Sc in the second chain from the hook and across. Turn. 24 sc.
Row 2: Ch 1, inc in the first stitch, sc in the next 22 stitches, inc in the last stitch. Turn. 26 sc.
Row 3: Ch 1, inc, sc in the next 24 stitches, inc. Turn. 28 sc.
Row 4: Ch 1, inc, sc in the next 26 stitches, inc. Turn. 30 sc.
Rows 5–12: Ch 1, sc in every stitch across. Turn. 30 sc per row. Fasten off after Row 12.
This gives the cloud a relatively flat lower edge with gently sloping lower corners. The three upper lobes provide the cloud silhouette. Count the final row before dividing it into sections.
Step 2: Mark Three Lobe Sections
Lay the panel flat and choose the face you prefer as its RS. With that side facing you, number the stitches of Row 12 from 1 to 30 in your working direction.
Mark three consecutive groups: stitches 1–10, 11–20, and 21–30. Each stitch is used by one lobe only. Do not overlap the sections or leave an extra stitch between them.
The two outer lobes use five rows each. The middle lobe has two extra straight rows before its decreases, making it slightly taller. Work each lobe separately with a new strand, beginning with the RS facing.

Step 3: Work the Two Outer Lobes
Work this sequence over stitches 1–10, then repeat over stitches 21–30.
Lobe Row 1: Join A in the section’s first stitch, ch 1, sc in that stitch and the next 9 stitches. Turn. 10 sc.
Lobe Row 2: Ch 1, sc2tog, sc in the next 6 stitches, sc2tog. Turn. 8 sc.
Lobe Row 3: Ch 1, sc2tog, sc in the next 4 stitches, sc2tog. Turn. 6 sc.
Lobe Row 4: Ch 1, sc2tog, sc in the next 2 stitches, sc2tog. Turn. 4 sc.
Lobe Row 5: Ch 1, sc2tog twice. 2 sc. Fasten off and weave in the end on the WS.
Step 4: Work the Taller Center Lobe
Over stitches 11–20, join A with the RS facing.
Center Rows 1–3: Work 10 sc across, with ch 1 and a turn between rows. 10 sc per row. Begin Row 1 in the joining stitch as described above.
Center Rows 4–7: Follow Outer Lobe Rows 2–5, decreasing to 8, 6, 4, then 2 sc. Fasten off.
Weave all panel tails into the WS. Make a second identical panel using the same hook and tension. Place them together and check that the bodies, valleys, and lobe tips align.
Crochet Three Flat Drops
Make one drop each in dusty blue C, mustard D, and peach E. Begin at the lower point and work upward toward the rounded attachment end.
Row 1: Ch 2, sc in the second chain from the hook. Turn. 1 sc.
Row 2: Ch 1, work 3 sc in the single stitch. Turn. 3 sc.
Row 3: Ch 1, inc, sc in the next stitch, inc. Turn. 5 sc.
Row 4: Ch 1, inc, sc in the next 3 stitches, inc. Turn. 7 sc.
Rows 5–6: Ch 1, sc across. Turn. 7 sc per row.
Row 7: Ch 1, sc2tog, sc in the next 3 stitches, sc2tog. Turn. 5 sc.
Row 8: Ch 1, sc across. Turn. 5 sc.
Row 9: Ch 1, sc2tog, sc in the next stitch, sc2tog. Turn. 3 sc.
Row 10: Ch 1, sc3tog. 1 sc. Fasten off, leaving a long tail for attachment. Weave in the starting tail at the lower point.
The Row 1 point faces downward in the finished hanging. The Row 10 end faces up toward the cloud. Keep all three drops single-layer and unstuffed.
Block and Decorate the Front
Block the panels and drops using a method permitted by the yarn label. Smooth the lobe slopes and lower corners without stretching the fabric sharply. Let all pieces dry fully before joining.
Choose one panel as the front. With mustard D, embroider three tiny plus-shaped crosses across the body. Each cross can consist of one short vertical stitch crossed by one short horizontal stitch. Space them loosely and keep the strands relaxed.
Secure the embroidery on the WS through nearby stitch bases. Avoid bulky knots or tight stitches that pull the panel into a dimple. Leave the second panel undecorated so the wall-facing side stays simple.
Join and Lightly Fill the Cloud
Place the panels WS together with the decorated front facing you. Align the lower corners, lobe valleys, and lobe tips with removable markers.
With lavender B, join through both layers at a lower side edge. Ch 1, then work sc through corresponding edges of both panels around the outline. Where you meet stitch tops, work one joining sc per matching pair. Along row ends, start with roughly one joining sc per matching row-end pair and adjust locally if needed for a smooth edge.
Use two joining sc at a sharp outward turn if the edge pulls inward. At a lobe valley, make a close joining stitch through secure strands without stretching the gap. The border count is not fixed because row-end placement can vary; the goal is a smooth outline with both panels aligned.
Leave approximately 4 cm open near the starting point. Insert a thin layer of fiberfill and spread it evenly. The cloud should look softly padded, not round like a ball. Keep filling away from the active seam, then finish the joining sc and sl st to the first joining stitch. Fasten off and bury the tail.

Add the Drops and Upper Hanger
With ivory A, make three separate chains. Measure them without stretching and aim for finished visible lengths of approximately 4 cm, 7 cm, and 4 cm. Leave sewing tails at both ends. Chain counts will depend on your tension, so use the actual measurements.
Sew one end of each chain securely to the Row 10 end of a drop. Attach the other ends to the cloud’s lower joining edge, with the mustard drop at the center and blue and peach evenly spaced to either side. Use several small passes through secure crochet strands rather than one loose knot.
Make another ivory chain approximately 20 cm long for the upper hanger, adjusting after a trial hang. Sew its ends to the upper parts of the two outer lobes, catching both panels near the lavender seam. Spread the load across several stitches at each attachment.
Hang the piece briefly and check the balance before trimming the remaining tails. Adjust the outer attachment points if the cloud tilts. Weave in every end, remove all markers, and inspect the cords and seams for loose loops.
More Information: Display, Care, and Variations
Display the cloud against a plain wall where the drop colors remain easy to see. A small picture hook can suit a lightweight piece, but choose the hanging method for your actual wall and finished weight.
For a quieter version, omit the crosses and use one color for all three drops. For a wider cloud, the body and all three lobe sections need to be recalculated together. Adding stitches only to the body will leave unused stitches at the upper edge.
Follow the yarn and filling care instructions. Support the entire decoration during washing, reshape gently, and allow the filling to dry fully. Lay the drops separately while drying so their cords do not tangle around the cloud.
Frequently Asked Questions
Is this suitable for a beginner?
It suits someone comfortable with single crochet, increases, and decreases. Make one drop first to practice the shaping before beginning both cloud panels.
Why do my lobes lean in different directions?
Check that every lobe begins with the same chosen RS facing and uses exactly ten base stitches. An extra stitch at a join or an uneven decrease can change its slope.
Can I omit the filling?
Yes. Join the two panels without filling for a flatter piece. Its hanging shape will depend more on the yarn and blocking, so test it before attaching the drops permanently.
Why does the lavender edge ripple?
There may be too many joining stitches along the row ends or the border tension may be too loose. Remove the affected section and adjust the placement while keeping the panel edges aligned.
Can I make longer drop cords?
You can adjust the decorative lengths, but check the final hanging arrangement and display position. Measure each finished cord and secure every attachment through several stitch bases.
Are the pictures exact technical demonstrations?
They show the intended appearance and general working stages. They are AI-generated concepts and may not match exact stitch counts or needle placement. Use the written draft and the actual panel edges for construction.
Has the pattern been physically tested?
No. The arithmetic has been reviewed, but a full crochet sample is still needed to confirm the outline, dimensions, filling amount, yarn use, and hanging balance.