Snorlax Amigurumi Crochet Pattern

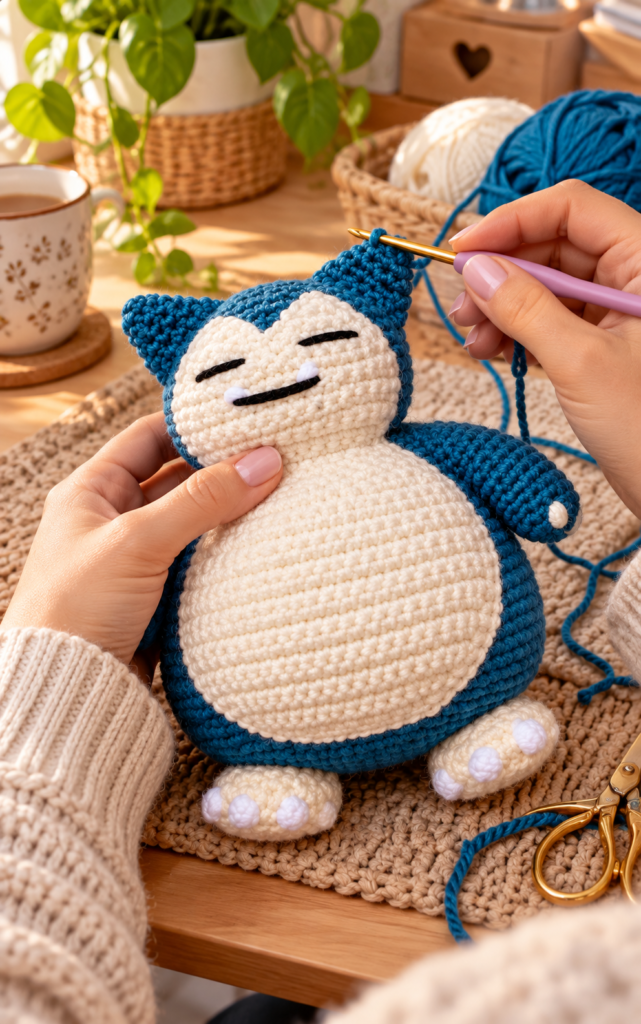
There are some crochet projects that are almost impossible to work on without smiling, and this little Snorlax is definitely one of them.
Maybe it is the wonderfully round belly. Maybe it is those tiny ears and little clawed feet. Or perhaps it is that familiar sleepy expression that somehow makes the finished amigurumi look perfectly content wherever you put it.
Whatever the reason, I absolutely love how much personality can come from a few balls of yarn.
At first, this project might look complicated because there are several different shapes and color changes involved. But once you break the construction into sections, everything becomes much easier.
We will start by crocheting the large Petrol-colored head and body as one continuous piece. Then we will make the contrasting cream face and belly panel, followed by the arms, feet, and ears.
Finally comes my favorite part: assembly.
That is when all those slightly strange-looking crochet pieces suddenly come together and become an adorable little Snorlax.
The finished project measures approximately 14 cm tall and weighs around 70 g, depending on your yarn, tension, and stuffing.
So find a comfortable spot, grab your crochet hook, and let’s make this sleepy little character together.
About This Snorlax Amigurumi

This Snorlax-inspired amigurumi is built around one large continuous body shape.
Rather than crocheting the head and torso separately, you begin at the top of the head, gradually shape the neck area, and then increase again to form the large rounded body.
A separate cream crochet panel creates the face and belly.
This panel is particularly important because it also helps determine where the arms, feet, and ears should eventually be positioned.
The remaining pieces are crocheted separately and sewn onto the body during assembly.
Finished Size
The finished Snorlax measures approximately:
14 cm tall
The approximate finished weight is:
70 g
This includes the materials used to create the toy.
Your finished dimensions can vary depending on your yarn, hook size, crochet tension, and how firmly you stuff the body.
Skill Level
I would consider this an intermediate amigurumi project.
The individual stitches are manageable, but there is more shaping involved than in a basic crochet animal.
You should be comfortable with:
- Magic rings
- Continuous crochet rounds
- Working flat in rows
- Increasing
- Three-stitch increases
- Decreasing
- Slip stitches
- Skipping stitches
- Working in back loops only
- Puff stitches
- Changing yarn colors
- Sewing crochet pieces together
- Embroidering facial details
- Stuffing and shaping amigurumi
Careful stitch counting is especially important.
Materials You Will Need
Yarn
You will need DK yarn in:
- Petrol
- Cream
- Parchment
- White
Petrol creates the main body, arms, and ears.
Cream is used for the contrasting face and belly as well as portions of the feet.
Parchment and White are also used when making the feet.
Additional Supplies
You will need:
- 2 mm crochet hook
- Black embroidery floss
- Polyester toy filling
- Pins
- Darning needle
- Stitch markers
Scrap yarn can also be used as an easy stitch marker.
Crochet Abbreviations
This pattern uses UK crochet terminology.
dc – double crochet
sl st – slip stitch
st/sts – stitch/stitches
inc – work 2 dc into one stitch
inc3 – work 3 dc into one stitch
dec – decrease
sk – skip
y.o. – yarn over
puff st – puff stitch
rs – right side
ws – wrong side
How to Make the Puff Stitch
Yarn over and insert your hook into the indicated stitch.
Yarn over and pull through the stitch.
Repeat this process in the same stitch two more times.
Yarn over once more and pull through all the loops on your hook.
The puff stitches are eventually used to create Snorlax’s little white claws.
Before You Start
Use stitch markers throughout the main body.
The body reaches as many as 78 stitches in a round, so losing track of the beginning of a round can quickly create problems.
I also recommend counting after every increase or decrease round.
For assembly, don’t immediately sew every piece onto the body.
Pin everything first.
The cream face and belly panel should be attached before the arms, feet, and ears because this makes it much easier to judge their correct positions.
How to Crochet the Snorlax Body
Use Petrol yarn.
Begin the Head
Round 1
Work 6 dc into a magic ring.
6 stitches
Round 2
Increase in every stitch.
12 stitches
Round 3
Repeat twice:
(inc × 3, dc 3)
18 stitches
Round 4
Repeat twice:
(dc, inc) × 3, dc 3
24 stitches
Round 5
Repeat twice:
(2 dc, inc) × 3, dc 3
30 stitches
Round 6
Repeat twice:
(3 dc, inc) × 3, dc 3
36 stitches
Round 7
Repeat twice:
(4 dc, inc) × 3, dc 3
42 stitches
Rounds 8–16
Dc around.
42 stitches
At this point, you should have a substantial rounded section forming the head.
Shape the Lower Head
Round 17
Repeat twice:
3 dc, (4 dc, dec) × 3
36 stitches
Round 18
Repeat twice:
3 dc, (3 dc, dec) × 3
30 stitches
Begin lightly stuffing the head.
Do not fasten off because we are going to continue directly into the body.
Crochet the Body
Now we begin increasing again to create Snorlax’s wonderfully large belly.
Round 19
Repeat twice:
3 dc, (3 dc, inc) × 3
36 stitches
Round 20
Repeat twice:
3 dc, (4 dc, inc) × 3
42 stitches
Round 21
Repeat twice:
3 dc, (5 dc, inc) × 3
48 stitches
Round 22
Repeat twice:
3 dc, (6 dc, inc) × 3
54 stitches
Round 23
Repeat twice:
3 dc, (7 dc, inc) × 3
60 stitches
Rounds 24–28
Dc around.
60 stitches
Round 29
Repeat twice:
3 dc, (8 dc, inc) × 3
66 stitches
Rounds 30–32
Dc around.
66 stitches
Round 33
Repeat twice:
3 dc, (9 dc, inc) × 3
72 stitches
Rounds 34–36
Dc around.
72 stitches
Round 37
Repeat twice:
3 dc, (10 dc, inc) × 3
78 stitches
Rounds 38–42
Dc around.
78 stitches
You should now have that wonderfully round Snorlax body beginning to appear.
Decrease and Shape the Bottom
Round 43
Repeat twice:
3 dc, (10 dc, dec) × 3
72 stitches
Round 44
Repeat twice:
3 dc, (9 dc, dec) × 3
66 stitches
Round 45
Repeat twice:
3 dc, (8 dc, dec) × 3
60 stitches
Round 46
Repeat twice:
3 dc, (7 dc, dec) × 3
54 stitches
Round 47
Repeat twice:
3 dc, (6 dc, dec) × 3
48 stitches
Round 48
Repeat twice:
3 dc, (5 dc, dec) × 3
42 stitches
Start stuffing the body.
Use smaller pieces of toy filling rather than trying to insert one large clump.
This helps create a smooth, evenly rounded body.
Round 49
Repeat twice:
3 dc, (4 dc, dec) × 3
36 stitches
Round 50
Repeat twice:
3 dc, (3 dc, dec) × 3
30 stitches
Round 51
Repeat twice:
3 dc, (2 dc, dec) × 3
24 stitches
Stop and check your stuffing.
This is a good opportunity to add more before the opening becomes too small.
Round 52
Repeat twice:
3 dc, (dc, dec) × 3
18 stitches
Round 53
(dc, dec) × 6.
12 stitches
Round 54
Decrease × 6.
6 stitches
Fasten off and close the remaining opening.
Weave in your loose yarn end.
Crochet the Cream Face and Belly Panel
Now we are going to make the large cream-colored piece that covers Snorlax’s face and front.
Use Cream yarn.
Chain 12.
Rows 1–8: Increasing the Panel
Row 1 – Right Side
Starting in the second chain from your hook:
10 dc, inc3.
Turn.
13 stitches
Row 2 – Wrong Side
Dc 12, inc3.
Turn.
15 stitches
Row 3 – Right Side
Dc 14, inc3.
Turn.
17 stitches
Row 4 – Wrong Side
Dc 16, inc3.
Turn.
19 stitches
Row 5 – Right Side
Dc 18, inc.
Turn.
20 stitches
Row 6 – Wrong Side
Dc 19, inc.
Turn.
21 stitches
Row 7 – Right Side
Dc 20, inc.
Turn.
22 stitches
Row 8 – Wrong Side
Dc 21, inc.
Turn.
23 stitches
Rows 9–16
Dc across.
23 stitches
Shape the Panel
Row 17 – Right Side
Skip 1, dc 20, skip 1, dc.
Turn.
21 stitches
Row 18 – Wrong Side
Skip 1, dc 18, skip 1, dc.
Turn.
19 stitches
Row 19 – Right Side
Skip 1, dc 16, skip 1, dc.
Turn.
17 stitches
Row 20 – Wrong Side
Skip 1, dc 14, skip 1, dc.
Turn.
15 stitches
Row 21 – Right Side
Skip 1, dc 12, skip 1, dc.
Turn.
13 stitches
Row 22 – Wrong Side
Skip 1, dc 10, skip 1, dc.
Turn.
11 stitches
Row 23 – Right Side
Dc 11.
Turn.
11 stitches
Row 24 – Wrong Side
Dc 10, inc.
Turn.
12 stitches
Row 25 – Right Side
Dc 11, inc.
Turn.
13 stitches
Row 26 – Wrong Side
Inc, dc 11, inc.
Turn.
15 stitches
Rows 27–31
Dc across.
15 stitches
Row 32 – Wrong Side
Skip 1, dc 12, dec.
Turn.
13 stitches
Shape the Top Right Side of the Face
Row 33 – Right Side
Skip 1, dc 6.
Turn.
6 stitches
Row 34 – Wrong Side
Skip 1, dc 3, skip 1, dc.
Turn.
4 stitches
Row 35 – Right Side
Skip 1, dc, skip 1, dc.
Turn.
2 stitches
Row 36 – Wrong Side
Skip 1, dc.
1 stitch
Fasten off and weave in the loose end.
Shape the Top Left Side of the Face
Attach the cream yarn with a slip stitch into the middle dc of Row 31.
This is the same seventh stitch where the final dc of Row 33 on the top-right section was positioned.
Row 33 – Right Side
Dc into the same stitch, dc 4, skip 1, dc.
Turn.
6 stitches
Row 34 – Wrong Side
Skip 1, dc 3, skip 1, dc.
Turn.
4 stitches
Row 35 – Right Side
Skip 1, dc, skip 1, dc.
Turn.
2 stitches
Row 36 – Wrong Side
Skip 1, dc.
1 stitch
Fasten off.
Add the Border Around the Face Panel
With the right side facing you, work approximately 86 dc evenly around the entire cream piece.
Begin with 11 dc across the bottom.
Work approximately 21 dc along the rows until you reach the neck.
Skip 1 stitch, work a dc into the neck corner, skip another stitch, and continue with 11 dc until reaching the top of the first eye section.
Work 2 dc into the top of that eye.
Dc 2.
Dc into the corner between the eyes.
Dc 2.
Work 2 dc into the top of the opposite eye.
Continue with approximately 11 dc down the left side of the face.
At the neck, skip 1, dc into the corner, skip 1 again, and work approximately 21 dc until you return to the beginning.
Slip stitch into the first dc.
Fasten off, leaving a long yarn tail for sewing.
Embroider the Face
Keep the right side of the panel facing you.
Using black embroidery floss, embroider Snorlax’s closed eyes and mouth onto the cream section.
Take your time here.
Facial embroidery can completely change the personality of an amigurumi.
Once you are happy with the expression, the cream panel is ready to attach to the body.
Crochet the Arms
Use Petrol yarn.
The arms are created using a combination of continuous rounds and rows.
Round 1
6 dc into a magic ring.
6 stitches
Round 2
(inc3, dc 2) × 2.
10 stitches
Round 3
(inc, dc, inc, dc 2) × 2.
14 stitches
Rounds 4–5
Dc around.
14 stitches
Round 6
Dc 2, inc, 6 sl st, inc, dc 4.
16 stitches
Round 7
Dc 4, sl st 6, dc 6.
16 stitches
Round 8
Repeat Round 7.
16 stitches
Round 9
Dc 3, inc, sl st 6, inc, dc 5.
18 stitches
Round 10
Dc 5, sl st 6, dc 7.
18 stitches
Round 11
Repeat Round 10.
18 stitches
Now continue the remainder of the arm in rows.
Arm Rows
Row 1 – RS: dc 5, turn.
Row 2 – WS: dc 12, turn.
Row 3 – RS: dc 12, turn.
Row 4 – WS: dc 12, turn.
Row 5 – RS: skip 1, dc 9, skip 1, dc, turn. (10)
Row 6 – WS: dc 10.
Row 7 – RS: skip 1, dc 7, skip 1, dc, turn. (8)
Row 8 – WS: dc 8, turn.
Row 9 – RS: dc 8.
Fasten off and leave a long yarn tail for sewing.
Stuff the arm before attaching it to the body.
Using leftover Cream yarn, embroider three little claws onto each hand.
Crochet the Feet
The feet use Parchment, Cream, and White yarn, so pay attention to the color changes.
Begin with Parchment.
Round 1
6 dc into a magic ring.
6 stitches
Round 2
Increase around.
12 stitches
Round 3
(dc, inc) × 6.
18 stitches
Now change to Cream yarn.
Round 4
(inc, 2 dc) × 6.
24 stitches
Round 5 – Back Loops Only
Work:
dc 8.
Change to White and work a puff stitch into the next stitch.
Change back to Cream and dc 2.
Repeat this White puff stitch/Cream section three times total.
Continue in Cream with dc 7.
The three white puff stitches create Snorlax’s little claws.
Round 6
Dc around.
24 stitches
Round 7
Dc 9, dec × 3, dc 9.
21 stitches
Fasten off and leave a long yarn tail.
Stuff each foot before attaching it to the body.
When positioning the feet, make sure the three white puff-stitch claws face forward.
Crochet the Ears
Use Petrol yarn.
Round 1
6 dc into a magic ring.
6 stitches
Round 2
Dc around.
6 stitches
Round 3
(dc, inc) × 3.
9 stitches
Round 4
Dc around.
9 stitches
Round 5
(2 dc, inc) × 3.
12 stitches
Fasten off and leave a long yarn tail for sewing the ear onto the head.
Make the second ear in exactly the same way.
How to Assemble Your Snorlax
Assembly is where this project really comes to life.
Before sewing on the smaller pieces, begin with the cream face and belly panel.
Position it carefully on the front of the stuffed Petrol body.
Use plenty of pins.
The placement of this panel will help you determine where everything else belongs.
Once you are satisfied, sew the cream panel securely to the body using the long yarn tail.
Now temporarily pin the:
- Arms
- Feet
- Ears
into position.
Look at Snorlax from several angles before sewing.
The arms should sit naturally beside the cream belly.
Position the feet near the bottom with the white puff-stitch claws pointing forward.
Place the ears on the top of the head.
Once everything looks balanced, sew each piece securely into place.
Tips for Making Your Snorlax Look Amazing
Attach the Cream Panel First
Don’t start with the arms or feet.
The large cream front panel establishes the center of the character and makes positioning everything else much easier.
Pin Everything Before Sewing
Amigurumi placement is surprisingly sensitive.
Moving an ear just a few millimeters can noticeably change the finished expression.
Pins allow you to experiment before committing.
Stuff the Body Gradually
Begin lightly stuffing the head around Round 18.
Continue adding filling as the body grows.
Once you begin the final decreases, add more stuffing before the opening becomes too small.
Don’t Overstuff the Arms
The arms need enough stuffing to maintain their shape without becoming stiff.
Keep the Claws Facing Forward
When attaching the feet, check that the three white puff stitches are visible from the front.
Take Your Time With the Face
The closed eyes and mouth create Snorlax’s recognizable sleepy expression.
Place the embroidery carefully before permanently securing everything.
Frequently Asked Questions
Is this Snorlax crochet pattern beginner-friendly?
I would recommend it for an intermediate crocheter or a confident beginner who already has some amigurumi experience.
There are several shaping techniques, color changes, rows, rounds, skipped stitches, and puff stitches.
How large is the finished Snorlax?
The finished amigurumi is approximately 14 cm tall.
Your exact size may vary slightly depending on yarn, hook size, tension, and stuffing.
What hook size should I use?
The project uses a 2 mm crochet hook.
Using a small hook helps produce the dense fabric needed for stuffed amigurumi.
What yarn colors do I need?
You will need:
- Petrol
- Cream
- Parchment
- White
You will also need black embroidery floss for the facial details.
Are the head and body made separately?
No.
The main Petrol-colored head and body are crocheted continuously as one piece.
This reduces sewing and helps create a smooth transition between the two sections.
Why is the cream front piece separate?
The cream panel creates Snorlax’s contrasting face and belly.
Attaching it first also gives you a visual guide for positioning the arms, feet, and ears.
How are the claws made?
The hand claws are embroidered using leftover Cream yarn.
The foot claws are different.
Three White puff stitches are incorporated directly into each foot during Round 5.
Should I stuff the arms and feet?
Yes.
The original instructions specify stuffing these pieces before attaching them to the body.
Can I make a bigger Snorlax?
You can experiment with thicker yarn and an appropriately larger crochet hook.
Following the same stitch counts with larger materials should generally produce a larger finished amigurumi, although the proportions and fabric density may vary.
Final Thoughts
There is a moment during almost every amigurumi project when I look at the collection of strange little crochet shapes scattered across my table and wonder how they are possibly going to become the character I imagined.
Then assembly begins.
The big cream belly settles into place.
The sleepy eyes and little mouth suddenly give the face personality.
The arms go on.
Then the tiny ears.
Finally, those chunky little feet with their white puff-stitch claws find their place at the bottom.
And suddenly, it is Snorlax.
That transformation is one of my favorite things about crochet.
You started with yarn, a hook, some stuffing, and a handful of basic stitches. Now you have a little handmade character with its own expression and personality.
Don’t worry about making every detail perfectly symmetrical.
Handmade amigurumi has charm precisely because it looks handmade. A slightly different ear angle or tiny variation between the feet simply makes your Snorlax uniquely yours.
Take your time with the shaping, use plenty of pins during assembly, and enjoy watching this wonderfully sleepy little character come together.
Happy crocheting!