Milo the Amigurumi Cocoa Mug
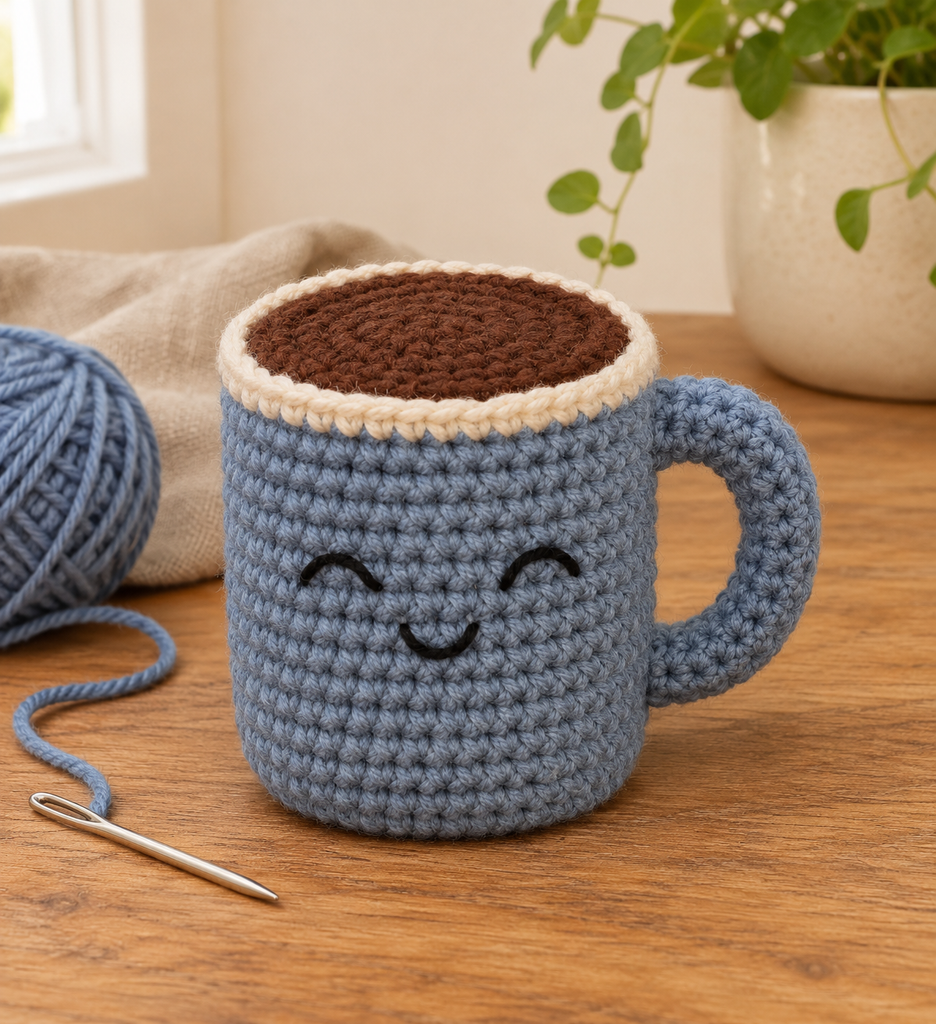
Meet Milo, a small crochet cocoa mug with a dusty blue body, a cream rim, and a quiet embroidered smile. The dark brown top gives the impression of a warm drink, but every part is soft yarn and stuffing. I like the simplicity of this little character: one familiar shape, a curved handle, and a few black stitches are enough to give it personality.
The construction begins with a round base and straight sides. A separate brown disc closes the top over the filling, while a narrow crochet tube bends into the handle. There are no arms, feet, or extra decorations to arrange. It is a small amigurumi project that gives you practice with continuous rounds, a flat circle, embroidery, and neat attachment seams.
Pattern status: This is a newly drafted, untested pattern. Stitch arithmetic and gauge calculations have been reviewed, but no physical sample has been made. Proportions, yarn consumption, disc fit, stuffing, and handle placement require sample testing. All four images are AI-generated design or process concepts; texture, scale, and apparent round counts are approximate. Follow the written draft for construction.
About This New Amigurumi Design
The supplied reference is a peppermint lollipop character with a stick and decorative bow. Milo changes the character and construction into a stuffed cylindrical mug with a separate flat cocoa surface, narrow contrast rim, and curved tubular handle. The reference’s striped peppermint design, stick, bow, instructions, and photographs are not reproduced.
The proposed finished height is approximately 8 cm, with a body diameter around 5 cm and additional width from the handle. These are planning estimates rather than measured sample dimensions. This is a stuffed craft character; its suitability for a particular recipient or use needs separate assessment.
| Project detail | Draft specification |
|---|---|
| Skill level | Confident beginner comfortable with small spiral pieces |
| Terminology | US crochet terms |
| Mug body | 27 rounds, including its base and cream rim |
| Body circumference | 36 stitches after the base increases |
| Cocoa surface | Separate six-round disc ending at 36 stitches |
| Handle | Six-stitch tube, 20 rounds long |
| Face | Embroidered closed eyes and a curved smile |
| Construction | Stuffed cup closed with a sewn disc; separate handle |
Materials and Gauge
Choose a smooth DK cotton or cotton blend that produces close stitches. Begin with a 3 mm hook, adjusting for your yarn and tension. The fabric should be dense enough that filling does not show through relaxed stitches, without making the hook difficult to insert.
- Dusty denim blue: approximately 65–90 m for the cup and handle.
- Dark cocoa brown: approximately 10–15 m for the top disc and its seam.
- Oatmeal cream: approximately 3–5 m for the rim.
- A little black embroidery thread or fine black yarn.
- Polyester fiberfill, added in small portions.
- A 3 mm crochet hook, or suitable size for the fabric.
- Removable stitch marker, blunt yarn needle, embroidery needle, scissors, and measuring tape.
The quantities are provisional allowances, not measurements from a completed sample. Use compatible yarns from the same range so the brown disc and blue body have similar stitch width.
A suggested gauge is 22 sc stitches and 26 rounds per 10 cm in the straight body fabric. At this stitch gauge, 36 stitches give a circumference near 16.4 cm, corresponding to a circular diameter of approximately 5.2 cm. The actual base and stuffed shape can differ slightly.
The upright body contains 20 blue rounds above the base, plus one cream round, giving a height around 8 cm at the proposed round gauge. The base rounds grow outward rather than contributing their full count to the upright height.
Abbreviations and Working Notes
Ch means chain, sc means single crochet, sl st means slip stitch, and st/sts means stitch/stitches. Inc means work two sc in one stitch. BLO means back loop only: use the farther of the two top loops of the stitch’s V.
Work all pieces in continuous rounds unless a finishing instruction says otherwise. Do not add a starting chain between rounds, join at each round end, or turn the work. Mark the first actual stitch and move the marker as you progress.
Ordinary stitches use both top loops. Only the specified base-to-wall transition round uses BLO. The counts in bold are the new total after each round, not the number of repeats.
For a regular sc, insert the hook, yarn over and draw up a loop, then yarn over and pull through both loops. No decrease is required for the body or cocoa disc in this particular draft.
How to Crochet Milo the Cocoa Mug
Step 1: Crochet the Blue Circular Base
With dusty blue, make an adjustable ring.
- Round 1: Work 6 sc into the ring. Mark the first stitch: 6 sc.
- Round 2: Inc in every stitch: 12 sc.
- Round 3: Repeat 1 sc, inc six times: 18 sc.
- Round 4: Repeat 2 sc, inc six times: 24 sc.
- Round 5: Repeat 3 sc, inc six times: 30 sc.
- Round 6: Repeat 4 sc, inc six times: 36 sc.
For clarity, “2 sc, inc” means one sc in each of two separate stitches, followed by two sc in the next stitch. Each increase round adds six stitches.
Pull the starting ring closed gently and secure its tail through the backs of several stitches inside. Check that the base lies reasonably flat. Aligned increases can give a gentle six-sided outline; strong ruffles or a deep bowl suggest a count or gauge problem that should be corrected before continuing.
Step 2: Turn Up the Walls
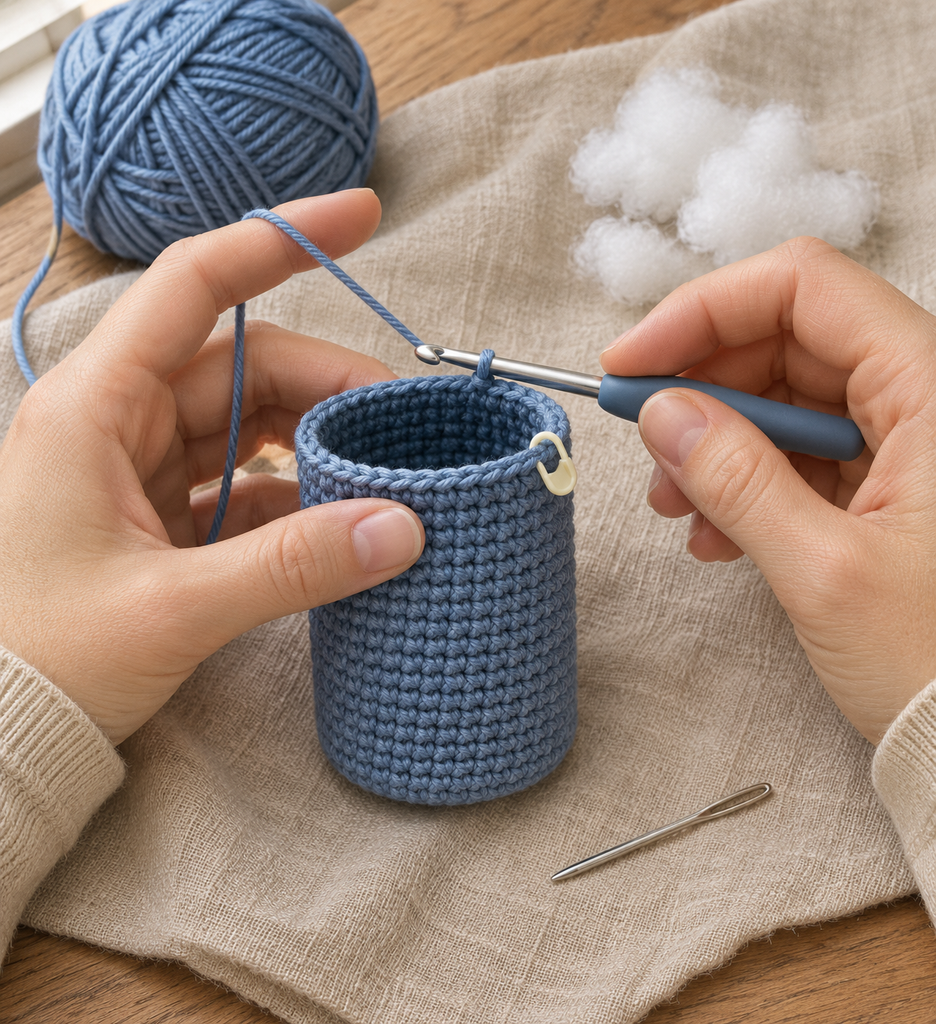
Round 7: Work one sc BLO in each of the 36 stitches. Do not increase. This makes a subtle turning line at the base edge.
Rounds 8–26: Work one sc through both loops of every stitch: 36 sc in each round. These 19 rounds, together with Round 7, make 20 upright blue body rounds.
The piece should form an open cylinder with a level circumference. It is not intended to remain flat after Round 7. Check the count regularly so an accidental extra stitch does not widen the mug toward its top.
Leave the working loop secured temporarily while you embroider the face. Do not fill or close the cup yet; the open top makes it easier to manage the thread ends inside.
Step 3: Embroider the Sleepy Face
Choose a front area away from the round-start line if you prefer to keep that line toward the back. Mark two eye positions around Rounds 18–19, with approximately four body stitches between their nearest ends.
For each eye, use two or three short black backstitches to make a small curved arch approximately two or three stitches wide. Keep the thread relaxed so it rests on the surface rather than pulling a deep dent into the fabric.
Add a little curved smile below the eyes around Rounds 16–17. The body is worked bottom up, so the lower-numbered rounds sit below the eyes. Make the smile about two stitches wide and check its position from the front before securing the ends inside.
This version uses embroidered curves only. There are no plastic eyes, beads, or separate cheek pieces in the written draft.
Step 4: Add the Narrow Cream Rim
Return to the working loop. Complete the last yarn-over of the final blue stitch of Round 26 with cream; undo that final stitch first if necessary to place the change neatly. Keep the change toward the back.
Round 27: With cream, work one sc in every stitch around: 36 sc.
Work a sl st into the next stitch to taper the end, then fasten off. This finishing slip stitch does not add another rim round or an extra attachment position. Weave the blue and cream tails inside while the opening remains accessible.
The cream section is one narrow round, not a wide folded cuff. Leave it visible when fitting the brown disc in the next steps.
Step 5: Crochet the Brown Cocoa Surface
With dark brown, make an adjustable ring.
- Round 1: Work 6 sc into the ring: 6 sc.
- Round 2: Inc in every stitch: 12 sc.
- Round 3: Repeat 1 sc, inc six times: 18 sc.
- Round 4: Repeat 2 sc, inc six times: 24 sc.
- Round 5: Repeat 3 sc, inc six times: 30 sc.
- Round 6: Repeat 4 sc, inc six times: 36 sc.
Finish with a sl st into the next stitch and fasten off with a generous brown sewing tail. Secure the center tail on the underside.
The brown disc has the same outer stitch count as the cup opening. It should sit just inside the cream rim without needing to be stretched hard or folded. Compare the actual pieces now. If their diameters differ substantially, check the two yarn thicknesses and your gauge rather than gathering an oversized disc into the opening.
Step 6: Crochet the Blue Handle Tube
With blue, make an adjustable ring, leaving a starting tail for attachment.
Round 1: Work 6 sc into the ring: 6 sc.
Rounds 2–20: Sc in every stitch around: 6 sc per round.
Add a very small amount of fiberfill as you work if the tube needs support. Keep it flexible enough to bend into a C. Overfilling will make the curve difficult and can spread the stitches.
Fasten off with a long tail. Pass it through the front loops of the final six stitches and draw the opening closed gently. There is no decrease round; this is a sewn closure of the existing six stitches. Keep the remaining tail for attachment.
At the proposed round gauge, the tube is approximately 7.7 cm long before bending. Its actual length and fullness determine how far the handle projects from the cup.
Stuff and Assemble the Mug
Step 7: Fill the Body Evenly
Add small portions of fiberfill into the blue cylinder. Support the base so it stays reasonably flat, then distribute filling around the inner walls and through the middle. Aim for a soft, supported cup rather than a hard, overfilled ball.
Leave room under the top for the brown disc to sit flat. Too much filling can push the cocoa surface into a dome or pull the cream rim out of shape. Check the embroidered face as you fill, because excess pressure can change the expression.
Pin the brown disc just below the cream rim with its preferred face upward. Match four roughly equal quarter points on the disc and opening so the seam distributes evenly.
Step 8: Sew the Cocoa Disc into Place
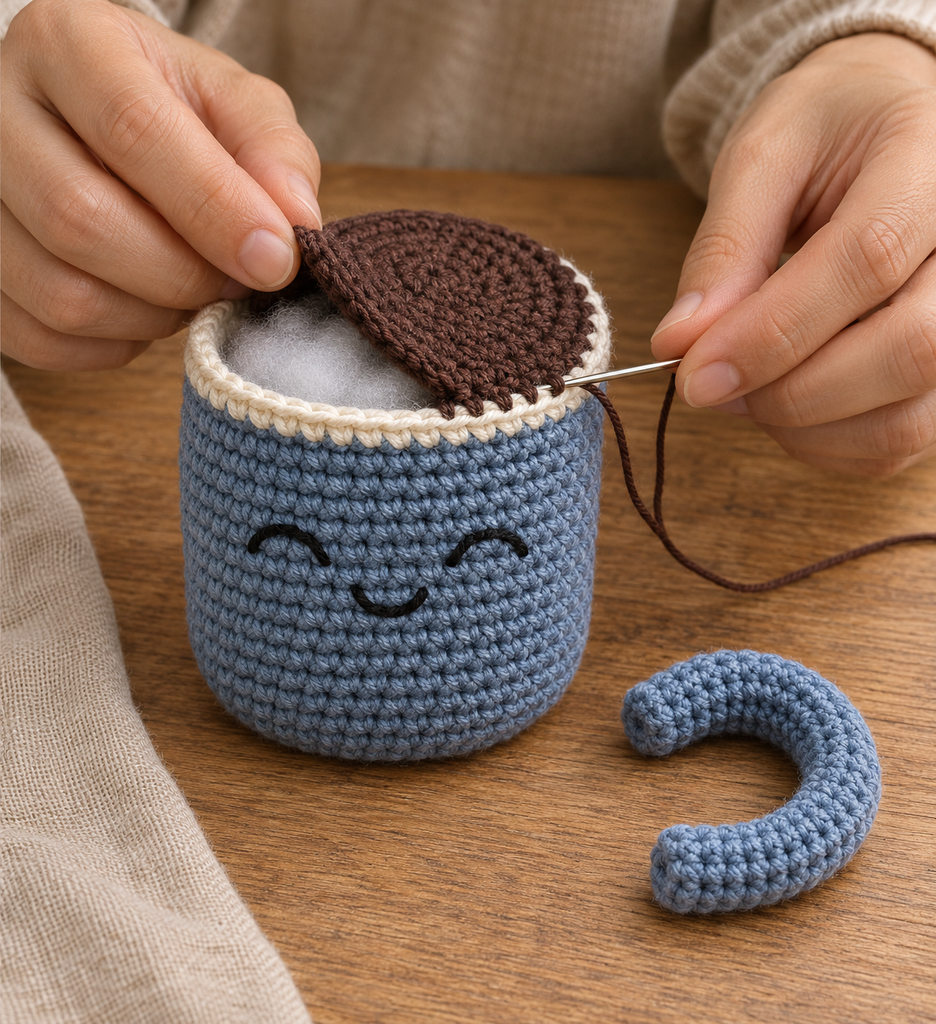
Using the brown tail, sew each of the disc’s 36 outer stitches to a corresponding anchor around the inside of Blue Round 26, immediately below the cream rim. Catch sound inner stitch loops or posts rather than splitting a single strand.
Work one disc stitch to one body attachment position. Keep the cream Round 27 standing visibly above the seam. Do not sew the disc across opposite sides of the cup or catch both walls together.
After attaching about three quarters of the disc, check the surface and add a little filling if needed. Complete the remaining seam, secure the tail, and hide it inside. The top should look level or very gently rounded, with no exposed filling around the edge.
Step 9: Position and Sew the Handle
Curve the blue tube into a C and pin it to one side of the mug. A proposed placement is the upper end around Blue Rounds 23–24 and the lower end around Rounds 11–12. Keep the embroidered face centered on the front, with the handle beside it rather than crossing the expression.
View the mug from the front, side, and above. The tube should form a clear opening without twisting. Adjust the contact points to the actual curve of your sample rather than stretching the handle to reach the proposed rounds.
With the blue tails, sew each end to several sound body loops around its full contact area. Add a second pass through adjacent loops to spread the attachment. Do not anchor the whole handle at a single stitch.
Secure the tails inside and check both joins with a gentle tug. The handle is part of a stuffed character, not a tested carrying handle. Hold the finished piece by its body while assessing the seams.
Step 10: Finish the Character
Inspect the rim, top seam, handle attachments, and embroidery for loose loops. Hide every remaining tail. Shape the base gently with your fingers and let the filling settle without pulling the cup wider.
Milo is complete without an additional scarf, bow, hanging cord, or topper. The plain cocoa surface and small face keep the construction clear and let the familiar mug shape do the work.

More Information and Customization
Keep the Top Disc Flat
The disc and opening both end at 36 stitches, but matching counts alone do not guarantee matching physical size. A thicker brown yarn or a tighter blue body can produce a mismatch. Use compatible yarns and compare the pieces before sewing.
If the disc ripples, check its increase counts and flatness before adjusting the seam. If it pulls the rim inward, check its actual diameter. Avoid disguising a large mismatch with very tight sewing stitches, which can distort the cup.
Change the Color Palette
Dusty blue, cream, and dark brown give a clear cocoa-mug look. A soft sage body or a muted terracotta body would use the same construction. Keep the handle in the body color for the simplest version.
For a first sample, change colors before changing the counts. A wider mug requires a larger base, a matching cocoa disc, and a reconsidered handle size, not just more straight wall rounds.
Add or Remove a Little Height
At the proposed gauge, adding three blue wall rounds adds approximately 1.2 cm of height. Keep the 36-stitch circumference and the one-round cream rim unchanged. Record the new row numbers and recheck face and handle positions.
A taller cylinder can look less like the illustrated character, and it needs more filling and yarn. Make the stated draft once before treating a modified shape as a reliable pattern.
Care for the Finished Amigurumi
Follow the yarn and filling care instructions, check contrasting thread for colorfastness, and support the shape while drying. Inspect the handle seams afterward. A small embroidered face and secure seams do not by themselves establish a tested toy-safety rating; assess the finished item’s intended use separately.
Frequently Asked Questions
Is Milo the same character as the PDF lollipop?
No. Milo is a stuffed mug with a round base, straight walls, a sewn cocoa disc, a cream rim, and a curved handle. The reference’s peppermint pattern, stick, bow, and hanging loop are not used.
Is this a no-sew amigurumi pattern?
No. The body is one piece, but the brown top and blue handle are sewn on. Matching and reinforcing those seams is part of the project.
Does the cocoa top cover an empty cup?
No. The cup is filled with fiberfill, and the brown crochet disc closes that filling inside. The finished character is stuffed throughout its body rather than hollow like a usable mug.
Why is my handle too stiff to bend?
It may be overfilled or worked in a very firm yarn. Use minimal filling in the narrow tube and check its curve before attachment. There is no wire or rigid insert in this draft.
Can I use a thicker plush yarn?
That changes the size, gauge, stitch visibility, and handle behavior. Treat it as a new yarn substitution requiring a sample. The proposed dimensions are based on a smooth DK fabric, not chenille.
Has the pattern been physically tested?
No. The counts have been reviewed mathematically, but the size, disc fit, stuffing, yarn use, assembly, and finished-item suitability still require a physical sample. The generated images illustrate the intended design rather than tested results.