Little Crochet Piggy Pattern

Some crochet projects are cute from the very first stitch, and this Little Crochet Piggy is definitely one of them.
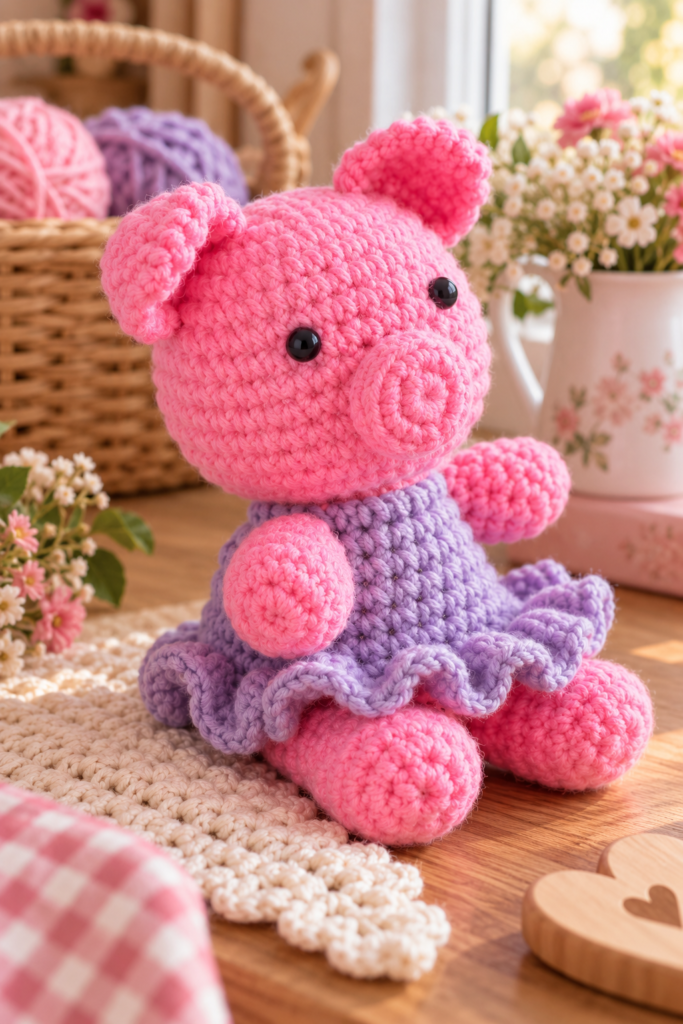
With her round pink head, tiny snout, folded ears, chubby arms and legs, curly tail, and sweet lavender skirt, this little pig has all the personality you could want from a handmade crochet toy.
What I especially love about this pattern is that the finished piggy looks detailed and full of character without requiring complicated crochet techniques. The original pattern is rated easy, and most of the project is made with simple single crochet worked in continuous rounds. RHC0334-014670M
The finished pig measures approximately 5½ inches tall, making her small enough to display on a nursery shelf, tuck into a handmade gift basket, or use as a charming little decorative amigurumi project. RHC0334-014670M
The photograph on page 1 shows the finished piggy in bright Pretty ‘n Pink yarn with a Pale Plum middle section and matching ruffled skirt. Two tiny black button eyes give her a simple expression, while the dimensional snout and folded ears bring the face to life.
One clever feature is that the head and body are crocheted as one continuous piece. You don’t have to make a separate head and then sew it onto the body. Instead, you begin at the top of the head, shape the face, decrease into the neck, change colors, and continue directly into the body.
Then you add the skirt, snout, arms, legs, tail, ears, and eyes.
Let’s turn this short original pattern into a complete step-by-step crochet guide.
About the Little Crochet Piggy
The Little Crochet Piggy was designed by Michele Wilcox.
The finished toy measures approximately:
5½ inches tall
and is made primarily with worsted-weight Red Heart Super Saver yarn.
The original piggy uses two colors:
Pretty ‘n Pink for the head, lower body, snout, arms, legs, tail, and ears.
Pale Plum for the upper body and little ruffled skirt.
Although she looks like she is wearing a separate dress, the clothing effect is actually built directly into the body through color changes and a clever round of unused back loops.
Later, those unused loops become the foundation for the skirt.
That means the ruffle looks naturally attached rather than sewn around the pig afterward.
Little Crochet Piggy Pattern at a Glance
Project: Little Crochet Piggy
Designer: Michele Wilcox
Skill Level: Easy
Finished Height: Approximately 5½”
Main Yarn: Red Heart Super Saver
Hook: 3.75 mm / U.S. F-5
Construction: Head and body worked continuously
Main Stitch: Single crochet
Additional Stitch: Half double crochet for the skirt
Working Method: Continuous rounds
Separate Pieces: Snout, 2 arms, 2 legs, tail and 2 ears
Why I Love This Crochet Pig Pattern
Small amigurumi projects can sometimes involve dozens of tiny pieces and a surprising amount of assembly.
This piggy keeps things much simpler.
Because the head and body are one piece, you immediately eliminate one of the biggest seams normally found in crochet animals.
The color change at the neck also gives the pig a dressed-up appearance without requiring you to make a separate shirt.
Then there is the skirt.
Round 20 is worked through the back loops only, leaving the front-facing loops available. Later, Pale Plum yarn is attached to those unused loops and several half double crochets are worked into each one.
That simple technique creates the full little ruffle visible in the page 1 photograph.
It’s such a clever detail for an otherwise straightforward project.
Materials You’ll Need
The original pattern uses RED HEART Super Saver yarn.
You will need:
Color A – 722 Pretty ‘n Pink: 1 skein
Color B – 579 Pale Plum: 1 skein
You will also need:
- 3.75 mm / U.S. F-5 crochet hook
- Split-lock stitch marker
- Yarn needle
- Stuffing
- Two ¼-inch black buttons for the eyes
- Scissors
The original materials list specifies one skein of each color and two ¼-inch black buttons. RHC0334-014670M
Crochet Gauge
The pattern gauge is:
16 stitches = 4 inches
and
20 rounds = 4 inches
in single crochet.
The source recommends changing your hook size if necessary to obtain the correct gauge. RHC0334-014670M
For a stuffed toy, gauge doesn’t usually need to be as exact as it would for a fitted sweater, but you do want your stitches tight enough that the stuffing doesn’t show through.
Crochet Abbreviations
Here are the abbreviations used throughout the pattern:
A – Pretty ‘n Pink
B – Pale Plum
Ch – Chain
Hdc – Half double crochet
Rnd/Rnds – Round/Rounds
Sc – Single crochet
St/Sts – Stitch/Stitches
Slip st – Slip stitch
Inc – Increase
Dec – Decrease
How to Crochet an Increase
The pattern defines an increase as:
Work 2 sc in the next sc.
This turns one stitch into two stitches.
How to Crochet a Decrease
To make the decrease used in this pattern:
Draw up a loop in each of the next:
2 single crochet stitches
Yarn over.
Draw the yarn through all:
3 loops
on your hook.
You have now decreased two stitches into one. RHC0334-014670M
Important Note About Continuous Rounds
Most of this piggy is crocheted in:
continuous rounds without joining.
Do not slip stitch at the end of each round unless the instructions specifically tell you to.
Place your stitch marker in the first stitch of each round.
As you complete a round, move the marker into the first stitch of the next round.
This prevents you from losing track of where your rounds begin and end. RHC0334-014670M
How to Crochet the Piggy Head and Body
We begin at the:
top of the head
using Color A – Pretty ‘n Pink.
Chain:
2
Head Round 1
Work:
6 sc in the second chain from your hook
You should have:
6 stitches
Round 2
Work:
2 sc in every stitch around
You should now have:
12 sc
Round 3
Repeat around:
Sc in next stitch, increase in next stitch
Repeat this sequence:
6 times
You should have:
18 sc
Round 4
Repeat:
Sc in next 2 stitches, increase
6 times.
You should have:
24 stitches
Round 5
Repeat:
Sc in next 3 stitches, increase
6 times.
You should now have:
30 stitches
At this stage, you have gradually expanded the top of the head into a rounded shape.
Head Rounds 6–12
Work:
1 sc in every stitch around
Continue without increasing.
Keep:
30 stitches
in each round.
These straight rounds build the height of the piggy’s head.
Shape the Bottom of the Head
Round 13
Work:
Decrease 15 times
around.
Your stitch count drops dramatically from 30 to:
15 stitches
This begins pulling the bottom of the head inward toward the neck.
Crochet the Neck
Round 14
Repeat:
Sc in next 3 stitches, decrease
3 times.
While completing the final single crochet of the round:
change to Color B – Pale Plum
You should finish with:
12 stitches
The head shaping and neck transition are given together in the source pattern. RHC0334-014670M
Crochet the Piggy Body
Body Round 15
Using Color B:
Increase in every stitch around
You should have:
24 stitches
At this point:
Stuff the head.
Try to fill it evenly, pushing the stuffing gently into the top and sides without stretching the crochet fabric excessively.
Body Rounds 16–19
Continue using Color B.
Work:
1 sc in every stitch around
At the end of Round 19:
change back to Color A
in the final stitch.
Body Round 20
Using Color A:
Work:
1 sc in the back loop only of every stitch around
This is a very important round.
By working only into the back loops, you leave the other loops unused.
Don’t crochet into those free loops later by accident—they will become the foundation for the skirt.
Body Rounds 21–24
Work:
1 sc in every stitch around
At this point:
Stuff the body.
Try to distribute the stuffing evenly so the pig can maintain the rounded shape visible in the original photograph.
Body Round 25
Work:
Decrease 12 times
You should have:
12 stitches
Body Round 26
Work:
Decrease 6 times
You should have:
6 stitches
Fasten off, leaving a yarn tail.
Finish adding stuffing if necessary.
Thread the yarn tail through the remaining six stitches.
Pull firmly to gather the opening closed.
Fasten securely.
The complete body section moves from the Pale Plum upper body into the pink lower body before decreasing to a six-stitch opening. RHC0334-014670M
How to Crochet the Piggy’s Ruffled Skirt
Remember those loops you left unused when you worked Round 20 through the back loops?
Now we’re going to use them.
Take:
Color B – Pale Plum
Join the yarn into any unused back loop from Round 20.
Chain:
2
In the same loop where you joined the yarn, work:
2 hdc
Then work:
3 hdc in every remaining loop around
Join with a slip stitch into the top of the beginning chain 2.
Fasten off.
The large number of half double crochets creates extra fabric, causing the edge to flare outward naturally into a ruffle. RHC0334-014670M
The page 1 photograph shows this skirt extending around the pig’s waist in Pale Plum, coordinating perfectly with the upper body.
How to Crochet the Piggy Snout
Using Color A:
Chain:
2
Snout Round 1
Work:
6 sc in the second chain from your hook
Round 2
Work:
2 sc in each stitch around
You should have:
12 stitches
Round 3
Work:
1 sc in the back loop only of every stitch around
This back-loop round helps the snout turn forward rather than continuing to expand flat.
Round 4
Work:
1 slip stitch in every sc around
Fasten off.
Stuff the snout:
lightly
and sew it securely onto the front of the piggy’s face.
Then sew the two black button eyes above the snout.
The original page 1 photograph shows the eyes spaced fairly wide apart, with the round dimensional snout centered below them. RHC0334-014670M
How to Crochet the Piggy Arms
Make:
2 arms
using Color A.
Chain:
2
Arm Round 1
Work:
6 sc in the second chain from your hook
Round 2
Repeat:
Sc in next stitch, increase
3 times.
You should have:
9 stitches
Rounds 3–6
Work:
1 sc in every stitch around
Fasten off.
Stuff the arms and sew them onto the sides of the body.
The photograph shows them extending outward just above the skirt line.
How to Crochet the Piggy Legs
Make:
2 legs
using Color A.
Chain:
2
Leg Round 1
Work:
6 sc in the second chain from your hook
Round 2
Work:
2 sc in every stitch around
You should have:
12 stitches
Rounds 3–5
Work:
1 sc in every stitch around
Leg Round 6
Repeat:
Sc in next 2 stitches, decrease
3 times.
You should have:
9 stitches
Fasten off.
Stuff each leg lightly.
Sew both legs securely to the bottom of the body. RHC0334-014670M
How to Crochet the Curly Pig Tail
Of course, our little piggy needs a curly tail.
Using Color A:
Chain:
6
Beginning in the second chain from your hook:
Work:
2 sc in every chain across
Fasten off.
The extra stitches cause the small chain to curl naturally.
Sew the tail onto the back of the piggy. RHC0334-014670M
It’s an incredibly simple detail, but it adds so much personality.
How to Crochet the Piggy Ears
Make:
2 ears
using Color A.
Chain:
6
Unlike the arms and legs, the ears are crocheted flat in rows.
Ear Row 1
Beginning in the second chain from your hook:
Work 1 sc in every chain across.
Turn.
You should have:
5 sc
Ear Row 2
Chain 1.
Sc in every stitch across.
Turn.
Ear Row 3
Chain 1.
Decrease.
Sc in the next stitch.
Decrease again.
Turn.
You should have:
3 stitches
Ear Row 4
Chain 1.
Sc in each stitch across.
Turn.
Ear Row 5
Chain 1.
Draw up a loop in each of the next:
3 stitches
You should now have four loops on your hook.
Yarn over.
Draw through all four loops.
Turn.
You have:
1 stitch
This creates the narrow tip of the ear.
Ear Row 6
Chain 1.
Sc in the remaining stitch.
Then:
Slip stitch into the center stitch of Row 2
to create the ear fold.
Fasten off.
This final slip stitch is a clever detail because it pulls part of the ear inward, giving it the folded, dimensional appearance visible in the page 1 photograph.
Sew both ears securely to the top sides of the head. RHC0334-014670M
How to Assemble Your Little Crochet Piggy
Once every component is crocheted, arrange all the pieces before sewing them permanently.
The page 1 photograph is especially useful as an assembly reference.
Position the snout in the lower center of the face.
Place the two black button eyes above it.
The ears sit high on either side of the head and have a slightly folded appearance rather than lying completely flat.
Attach the arms on either side of the upper body.
The little lavender skirt should naturally flare around the waist.
Position the legs near the bottom so the piggy has the seated appearance shown in the photograph.
Finally, attach the curly tail to the back.
Take your time during this stage. With amigurumi, even moving an eye or ear by a few stitches can noticeably change the finished expression.
Tips for Making Your Crochet Piggy Look Adorable
Don’t Overstuff the Snout
The source specifically says to stuff it lightly.
Too much stuffing can turn the little snout into an oversized ball.
Stuff the Head Before Continuing Too Far
The pattern tells you to stuff the head after beginning the body.
This is easier than trying to push all the stuffing upward after the body is nearly closed.
Use Your Stitch Marker
Continuous rounds can be deceptive because there is no visible joining seam.
Move your marker after every round.
Keep Your Stitches Tight
Amigurumi usually looks best when the stuffing doesn’t show through the fabric.
If your stitches are very loose, consider adjusting your hook while still respecting the source gauge.
Pin the Pieces Before Sewing
Temporarily position the ears, snout, arms, and legs before attaching them.
Check the pig from the front and side.
Only start sewing once you’re happy with the placement.
A Note About Button Eyes and Child Safety
The original pattern uses two ¼-inch black buttons for the eyes. RHC0334-014670M
If the finished pig is intended for a very young child, small detachable pieces can present a choking hazard. For a child-safe adaptation, embroidered eyes can be considered instead of buttons.
That is a practical safety adaptation rather than an instruction from the original pattern.
Color Ideas for Your Crochet Pig
The original Pretty ‘n Pink and Pale Plum combination gives this piggy a sweet classic look.
But once you understand the construction, you could experiment with your own colors.
A pale blush pig with a cream skirt would create a softer neutral version.
A bright pink pig with turquoise clothing would feel playful and modern.
You could also keep the traditional pink body and simply make several piggies with differently colored outfits.
These are creative variations—the source pattern itself specifies Pretty ‘n Pink and Pale Plum.
Frequently Asked Questions
Is the Little Crochet Piggy beginner-friendly?
Yes. The original pattern is rated:
Easy.
You should be comfortable with single crochet, half double crochet, increases, decreases, continuous rounds, back-loop crochet and basic sewing.
Who designed the Little Crochet Piggy?
The pattern was designed by:
Michele Wilcox.
How big is the finished crochet pig?
Approximately:
5½ inches tall.
What yarn does the pattern use?
The original uses:
RED HEART Super Saver
in Pretty ‘n Pink and Pale Plum.
What crochet hook do I need?
Use:
3.75 mm / U.S. F-5
or another size needed to obtain gauge.
What is the gauge?
The source gives:
16 stitches = 4 inches
and
20 rounds = 4 inches
in single crochet.
Is the head sewn onto the body?
No.
The head and body are crocheted continuously as one main piece.
How many separate arms do I make?
Make:
2 arms.
How many legs do I make?
Make:
2 legs.
How many ears do I make?
Make:
2 ears.
How is the skirt made?
The skirt is crocheted into the loops left unused during Body Round 20.
Three half double crochets are worked into each loop to create the ruffled effect.
How is the curly tail made?
Chain 6, then work 2 single crochets into every chain beginning in the second chain from your hook.
The extra stitches naturally cause the piece to curl.
Should I stuff the arms?
Yes.
The source continues the arm instructions on page 2 with:
“Stuff and sew in place.” RHC0334-014670M RHC0334-014670M
Should I stuff the legs?
Yes, but only:
lightly.
Should I stuff the snout?
Yes.
Again, the source specifies that the snout should be stuffed:
lightly.
Are the ears stuffed?
No stuffing instruction is given for the ears. They are flat crocheted pieces that are folded using the final slip stitch before being sewn onto the head.
Final Thoughts
This Little Crochet Piggy is a perfect example of how much personality you can create with basic crochet stitches.
The project begins with just six single crochets.
A few increase rounds later, you have the top of a head.
Add several straight rounds, decrease sharply toward the neck, switch from pink to lavender, and suddenly the piggy looks like she’s wearing a tiny outfit.
Then comes my favorite construction detail.
One round is worked through the back loops, leaving a row of unused loops around the waist. Later, those loops become the foundation for a full lavender ruffle.
It’s such a simple technique, but it completely changes the character of the finished toy.
Then you add all those little pieces one by one.
Two chubby arms.
Two rounded legs.
A dimensional snout.
Two folded ears.
A tiny curly tail.
And finally, the eyes.
That’s when the little collection of crochet shapes suddenly becomes a piggy.
The original pink-and-plum version shown on page 1 is wonderfully cheerful, but this pattern also gives you plenty of room to experiment with different outfit colors and expressions.
Make one as a sweet shelf decoration, add it to a handmade gift, or simply crochet it because sometimes a tiny pink pig in a ruffled skirt is exactly the project your yarn basket needs.
Happy crocheting!