Lalafanfan Crochet Duck

If you’ve spent any time on social media over the past few years, chances are you’ve seen her: the round-cheeked, wide-eyed duck plushie known as Lalafanfan, dressed in a ruffled bonnet and a matching dress with a tiny crossbody bag. The Lalafanfan Crochet Duck Amigurumi, designed by yuliya_knitting11, brings that viral plush design into a fully crocheted pattern, complete with the character’s signature blushing cheeks, an orange beak, a ruffled hat, a flouncy dress, and a little handbag to finish the look.
As the pattern’s introduction promises, this is “very easy to crochet step by step,” and the materials are refreshingly accessible — the designer even suggests you “can crochet using yarn that you do not use at home,” as long as the yarn thicknesses stay consistent. Once the base duck is complete, the hat and dress are worked separately, so you’re free to experiment with different color combinations from the reference photo if you’d like to design your own unique version.
Below is the complete pattern, reorganized with clear headings for every component, along with the full materials list, abbreviations, and a set of tips and frequently asked questions to help you bring your own Lalafanfan duck to life.
About This Pattern

Designer: yuliya_knitting11
Materials
- Yarn Art Dolce, main color (761), 1 skein
- Yarn Art Dolce, cheeks color (759)
- Yarn Art Dolce, beak color (778)
- Yarn Art Suit Jeans (75)
- 1 skein of white yarn, for the bag
- Eyes, 10mm
- Filler (stuffing)
- Cotton yarn, for sewing details
- Crochet hook, size 4.5mm
Abbreviations
| Abbreviation | Meaning |
|---|---|
| MR | Magic ring |
| sc | Single crochet |
| inc | Increase |
| dec | Decrease |
| tr | Triple crochet / treble crochet |
| st | Stitch |
| dc | Double crochet |
| hdc | Half double crochet |
| slst | Slip stitch |
| ch | Chain |
| FLO | Crochet into front loops only |
| BLO | Crochet into back loops only |
Crocheting the Head
- Rnd 1: 6 sc in MR (6).
- Rnd 2: (inc) x6 (12).
- Rnd 3: (1 sc, inc) x6 (18).
- Rnd 4: (2 sc, inc) x6 (24).
- Rnd 5: (3 sc, inc) x6 (30).
- Rnd 6: (4 sc, inc) x6 (36).
- Rnd 7: (5 sc, inc) x6 (42).
- Rnd 8: (6 sc, inc) x6 (48).
- Rnd 9–14: 48 sc (6 rows).
- Rnd 15: (6 sc, dec) x6 (42).
- Rnd 16: (5 sc, dec) x6 (36).
- Rnd 17: (4 sc, dec) x6 (30).
- Rnd 18: (3 sc, dec) x6 (24).
- Rnd 19: (2 sc, dec) x6 (18).
- Rnd 20: (1 sc, dec) x6 (12).
- Rnd 21: (dec) x6 (6).
Cut the thread, pull the loops closed, fasten, and hide the tail inside the piece.
Crocheting the Arms (Make 2)
- Rnd 1: 6 sc in MR (6).
- Rnd 2: (inc) x6 (12).
- Rnd 3: (3 sc, inc) x3 (15).
- Rnd 4–6: 15 sc (3 rows).
- Rnd 7: (3 sc, dec) x3 (12).
Fill the arm with stuffing, then fold it in half and crochet both sides of the remaining 6 sc together to close and flatten the tip.
Crocheting the Legs and Body
- Rnd 1: 6 sc in MR (6).
- Rnd 2: (inc) x6 (12).
- Rnd 3: (1 sc, inc) x6 (18).
- Rnd 4–7: 18 sc (4 rows).
Cut the thread and fasten off the first leg. Crochet a second leg using the same instructions, but this time don’t cut the thread — you’ll continue directly into joining the two legs together.
- Rnd 8: Immediately connect with the first leg: 18 sc across the first leg, 18 sc across the second leg (36).
- Rnd 9–14: 36 sc (6 rows).
- Rnd 15: (10 sc, dec) x3 (30).
- Rnd 16: (9 sc, dec) x3 (30).
- Rnd 17: (8 sc, dec) x3 (27).
- Rnd 18: (7 sc, dec) x3 (24).
- Rnd 19–20: 24 sc.
Cut the thread and fasten off.
Crocheting the Cheeks
- Rnd 1: 6 sc in MR.
- Rnd 2: (inc) x6 (12).
- Rnd 3: (1 sc, inc) x6 (18).
- Rnd 4: 18 sc.
Make two cheek pieces in total, and don’t stuff them too firmly — a soft, slightly flattened puff is what gives Lalafanfan her signature rounded blush.
Crocheting the Beak
The beak is made from two separate parts — a top and a lower piece — that are joined together, plus a small final detail piece.
Top Part
- Rnd 1: 6 sc in MR.
- Rnd 2: (1 sc, inc) x3 (9).
- Rnd 3: (2 sc, inc) x6 (12).
Lower Part
- Rnd 1: 6 sc in MR.
- Rnd 2: (inc) x6 (12).
Connect the two beak parts and sew them together from the inside, along the sides of the 6 sc sections.
Final Beak Detail
- Rnd 1: 6 sc in MR.
- Rnd 2: 6 sc.
This small final piece adds a bit of extra dimension to the center of the finished beak, matching the raised orange detail shown in the reference photo.
Crocheting the Hat
Worked entirely in double crochet.
- Rnd 1: 12 dc in MR.
- Rnd 2: (inc) x12 (24).
- Rnd 3: (inc, 1 dc) x12 (36).
- Rnd 4: (inc, 2 dc) x12 (48).
- Rnd 5: (inc, 3 dc) x12 (60).
- Rnd 6: (inc, 4 dc) x12 (72).
- Rnd 7–10: 72 dc (4 rows).
- Rnd 11: In each loop, crochet an increase using dc.
- Rnd 12: (inc, 1 dc), alternating this sequence to the end of the round.
Rounds 11 and 12 together are what create the hat’s signature ruffled, wavy brim.
Crocheting the Ears (Make 2)
- Rnd 1: 8 dc in MR.
- Rnd 2: Turn the crocheting, chain 2, then (inc) x8 (16).
These small ear pieces attach to the hat, giving it the soft, bonnet-like shape shown on the finished doll.
Crocheting the Dress
- Row 1: 49 chains; starting from the 2nd loop from the hook, work 48 sc.
- Row 2: Turn and crochet 3 chains for lifting, 7 dc, then dial (chain) 10 stitches and skip 10 sc, 14 dc, dial 10 stitches and skip 10 sc, 7 dc (48).
- Row 3: Turn and crochet a chain, then (7 sc, inc) x6 (54).
- Row 4: Turn, 3 chains, 54 dc.
- Row 5: Turn and crochet a chain, then (8 sc, inc) x6 (60).
- Row 6: Turn, 3 chains, 60 dc.
- Row 7: Turn and crochet a chain, then (9 sc, inc) x6 (66).
- Row 8: In each loop, crochet an increase from sc.
- Row 9: (inc, 1 dc), alternating this sequence to the end of the row.
- Row 10: (inc, 2 dc), alternating this sequence to the end of the row.
With the same thread, move to the side of the dress and crochet a row of sc, adding small crocheted loops along the way to serve as buttonholes for closing the dress.
Crocheting the Bag
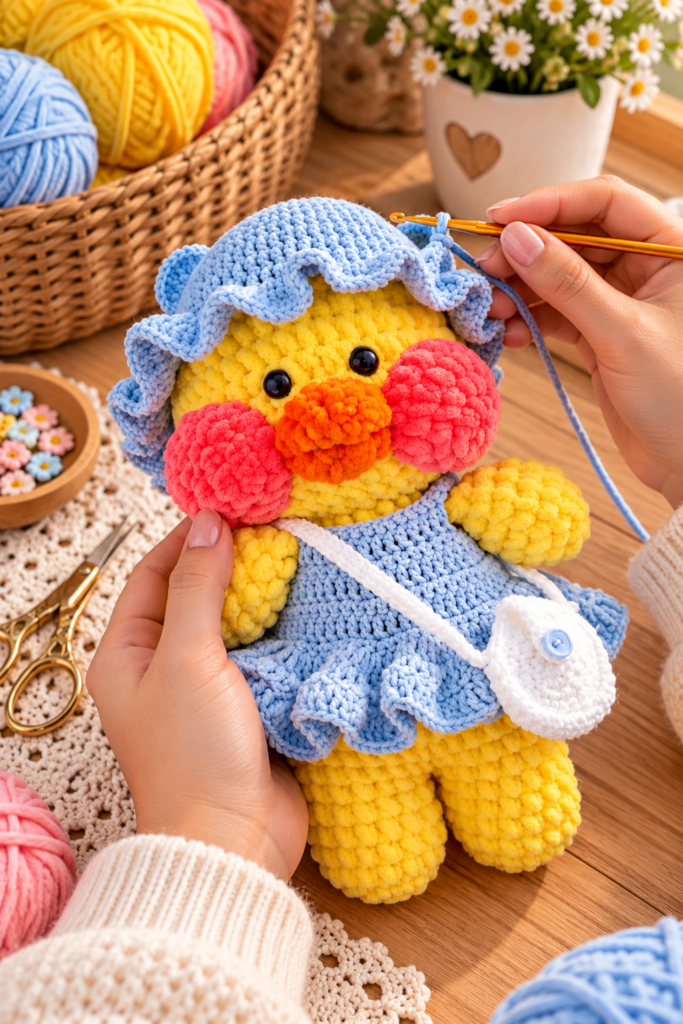
The bag is made from two identical round pieces joined together, with a strap and small closure added afterward.
Crochet the same two pieces using the following instructions:
- Rnd 1: 6 sc in MR.
- Rnd 2: (inc) x6 (12).
- Rnd 3: (1 sc, inc) x6 (18).
- Rnd 4: (2 sc, inc) x6 (24).
On one piece, cut the thread and fasten off. On the second piece, leave the thread attached, and continue crocheting further: work in the back loops only for 20 sc, then cut the thread, leaving a generous tail for sewing this piece to the first part. Sew the two pieces together, also working through the back loops.
The Strap
Chain 71; starting from the 2nd loop from the hook, crochet 70 sc. Sew this strap onto the bag.
The Closure
Chain 12; from the 6th loop from the hook, crochet 7 sc, forming a small loop closure for the bag’s flap or button.
Finishing
Congratulations — you have completed the amigurumi pattern! As the original pattern’s introduction suggests, once the duck is fully assembled, you can decorate it further using colored ribbon for an extra personal touch.
Tips for Crocheting the Lalafanfan Duck
- Keep your yarn weights consistent, even if you mix brands. Since the designer specifically notes you can use leftover yarn from home as long as the thicknesses match, take a moment to check that any substituted yarns are genuinely comparable in weight before starting, especially between the main duck color and the dress/hat colors.
- Don’t overstuff the cheeks. Since the cheeks are meant to sit softly against the face rather than bulge out firmly, a lighter touch with the stuffing (or no stuffing at all, depending on your preference) will better match the flattened, blush-like look in the reference photo.
- Take the dress’s chain-and-skip sections slowly. Row 2 of the dress involves dialing 10 chains and skipping 10 sc, twice within the same row — these open spaces are what create the armholes, so double-check your stitch count against the pattern before moving on to Row 3.
- Work the bag’s back loops only sections carefully. Both the second bag piece’s 20 sc round and the final seaming step are worked through the back loops only, which keeps a clean front-loop edge free for a neat seam — mixing up front and back loops here can make the final seam look uneven.
- Save the ribbon decorating for last. Since the pattern specifically mentions finishing touches with colored ribbon after the amigurumi is complete, hold off on any ribbon embellishments until the hat, dress, and bag are all sewn on, so you can adjust placement with the fully assembled doll in front of you.
Frequently Asked Questions
Who designed this pattern? The Lalafanfan Crochet Duck Amigurumi was designed by yuliya_knitting11 and shared as a free pattern.
Is this pattern beginner-friendly? Yes — the designer describes it as very easy to crochet step by step, and the materials are intentionally simple to source, even suggesting leftover yarn from home can work as long as the weights are consistent.
What size hook does this pattern use? A 4.5mm crochet hook is used throughout the entire pattern, from the duck’s body to the hat, dress, and bag.
How many separate pieces make up the finished doll? The core duck is made from a head, two arms, a combined legs-and-body piece, two cheeks, and a two-part beak. On top of that, the hat, two ears (for the hat), a dress, and a two-piece bag with a strap and closure are all crocheted separately and added afterward.
Can I use different colors than the ones listed? Absolutely — the pattern specifically notes you can crochet the hat and dress in different colors than shown, so feel free to design your own color palette rather than sticking strictly to the light blue and yellow shown in the reference photo.
How is the beak constructed? The beak is built from a top part and a lower part, each crocheted separately and then sewn together along the inside edges of their final 6-sc rounds, plus a small additional detail piece added afterward for extra dimension.
What creates the ruffled edge on the hat? The last two rounds of the hat (Rounds 11 and 12) both work increases into every loop or every other stitch, which causes the fabric to ruffle and flare outward, creating the wavy, bonnet-like brim.
How is the bag attached to the duck? The bag itself is sewn from two joined circular pieces, with a long chained strap sewn on separately and a small looped closure worked at the end — the whole assembled bag is then draped over the duck’s shoulder as shown in the reference photo.
A Duck Worth Dressing Up
Between her blushing cheeks, expressive beak, ruffled bonnet, flouncy dress, and tiny crossbody bag, this Lalafanfan crochet duck captures every bit of the charm that made the original plush such a viral favorite — and gives you full creative control over the color palette along the way. Whether you stick close to the classic blue-and-yellow look or design your own version, this pattern makes it easy to bring a piece of internet-famous cuteness into your own yarn stash.
For more free amigurumi and crochet patterns like this one, be sure to check out Lovelycraft.com.