Free Mushroom Crochet Pattern
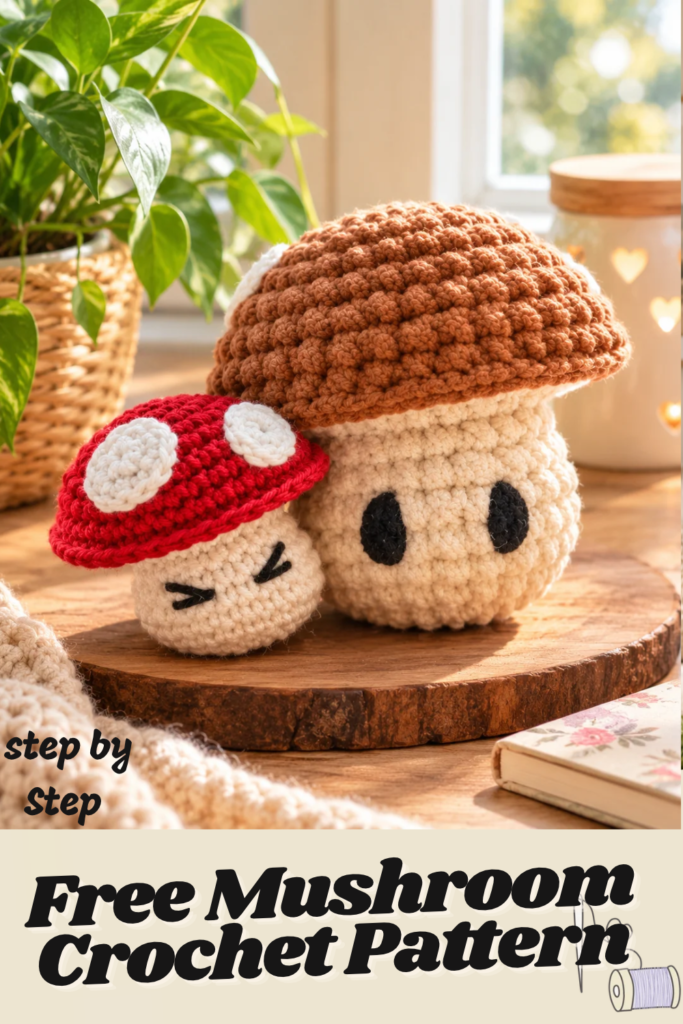
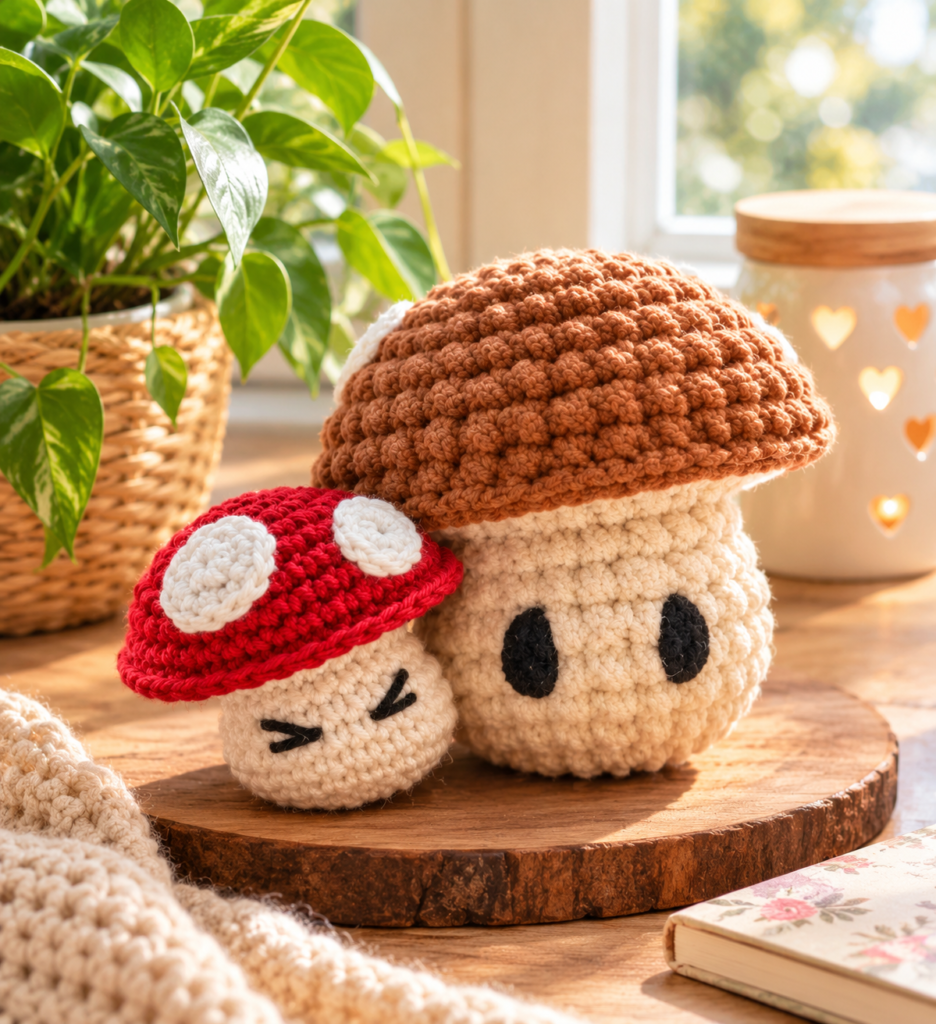
There is something absolutely adorable about a tiny handmade crochet mushroom. With its bright red cap, little white spots, soft rounded stem, and optional embroidered face, this miniature mushroom looks like it belongs in a cozy woodland fairy tale.
If you love cute crochet projects, beginner-friendly amigurumi, or quick handmade gifts, this free mushroom crochet pattern is a lovely project to add to your crafting list.
The design features a classic red-and-white mushroom inspired by the charming woodland toadstools often seen in cottagecore decorations. Its simple shape, playful colors, and tiny embroidered details make it perfect for a crochet keychain, bag charm, decorative plushie, or handmade gift.
One of the best things about this project is that you can make the same mushroom in several sizes without changing the basic pattern.
Using sport-weight cotton yarn and a 2.5 mm crochet hook creates a miniature mushroom measuring approximately 2 inches (4.5 cm). If you prefer a larger, softer version, you can use super bulky chenille yarn to make a plush mushroom measuring approximately 3–4 inches (7–10 cm).
The pattern also includes two adorable facial expressions. You can embroider little closed eyes for a sleepy, peaceful mushroom or choose oval eyes for a cheerful character. If you prefer a more traditional woodland look, simply leave the face off.
The original pattern is beginner-friendly and uses basic crochet stitches, increases, decreases, and simple assembly techniques.
Whether you’re making your first amigurumi project, using leftover yarn, or creating a collection of miniature crochet woodland decorations, this little mushroom is a fun and satisfying project.
In this guide, you’ll find the materials, crochet abbreviations, complete written instructions, assembly steps, helpful tips, and creative ways to use your finished mushroom.
About This Cute Crochet Mushroom
This mushroom is made from a white crocheted stalk, a separate red cap, and three white decorative spots.
The stalk begins with a magic ring and gradually increases to form a rounded base. After several even rounds, decreases narrow the upper section.
A special front-loop-only round creates the wider underside of the mushroom cap.
The red cap is crocheted separately and attached to the stalk using single crochet stitches worked through both pieces.
The finishing details are what make the design particularly charming.
The pattern includes one large white spot and two smaller spots, creating the classic red-and-white toadstool appearance.
You can also embroider a face onto the white stalk.
The original PDF provides two different eye styles, allowing you to personalize the mushroom without changing its construction.
Mushroom Crochet Pattern at a Glance
| Project detail | Information |
|---|---|
| Pattern | Mini Mushroom Amigurumi |
| Craft | Crochet |
| Skill level | Beginner-friendly |
| Crochet terminology | U.S. terms |
| Main colors | Red, white, black |
| Main stitches | Single crochet, increases, decreases |
| Special technique | Front loops only and back loops only |
| Construction | Separate stalk and cap joined together |
| Decorative spots | 1 large and 2 small |
| Face | Two optional styles |
| Stuffing | Synthetic polyester fiberfill |
| Suggested uses | Keychain, bag charm, plushie, decoration |
Finished Mushroom Sizes
The original pattern provides three size options.
| Yarn type | Crochet hook | Approximate finished size |
|---|---|---|
| Sport-weight cotton | 2.5 mm | 2 inches / 4.5 cm |
| Super bulky chenille | 4 mm | 3 inches / 7 cm |
| Super bulky chenille | 5 mm | 4 inches / 10 cm |
The same written pattern is used for all three versions.
Your finished measurements may vary depending on the yarn brand, hook size, and crochet tension.
Materials You’ll Need
One of the nicest things about this mushroom crochet pattern is that it requires only a few basic supplies.
You can use cotton yarn for a small, structured mushroom or chenille yarn for a softer plush version.
Option 1: Mini Cotton Mushroom
For the smallest version, the original pattern uses Yarn and Colors Must Have sport-weight cotton.
Yarn colors:
- Red – Color 032
- White – Color 001
- Black – Color 100
You’ll also need a 2.5 mm crochet hook and synthetic polyester fiberfill.
The finished mushroom measures approximately 4.5 cm.
This version is especially suitable for a miniature decoration or keychain.
Option 2: Small Chenille Mushroom
For a softer mushroom measuring approximately 7 cm, use red, white, and black super bulky chenille yarn.
The recommended hook size is 4 mm.
Chenille yarn gives the finished mushroom a soft, velvety texture.
Option 3: Larger Chenille Mushroom
For the larger version, use red, white, and black super bulky chenille yarn with a 5 mm crochet hook.
The finished mushroom measures approximately 10 cm.
This version is ideal if you want a cute, squishy mushroom plushie.
Additional Supplies
You’ll also need:
- Scissors
- Blunt-point tapestry needle, size 16 or 17
- Pins
- Polyester fiberfill
A stitch marker is an optional addition that can make counting rounds easier.
Crochet Abbreviations
The original pattern uses U.S. crochet terminology.
| Abbreviation | Meaning |
|---|---|
| Rnd | Round |
| St | Stitch |
| SC | Single crochet |
| Sl st | Slip stitch |
| Inc | Increase |
| Dec | Decrease |
| FLO | Front loops only |
| BLO | Back loops only |
How to Make a Single Crochet Increase
Work two single crochet stitches into the same stitch.
This adds one stitch to the round.
How to Make a Single Crochet Decrease
Work two neighboring stitches together to reduce the stitch count by one.
What Does FLO Mean?
FLO stands for front loops only.
Instead of inserting your hook through both loops of a stitch, work through the front loop.
This technique is used when shaping the mushroom stalk.
What Does BLO Mean?
BLO stands for back loops only.
It means working through the back loop of a stitch.
The pattern uses this technique when attaching the mushroom cap to the stalk.
Part 1: How to Crochet the White Mushroom Stalk
The mushroom begins with the white stalk.
This piece is worked in continuous rounds using single crochet stitches.
The base gradually widens before narrowing toward the upper section.
Step 1: Begin With a Magic Ring
Using white yarn, create a magic ring.
Round 1
Work 8 single crochet stitches into the magic ring.
Stitch count: 8
Pull the yarn tail to close the center.
Round 2
Work one increase into every stitch around.
Stitch count: 16
Round 3
Repeat the following sequence eight times:
1 single crochet into the next stitch, followed by an increase in the following stitch.
Stitch count: 24
Your mushroom stalk should now have a rounded base.
Step 2: Crochet the Straight Stalk Section
Rounds 4–7
Work one single crochet into each stitch around.
Stitch count: 24 per round
These four even rounds create the main height of the stalk.
The shape should begin to resemble a small cylinder with a rounded bottom.
Step 3: Narrow the Upper Stalk
Round 8
Repeat four times:
4 single crochet stitches, followed by one decrease.
Stitch count: 20
Round 9
Repeat four times:
3 single crochet stitches, followed by one decrease.
Stitch count: 16
The upper section of the stalk is now narrower than the base.
This helps create the recognizable mushroom silhouette.
Part 2: Crochet the Underside of the Mushroom Cap
The next rounds widen the top of the stalk.
This creates the white underside that will connect to the red mushroom cap.
Round 10
Work through the front loops only.
Repeat the following sequence eight times:
1 single crochet, followed by one increase.
Stitch count: 24
Working through the front loops creates a change in the fabric’s direction.
Round 11
Repeat six times:
3 single crochet stitches, followed by one increase.
Stitch count: 30
Round 12
Repeat six times:
4 single crochet stitches, followed by one increase.
Stitch count: 36
Fasten off.
The white stalk and underside are now complete.
The final round contains 36 stitches, matching the edge of the red mushroom cap.
Part 3: Embroider the Mushroom’s Cute Face
The original pattern offers two optional facial expressions.
Both use black yarn and simple embroidery.
You can also skip the face entirely for a classic woodland mushroom.
Option 1: Sleepy Closed Eyes
Using black yarn, embroider two closed eyes over Round 6 of the white stalk.
Leave approximately two stitches between the eyes.
Small curved lines can create a peaceful, sleepy expression.
The original pattern illustrates this option in photos 1–3.
Option 2: Cute Oval Eyes
For a more playful expression, embroider two oval eyes over Rounds 6 and 7.
Leave approximately three stitches between them.
This creates a cheerful little character with larger-looking eyes.
The original pattern illustrates this option in photos 4–5.
Tips for Neat Face Embroidery
Use a tapestry needle and a short length of black yarn.
Keep both eyes at a similar height.
Before securing the yarn, check the face from the front.
Once you’re happy with the expression, hide the yarn ends inside the stalk.
Because the face is embroidered rather than made with plastic safety eyes, there are no detachable plastic eye pieces.
However, any finished toy intended for young children should still be checked carefully for secure seams and attachments.
Part 4: How to Crochet the Red Mushroom Cap
The red mushroom cap is made separately.
It begins with a magic ring and gradually increases to create a rounded dome.
The cap is worked using red yarn.
Step 1: Begin the Cap
Round 1
Work 6 single crochet stitches into a magic ring.
Stitch count: 6
Round 2
Increase in every stitch around.
Stitch count: 12
Round 3
Repeat six times:
1 single crochet, followed by one increase.
Stitch count: 18
Round 4
Repeat six times:
2 single crochet stitches, followed by one increase.
Stitch count: 24
Round 5
Repeat six times:
3 single crochet stitches, followed by one increase.
Stitch count: 30
Step 2: Shape the Rounded Cap
Round 6
Work one single crochet into every stitch around.
Stitch count: 30
Round 7
Repeat six times:
4 single crochet stitches, followed by one increase.
Stitch count: 36
Round 8
Work one single crochet into every stitch around.
Stitch count: 36
The red cap should now have a rounded dome shape.
Do not fasten off yet.
The next round joins the cap to the white stalk.
Part 5: Attach the Mushroom Cap to the Stalk
This is one of the most important construction steps.
The original pattern uses single crochet stitches to join the red cap and white stalk together.
Both pieces have 36 stitches along their joining edges.
Step 1: Position the Pieces
Place the red cap over the white stalk.
Align the edges so the stitches match.
Use pins if needed to hold the pieces in position.
Step 2: Crochet the Joining Round
Round 9
Insert your hook through the next stitch of the red cap and the corresponding back loop of the white stalk.
Work one single crochet through both layers.
Continue around.
Stitch count: 36
The original pattern includes an important note: because the mushroom stalk has been turned for assembly, its back loops may appear to be front loops from your current viewpoint.
Follow the stitch orientation carefully so the cap and underside join correctly.
Step 3: Add the Stuffing
Before the opening is completely closed, add polyester fiberfill.
Start by stuffing the white stalk.
Then add a smaller amount of stuffing to the red cap.
The original instructions specifically recommend using only a little stuffing in the cap.
This helps preserve the rounded mushroom shape without making the top too bulky.
Step 4: Finish the Joining Round
Complete the remaining single crochet stitches around the cap.
Use an invisible fasten-off method for a neat finish.
Weave the yarn tail securely into the mushroom.
The main mushroom shape is now complete.
Part 6: Optional Trick to Help the Mushroom Stand Upright
The original pattern includes a clever optional finishing technique.
This can help make the mushroom slightly shorter and more stable.
Thread a length of red yarn through a tapestry needle.
Pass the needle from the top of the mushroom through to the bottom and back again.
Pull the yarn gently to draw the bottom upward slightly.
Secure the yarn.
This creates a subtle indentation and can help the mushroom stand more easily on a flat surface.
Avoid pulling too tightly, which could distort the shape.
Part 7: How to Crochet the White Mushroom Spots
The white spots create the classic red-and-white toadstool appearance.
The original pattern includes one large spot and two smaller spots.
These pieces are crocheted separately and sewn onto the cap.
Large White Spot
Using white yarn, create a magic ring.
Round 1
Work 6 single crochet stitches into the magic ring.
Stitch count: 6
Round 2
Work one increase into each stitch.
Stitch count: 12
Fasten off invisibly, leaving a long yarn tail.
The large spot is now ready to attach.
Small White Spots
Make two.
Using white yarn, create a magic ring.
Round 1
Work 8 single crochet stitches into the magic ring.
Stitch count: 8
Fasten off invisibly, leaving a long yarn tail.
Repeat to make the second small spot.
Part 8: Sew the Spots Onto the Mushroom Cap
Arrange the three white spots on the red cap.
Place the larger spot in a prominent position.
Position the two smaller spots around it, leaving some red fabric visible between them.
Use pins to check the arrangement before sewing.
Thread the yarn tail of each spot through your tapestry needle.
Sew around the outer edge, attaching the spot securely to the red cap.
Try to keep the stitches neat and avoid pulling too tightly.
Weave in the remaining yarn tails.
Your adorable red-and-white crochet mushroom is complete!
Complete Mushroom Crochet Pattern – Quick Reference
For crocheters who prefer a compact version, here is the stitch sequence.
White Stalk and Underside
| Round | Instructions | Stitch count |
|---|---|---|
| 1 | 8 SC in magic ring | 8 |
| 2 | INC × 8 | 16 |
| 3 | (SC, INC) × 8 | 24 |
| 4–7 | SC around | 24 |
| 8 | (4 SC, DEC) × 4 | 20 |
| 9 | (3 SC, DEC) × 4 | 16 |
| 10 | FLO (SC, INC) × 8 | 24 |
| 11 | (3 SC, INC) × 6 | 30 |
| 12 | (4 SC, INC) × 6 | 36 |
Fasten off.
Embroider the optional face on the stalk.
Red Mushroom Cap
| Round | Instructions | Stitch count |
|---|---|---|
| 1 | 6 SC in magic ring | 6 |
| 2 | INC × 6 | 12 |
| 3 | (SC, INC) × 6 | 18 |
| 4 | (2 SC, INC) × 6 | 24 |
| 5 | (3 SC, INC) × 6 | 30 |
| 6 | SC around | 30 |
| 7 | (4 SC, INC) × 6 | 36 |
| 8 | SC around | 36 |
| 9 | SC through cap stitches and stalk back loops | 36 |
Stuff the stalk and lightly stuff the cap before completing the join.
White Spots
Large spot:
- Round 1: 6 SC in magic ring (6)
- Round 2: INC × 6 (12)
Small spots – make two:
- Round 1: 8 SC in magic ring (8)
Fasten off each spot, leaving a tail for sewing.
Attach all three spots to the red cap.
How to Turn Your Mushroom Into a Keychain
The smallest cotton version is especially suitable for a cute crochet mushroom keychain.
The original pattern describes the mushroom as a keychain project, although it does not include separate written instructions for attaching keychain hardware.
To create your own keychain variation, you can add a small metal keyring or swivel clasp.
Use a strong yarn loop or suitable cord to connect the hardware to the top of the mushroom.
Secure the attachment carefully so it doesn’t pull loose during use.
For a bag charm, a small clasp can make it easier to attach the mushroom to a backpack or purse.
Helpful Tips for Crocheting a Beautiful Mushroom
Use a Stitch Marker
A stitch marker makes it easier to keep track of the beginning of each round.
Keep Your Stitch Counts Accurate
The stalk and cap both finish with 36 stitches along their joining edges.
Matching these counts is important for a neat assembly.
Don’t Overstuff the Cap
The original pattern recommends adding more stuffing to the stalk and only a little to the cap.
This helps maintain the mushroom’s natural shape.
Pay Attention to FLO and BLO
These loop-only techniques are important for the mushroom’s construction.
Take your time when working Round 10 of the stalk and Round 9 of the cap.
Embroider Before Final Assembly
Adding the face while the stalk is still accessible makes it easier to hide yarn ends.
Pin the Spots Before Sewing
Try different arrangements until you’re happy with the appearance.
Use Chenille for a Plush Look
Chenille yarn creates a softer texture and a larger finished mushroom.
Cotton yarn creates smaller, more defined stitches.
Creative Ways to Use Your Crochet Mushroom
This little mushroom can be used in so many adorable ways.
Mini Crochet Mushroom Keychain
Use the cotton version as a cute handmade accessory for keys or bags.
Cottagecore Shelf Decoration
Display several mushrooms in a small basket or alongside other handmade woodland decorations.
Crochet Mushroom Plushie
Use super bulky chenille yarn to create a soft decorative plush.
Woodland-Themed Gift Basket
Add a handmade mushroom to a gift basket with nature-inspired accessories.
Crochet Fairy Garden Display
Arrange miniature mushrooms with crocheted flowers, leaves, and other woodland-inspired decorations.
Handmade Crochet Garland
Make several cotton mushrooms and attach them to a decorative garland using securely sewn hanging loops.
These are creative uses for the finished design rather than additional instructions included in the original pattern.
Frequently Asked Questions
Is this mushroom crochet pattern beginner-friendly?
Yes. The original pattern describes it as easy and suitable for beginners.
What yarn is best for this crochet mushroom?
The source demonstrates sport-weight cotton and super bulky chenille yarn.
What crochet hook size should I use?
Use 2.5 mm for sport-weight cotton, 4 mm for the smaller chenille version, or 5 mm for the larger chenille version.
How big is the finished mushroom?
Approximately 2, 3, or 4 inches, depending on the yarn and hook size.
How many pieces are crocheted?
The design includes one stalk, one cap, one large white spot, and two small white spots.
Does the mushroom need stuffing?
Yes. The pattern uses synthetic polyester fiberfill.
How many stitches are in the final stalk round?
36 stitches.
How many stitches are in the final cap round?
36 stitches.
How are the cap and stalk joined?
They are joined using single crochet stitches worked through the cap and the back loops of the stalk.
Why does the pattern use front loops only?
The front-loop-only round helps shape the wider underside of the mushroom.
How many white spots are needed?
Three: one large and two small.
Can I leave the face off?
Yes. The original pattern specifically allows a plain mushroom without a face.
What facial expressions are included?
Two options: closed sleepy eyes or oval eyes.
Where should I embroider the closed eyes?
Over Round 6, leaving two stitches between them.
Where should I embroider the oval eyes?
Over Rounds 6 and 7, leaving three stitches between them.
Can I make a larger mushroom?
Yes. Use thicker yarn and an appropriately sized crochet hook.
Can I make a smaller mushroom?
Yes. Use thinner yarn and a smaller hook.
Can I turn the mushroom into a keychain?
Yes. The mini cotton version is particularly suitable, although the written pattern does not provide separate keychain hardware instructions.
Does the original pattern include a video tutorial?
Yes. The PDF includes a link to a full YouTube tutorial.
Free Mushroom Crochet Video Tutorial
If you’re new to amigurumi or prefer watching each step, the original pattern includes a complete video tutorial.
Watch the mushroom crochet tutorial:
The video can be especially helpful when learning how to work through the cap and stalk stitches during assembly.
Why This Crochet Mushroom Makes a Lovely Handmade Gift
A small handmade mushroom is a thoughtful gift because it feels personal, playful, and creative.
The miniature cotton version makes a charming accessory, while the larger chenille version becomes a soft decorative plushie.
You can also personalize the mushroom by choosing one of the two embroidered expressions.
A sleepy face creates a peaceful little woodland character.
Oval eyes make the mushroom look more cheerful and animated.
And if you prefer something simple, the classic red cap with white spots looks lovely without a face.
Because the design uses relatively little yarn, it’s also a practical way to use leftover materials from larger crochet projects.
Final Thoughts
This free mushroom crochet pattern is a wonderful project for anyone who enjoys cute amigurumi, cottagecore decorations, and quick handmade crafts.
The white stalk is made with basic single crochet stitches, increases, and decreases.
A front-loop-only round creates the wider underside, while the red cap is crocheted separately and joined using a simple single crochet round.
Three white spots complete the classic toadstool appearance.
For an extra adorable touch, you can embroider sleepy closed eyes or cheerful oval eyes onto the stalk.
Whether you choose the tiny cotton version or the larger chenille plushie, the same pattern produces a charming handmade mushroom.
Display it on a shelf, turn it into a keychain, add it to a woodland-themed collection, or give it as a thoughtful handmade gift.
Sometimes the smallest crochet projects bring the biggest smiles.
Happy crocheting!