Free Dragon Crochet Pattern
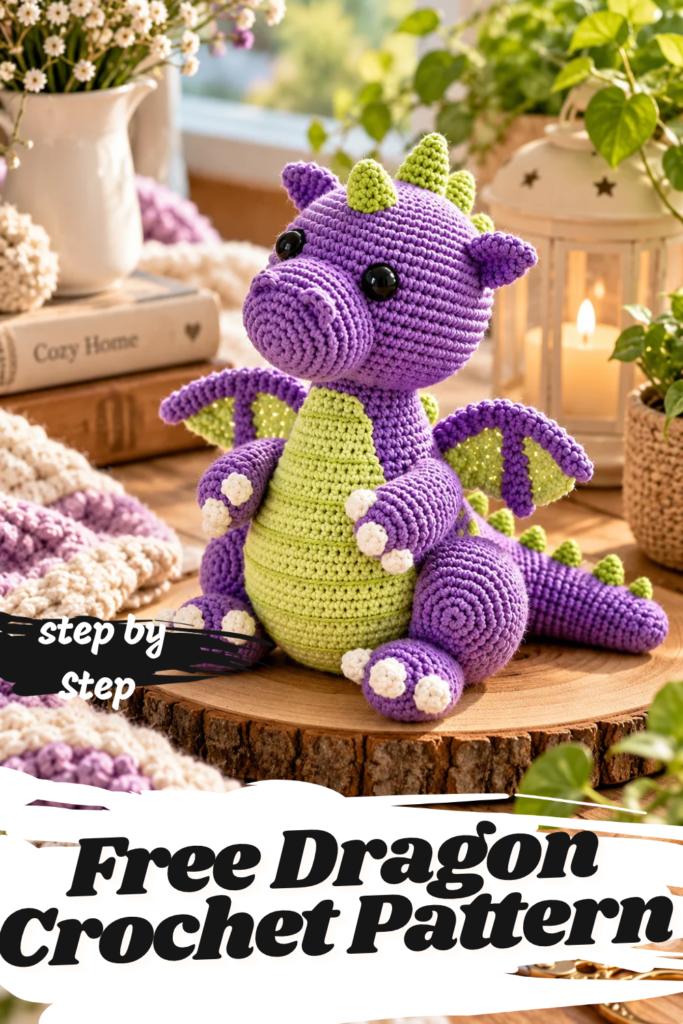
If you love adorable crochet animals, magical creatures, and handmade plushies full of personality, this free dragon crochet pattern is a wonderful project to try!
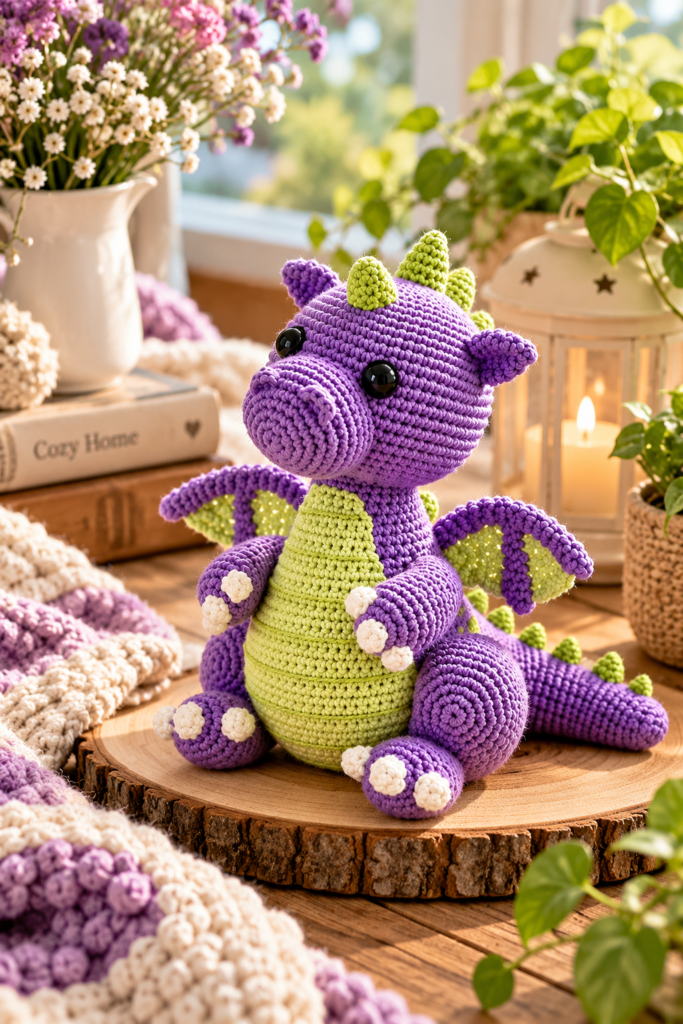
Meet Elio the Dragon, a charming purple amigurumi dragon with bright green spikes, tiny white claws, a long curved tail, and the sweetest little wings.
Unlike the fierce dragons found in fantasy stories, Elio has a friendly appearance that makes him perfect for a handmade gift, nursery decoration, or colorful addition to your crochet collection.
His rounded head, oversized snout, little ears, and soft stuffed body give him an irresistible personality. The contrasting green belly and decorative spikes make the finished dragon especially eye-catching.
This beginner-friendly pattern uses familiar amigurumi techniques, including single crochet stitches, increases, decreases, magic rings, and simple sewing.
Although Elio has quite a few individual pieces, each section is made using relatively straightforward stitches. That makes this an enjoyable project for crocheters who want to practice assembling a more detailed stuffed animal.
The original pattern was also featured in the book Amigurumi Fantasy 3, alongside other imaginative crochet creatures.
Using sport-weight cotton yarn and a 2.5 mm crochet hook, the finished dragon measures approximately 20 cm (8 inches) tall. You can also experiment with thicker yarn and larger hooks to create a bigger, softer plushie.
In this complete guide, you’ll find the materials, crochet abbreviations, detailed instructions for every part of Elio, assembly tips, and answers to frequently asked questions.
Meet Elio the Dragon
Elio isn’t an ordinary dragon.
According to the little story included with the original pattern, Elio lives in a mountainous region where he bravely protects a nearby town from the dangers of a dark forest.
The townspeople appreciate his courage and reward him with his favorite fruits: plums and grapes.
It’s a sweet story that perfectly matches his friendly, playful appearance.
The finished dragon features a large purple head, rounded snout, two little nostrils, pointed ears, and expressive eyes.
His purple body is decorated with a light green belly featuring eight embroidered horizontal stripes.
A long tail extends from the back, while green spikes run along his head, body, and tail.
His arms and legs are finished with tiny white claws, and two little wings complete the magical look.
Dragon Crochet Pattern at a Glance
| Project detail | Information |
|---|---|
| Pattern name | Elio the Dragon |
| Craft | Crochet amigurumi |
| Skill level | Beginner-friendly |
| Finished height | Approximately 20 cm / 8 inches |
| Main yarn | Sport-weight cotton |
| Main color | Purple |
| Accent colors | Green, light green, white |
| Crochet hook | 2.5 mm |
| Safety eyes | 12 mm |
| Main stitches | Single crochet, increases, decreases |
| Construction | Separate crocheted pieces sewn together |
| Stuffing | Synthetic polyester fiberfill |
| Special details | Wings, spikes, claws, striped belly |
Materials You’ll Need
The original pattern uses Yarn and Colors Must Have cotton yarn.
Yarn Colors and Quantities
| Color | Shade number | Amount |
|---|---|---|
| Purple | 053 | 140 g |
| Green | 083 | 30 g |
| White | 001 | 6 g |
| Light Green | 084 | 15 g |
You’ll also need:
- 2.5 mm crochet hook
- 12 mm safety eyes
- Synthetic polyester fiberfill
- Scissors
- Blunt-point tapestry needles, sizes 16 or 17
- Pins
A stitch marker is also helpful for keeping track of continuous rounds.
Can You Use Different Yarn?
Yes!
The original pattern suggests changing yarn thickness and hook size to make Elio larger or smaller.
It recommends an 8 mm hook for blanket yarn, 5 mm for super bulky chenille, and 3.5 mm for bulky velvet yarn.
These are suggested sizes; your exact hook choice will depend on the yarn and your crochet tension.
Safety note: Plastic safety eyes are not suitable for toys intended for babies or children under three because they can detach and become choking hazards. Use securely embroidered eyes instead for young children’s toys.
Crochet Abbreviations
The pattern uses basic amigurumi terminology.
| Abbreviation | Meaning |
|---|---|
| Rnd | Round |
| St | Stitch |
| SC | Single crochet |
| Sl st | Slip stitch |
| Inc | Increase |
| Dec | Decrease |
| Ch | Chain |
An increase means working two single crochet stitches into the same stitch.
A decrease means combining two neighboring stitches into one.
Most of Elio’s pieces begin with a magic ring and are crocheted in continuous rounds.
Part 1: Crochet Elio the Dragon’s Head
The head is worked in purple yarn.
It begins with a magic ring, gradually expands to 60 stitches, and then decreases to create a rounded shape.
Head Pattern
| Round | Instructions | Stitches |
|---|---|---|
| 1 | 6 SC in magic ring | 6 |
| 2 | INC × 6 | 12 |
| 3 | (SC, INC) × 6 | 18 |
| 4 | (2 SC, INC) × 6 | 24 |
| 5 | (3 SC, INC) × 6 | 30 |
| 6 | (4 SC, INC) × 6 | 36 |
| 7 | (5 SC, INC) × 6 | 42 |
| 8 | (6 SC, INC) × 6 | 48 |
| 9–10 | SC around | 48 |
| 11 | (7 SC, INC) × 6 | 54 |
| 12–13 | SC around | 54 |
| 14 | (8 SC, INC) × 6 | 60 |
| 15–22 | SC around | 60 |
| 23 | (8 SC, DEC) × 6 | 54 |
| 24 | SC around | 54 |
| 25 | (7 SC, DEC) × 6 | 48 |
| 26 | (6 SC, DEC) × 6 | 42 |
| 27 | (5 SC, DEC) × 6 | 36 |
| 28 | (4 SC, DEC) × 6 | 30 |
| 29 | (3 SC, DEC) × 6 | 24 |
| 30 | (2 SC, DEC) × 6 | 18 |
| 31 | (SC, DEC) × 6 | 12 |
| 32 | DEC × 6 | 6 |
Add the Eyes
Insert the safety eyes between Rounds 16 and 17, leaving nine stitches between them.
Check their positioning before securing them.
Stuff and Close the Head
Begin stuffing after Round 27 and continue as you decrease.
After Round 32, fasten off with a long yarn tail.
Thread the tail through the front loops of the remaining six stitches and pull tight.
Weave in the end.
Part 2: Crochet the Purple Dragon Body
The body begins with eight single crochet stitches in a magic ring.
It widens gradually before narrowing toward the neck.
Body Pattern
| Round | Instructions | Stitches |
|---|---|---|
| 1 | 8 SC in magic ring | 8 |
| 2 | INC × 8 | 16 |
| 3 | (SC, INC) × 8 | 24 |
| 4 | (2 SC, INC) × 8 | 32 |
| 5 | (3 SC, INC) × 8 | 40 |
| 6 | (4 SC, INC) × 8 | 48 |
| 7 | SC around | 48 |
| 8 | (5 SC, INC) × 8 | 56 |
| 9–11 | SC around | 56 |
| 12 | (6 SC, INC) × 8 | 64 |
| 13–19 | SC around | 64 |
| 20 | (14 SC, DEC) × 4 | 60 |
| 21 | SC around | 60 |
| 22 | (8 SC, DEC) × 6 | 54 |
| 23 | (7 SC, DEC) × 6 | 48 |
| 24 | SC around | 48 |
| 25 | (6 SC, DEC) × 6 | 42 |
| 26 | SC around | 42 |
| 27 | (5 SC, DEC) × 6 | 36 |
| 28–30 | SC around | 36 |
| 31 | (4 SC, DEC) × 6 | 30 |
| 32–37 | SC around | 30 |
Slip stitch into the next stitch and fasten off, leaving a long sewing tail.
Stuff the body with fiberfill.
Sew the body to the head between Rounds 28 and 29 of the head.
Add extra fiberfill around the neck before closing the seam to help support the large head.
Part 3: Crochet the Dragon’s Snout
Elio’s rounded snout is one of his most distinctive features.
Use purple yarn.
Snout Pattern
| Round | Instructions | Stitches |
|---|---|---|
| 1 | 6 SC in magic ring | 6 |
| 2 | INC × 6 | 12 |
| 3 | (SC, INC) × 6 | 18 |
| 4 | (2 SC, INC) × 6 | 24 |
| 5 | (3 SC, INC) × 6 | 30 |
| 6 | (4 SC, INC) × 6 | 36 |
| 7–9 | SC around | 36 |
| 10 | (4 SC, DEC) × 6 | 30 |
Slip stitch into the next stitch.
Fasten off with a long tail.
Stuff the snout with fiberfill.
Sew it onto the head between Rounds 16 and 27.
The top of the snout should touch the safety eyes.
Part 4: Crochet the Dragon’s Nostrils
Make two nostrils using purple yarn.
Unlike most of the other pieces, these are crocheted in rows.
Nostril Pattern
Row 1: Work 3 SC into a magic ring. Chain 1 and turn. (3)
Row 2: Increase in each of the three stitches. (6)
Fasten off, leaving a long sewing tail.
Gently bend each nostril to give it a curved shape.
Sew both nostrils onto Round 6 of the snout.
Try to position them evenly for a balanced expression.
Part 5: Crochet the Dragon’s Ears
Make two ears using purple yarn.
Ear Pattern
| Round | Instructions | Stitches |
|---|---|---|
| 1 | 4 SC in magic ring | 4 |
| 2 | (SC, INC) × 2 | 6 |
| 3 | (2 SC, INC) × 2 | 8 |
| 4 | (3 SC, INC) × 2 | 10 |
| 5 | (4 SC, INC) × 2 | 12 |
| 6 | SC around | 12 |
Slip stitch and fasten off, leaving a long tail.
Flatten the ears gently.
The original pattern does not require stuffing them.
Sew the ears between Rounds 10 and 16 of the head.
Part 6: Crochet the Light Green Dragon Belly
The belly is worked separately in light green yarn.
It begins as a narrow strip, gradually widens, and then narrows again.
Unlike the body, the belly is crocheted in rows.
Belly Pattern
Start by chaining 7.
| Row | Instructions | Stitches |
|---|---|---|
| 1 | SC in second chain from hook and next 5 chains | 6 |
| 2 | INC, 4 SC, INC | 8 |
| 3 | INC, 6 SC, INC | 10 |
| 4–5 | SC across | 10 |
| 6 | INC, 8 SC, INC | 12 |
| 7 | SC across | 12 |
| 8 | INC, 10 SC, INC | 14 |
| 9 | SC across | 14 |
| 10 | INC, 12 SC, INC | 16 |
| 11 | SC across | 16 |
| 12 | INC, 14 SC, INC | 18 |
| 13 | INC, 16 SC, INC | 20 |
| 14 | SC across | 20 |
| 15 | INC, 18 SC, INC | 22 |
| 16–18 | SC across | 22 |
| 19 | INC, 20 SC, INC | 24 |
| 20–25 | SC across | 24 |
| 26 | DEC, 20 SC, DEC | 22 |
| 27 | DEC, 18 SC, DEC | 20 |
| 28 | DEC, 16 SC, DEC | 18 |
| 29 | DEC, 14 SC, DEC | 16 |
| 30 | DEC, 12 SC, DEC | 14 |
| 31 | DEC, 10 SC, DEC | 12 |
| 32 | DEC, 8 SC, DEC | 10 |
| 33 | Skip first stitch, DEC, 4 SC, DEC, SL ST in next stitch | 7 |
Chain 1 and turn at the end of Rows 1–32, as directed in the original pattern.
Fasten off after Row 33, leaving a long sewing tail.
Attach and Decorate the Belly
Sew the belly onto the front of the dragon’s body between Rounds 3 and 36.
Using green yarn, embroider eight horizontal stripes across the belly.
Space them approximately four rows apart.
These little stripes create the classic segmented dragon-belly appearance.
Part 7: Crochet Elio’s Long Purple Tail
The tail is made in purple yarn.
It begins with a narrow tip and gradually widens toward the base.
Tail Pattern
| Round | Instructions | Stitches |
|---|---|---|
| 1 | 6 SC in magic ring | 6 |
| 2 | INC × 6 | 12 |
| 3–4 | SC around | 12 |
| 5 | (3 SC, INC) × 3 | 15 |
| 6–8 | SC around | 15 |
| 9 | (4 SC, INC) × 3 | 18 |
| 10–13 | SC around | 18 |
| 14 | (5 SC, INC) × 3 | 21 |
| 15–20 | SC around | 21 |
| 21 | (6 SC, INC) × 3 | 24 |
| 22–26 | SC around | 24 |
| 27 | (7 SC, INC) × 3 | 27 |
| 28–32 | SC around | 27 |
| 33 | (8 SC, INC) × 3 | 30 |
| 34–35 | SC around | 30 |
| 36 | (4 SC, INC) × 6 | 36 |
| 37–38 | SC around | 36 |
| 39 | (5 SC, INC) × 6 | 42 |
| 40 | SC around | 42 |
| 41 | (6 SC, INC) × 6 | 48 |
| 42 | SC around | 48 |
Slip stitch into the next stitch.
Fasten off, leaving a long tail.
Stuff the tail with polyester fiberfill.
Sew it to the back of the body between Rounds 5 and 23.
Part 8: Crochet the Dragon’s Haunches
Make two haunches using purple yarn.
These rounded pieces create Elio’s upper legs.
Haunch Pattern
| Round | Instructions | Stitches |
|---|---|---|
| 1 | 6 SC in magic ring | 6 |
| 2 | INC × 6 | 12 |
| 3 | (SC, INC) × 6 | 18 |
| 4 | (2 SC, INC) × 6 | 24 |
| 5 | (3 SC, INC) × 6 | 30 |
| 6 | (4 SC, INC) × 6 | 36 |
| 7–12 | SC around | 36 |
| 13 | (4 SC, DEC) × 6 | 30 |
| 14 | (3 SC, DEC) × 6 | 24 |
| 15 | SC around | 24 |
| 16 | (2 SC, DEC) × 6 | 18 |
| 17 | SC around | 18 |
| 18 | (SC, DEC) × 6 | 12 |
| 19 | DEC × 6 | 6 |
Begin stuffing lightly before Round 13 and continue as needed.
Do not overstuff.
After Round 19, close the opening through the front loops.
Flatten each haunch slightly.
Sew the haunches onto both sides of the body between Rounds 9 and 21.
Part 9: Crochet the Dragon’s Legs
Make two legs using purple yarn.
Leg Pattern
| Round | Instructions | Stitches |
|---|---|---|
| 1 | 6 SC in magic ring | 6 |
| 2 | INC × 6 | 12 |
| 3 | (SC, INC) × 6 | 18 |
| 4 | (2 SC, INC) × 6 | 24 |
| 5–8 | SC around | 24 |
| 9 | (2 SC, DEC) × 6 | 18 |
| 10 | (SC, DEC) × 6 | 12 |
| 11–13 | SC around | 12 |
| 14 | DEC × 6 | 6 |
Stuff the legs lightly before decreasing.
Fasten off with a long tail.
Close the final opening and leave the remaining yarn for sewing.
Part 10: Crochet the White Toenails
Make six toenails using white yarn.
Each toenail is made as follows:
Round 1: Work 4 SC into a magic ring. (4)
Round 2: Repeat (1 SC, INC) twice. (6)
Slip stitch and fasten off, leaving a sewing tail.
Attach the Toenails
Sew one toenail over Round 1 of each leg.
Position the other two toenails on either side of the first, over Rounds 4 and 5.
Repeat for the second leg.
Finally, sew the legs onto the haunches.
Part 11: Crochet Elio’s Arms
Make two arms using purple yarn.
Arm Pattern
| Round | Instructions | Stitches |
|---|---|---|
| 1 | 6 SC in magic ring | 6 |
| 2 | INC × 6 | 12 |
| 3 | (SC, INC) × 6 | 18 |
| 4–6 | SC around | 18 |
| 7 | (SC, DEC) × 6 | 12 |
| 8–13 | SC around | 12 |
| 14 | DEC × 6 | 6 |
Add fiberfill as you crochet.
After Round 14, close the opening through the front loops.
Leave a long sewing tail.
Part 12: Crochet the White Claws
Make six small claws using white yarn.
Round 1: Work 5 SC into a magic ring. (5)
Slip stitch and fasten off.
Leave a long tail for sewing.
Attach the Claws
Sew one claw over Round 1 of each arm.
Position the other two claws on either side of the first, over Rounds 3 and 4.
Repeat for the second arm.
Sew the arms to the body between Rounds 26 and 29.
Use a few additional stitches to secure the inner sides of the arms to the body and belly.
Part 13: Crochet the Dragon’s Green Spikes
The green spikes are one of the most recognizable details of this dragon.
The pattern includes three different spike sizes.
You’ll make seven large spikes, two medium spikes, and two small spikes.
Large Spikes – Make 7
Using green yarn:
| Round | Instructions | Stitches |
|---|---|---|
| 1 | 4 SC in magic ring | 4 |
| 2 | (SC, INC) × 2 | 6 |
| 3 | (2 SC, INC) × 2 | 8 |
| 4 | (3 SC, INC) × 2 | 10 |
| 5 | SC around | 10 |
Fasten off with a long tail.
Stuff each spike lightly.
Large Spike Placement
The original pattern specifies:
- One spike over Head Rounds 1–2
- Two spikes over Head Rounds 6–11, one toward the front and one toward the back
- One spike over Head Rounds 14–19, at the back
- One spike over Head Rounds 22–27, at the back
- One spike over Body Rounds 26–32
- One spike over Tail Rounds 38–42
Medium Spikes – Make 2
Using green yarn:
| Round | Instructions | Stitches |
|---|---|---|
| 1 | 4 SC in magic ring | 4 |
| 2 | (SC, INC) × 2 | 6 |
| 3 | (2 SC, INC) × 2 | 8 |
| 4 | SC around | 8 |
Fasten off with a long tail.
Stuff lightly.
Sew one medium spike over Tail Rounds 20–25.
Sew the second over Tail Rounds 28–32.
Small Spikes – Make 2
Using green yarn:
| Round | Instructions | Stitches |
|---|---|---|
| 1 | 4 SC in magic ring | 4 |
| 2 | (SC, INC) × 2 | 6 |
| 3 | SC around | 6 |
Fasten off with a long tail.
Stuff lightly.
Sew one small spike over Tail Rounds 4–9.
Sew the second over Tail Rounds 13–18.
Together, the eleven green spikes create a beautiful decorative line along Elio’s head, back, and tail.
Part 14: Crochet the Dragon Wings
Elio’s wings are made from purple branches and green triangular web sections.
Each wing contains one long branch, one short branch, and one green web.
Make two complete wings.
Long Wing Branch – Make 2
Using purple yarn:
Round 1: 4 SC in magic ring. (4)
Round 2: (SC, INC) × 2. (6)
Rounds 3–20: SC in all 6 stitches. (6)
Stuff lightly.
Fasten off with a long sewing tail.
Short Wing Branch – Make 2
Using purple yarn:
Round 1: 4 SC in magic ring. (4)
Round 2: (SC, INC) × 2. (6)
Rounds 3–8: SC in all 6 stitches. (6)
Stuff lightly.
Fasten off with a long sewing tail.
Sew each short branch to Round 11 of its corresponding long branch.
Part 15: Crochet the Green Wing Webs
Make two triangular wing webs using green yarn.
Begin by chaining 2.
Wing Web Pattern
| Row | Instructions | Stitches |
|---|---|---|
| 1 | INC in second chain from hook | 2 |
| 2 | INC, 1 SC | 3 |
| 3 | SC across | 3 |
| 4 | INC, 1 SC, INC | 5 |
| 5–6 | SC across | 5 |
| 7 | INC, 3 SC, INC | 7 |
Chain 1 and turn after Rows 1–6.
Fasten off after Row 7, leaving a long tail.
Assemble the Wings
Sew each green triangular web between its purple wing branches.
Make sure the web is positioned neatly between the long and short sections.
Repeat for the second wing.
Attach both wings to the back of the dragon’s body between Rounds 28 and 35.
Leave approximately six stitches between the wings.
Final Assembly Checklist
Before finishing, check that all of Elio’s pieces are securely attached.
- Head sewn firmly to the body
- Snout centered beneath the eyes
- Nostrils attached to the snout
- Ears positioned evenly
- Light green belly sewn to the front
- Eight green belly stripes embroidered
- Tail attached to the back
- Two haunches and two legs secured
- Six white toenails attached
- Two arms and six white claws attached
- Seven large, two medium, and two small spikes sewn in place
- Two wings attached to the back
Weave in any remaining yarn ends.
Gently adjust the stuffing and shape of each piece if needed.
Your handmade Elio the Dragon is complete!
Helpful Tips for Making Your Crochet Dragon Look Beautiful
Keep Track of Your Rounds
A stitch marker is especially useful for the head, body, tail, and other pieces worked in continuous rounds.
Count After Every Increase or Decrease Round
Accurate stitch counts help maintain the intended shapes.
Stuff Gradually
Add small amounts of polyester fiberfill as you work.
The head and body should be firm enough to hold their shapes, while the wings and spikes need only light stuffing.
Pin Pieces Before Sewing
Use pins to test the placement of the ears, snout, limbs, spikes, and wings.
This helps you achieve a balanced appearance.
Support the Neck
The original pattern specifically recommends adding extra fiberfill around the neck before closing the head-to-body seam.
This is especially important because Elio has a relatively large head.
Take Your Time With the Wings
The wings contain multiple pieces, but each individual section uses simple stitches.
Assemble both wings before sewing them to the body.
Creative Ways to Customize Elio the Dragon
Although the original pattern uses purple and green, you can experiment with other color combinations.
A pastel pink dragon with mint green spikes would look adorable in a nursery.
A blue dragon with turquoise wings could create a magical ocean-inspired character.
For a more traditional fantasy look, try forest green with cream accents.
You could also use plush chenille yarn for a larger, softer dragon.
These are optional creative adaptations rather than changes included in the original written pattern.
Frequently Asked Questions
Is this dragon crochet pattern beginner-friendly?
Yes. The original pattern describes Elio as easy and suitable for beginners, although assembling the many individual pieces requires patience.
How tall is the finished dragon?
Approximately 20 cm (8 inches) using sport-weight cotton and a 2.5 mm hook.
What yarn is recommended?
Yarn and Colors Must Have sport-weight cotton.
How much purple yarn is needed?
The original pattern specifies 140 grams.
How much green yarn is needed?
30 grams of green plus 15 grams of light green.
What size crochet hook should I use?
A 2.5 mm hook for the original cotton version.
What size safety eyes are used?
12 mm safety eyes.
Where should I position the eyes?
Between Head Rounds 16 and 17, with nine stitches between them.
How many rounds are in the head?
32 rounds.
How many rounds are in the body?
37 rounds.
How many rounds are in the tail?
42 rounds.
How many belly stripes are embroidered?
Eight horizontal stripes.
How many green spikes are needed?
Eleven in total: seven large, two medium, and two small.
How many wings does Elio have?
Two.
Are the wings stuffed?
The purple wing branches are lightly stuffed. The flat green wing webs are not stuffed.
Can I make a larger dragon?
Yes. Use thicker yarn and an appropriately sized crochet hook.
Can I use chenille yarn?
Yes. The original pattern recommends a 5 mm hook for super bulky chenille yarn.
Is Elio suitable as a baby toy?
Not with plastic safety eyes. For a toy intended for a baby or young child, use embroidered eyes and make sure every piece is securely attached.
Why Elio the Dragon Makes a Wonderful Handmade Gift
A handmade crochet dragon is a thoughtful gift because every part is created with care.
Elio’s rounded face, colorful belly, long tail, tiny claws, and decorative wings give him a playful appearance that makes him especially appealing to fantasy lovers.
The project also offers plenty of opportunities for personalization.
You can change the yarn colors, make a larger plush version, or create several dragons with different personalities.
Whether displayed on a bookshelf, included in a handmade gift basket, or added to an amigurumi collection, Elio brings a cheerful touch of fantasy to any space.
Final Thoughts
This free dragon crochet pattern is a wonderful project for crocheters who enjoy imaginative characters and detailed handmade plushies.
Elio the Dragon combines simple amigurumi techniques with charming decorative features.
His purple body and oversized head create a soft, rounded silhouette, while the green belly and eleven spikes add colorful contrast.
The long tail, tiny white claws, and carefully constructed wings make the finished dragon feel full of personality.
Although the pattern includes many separate pieces, the individual sections use approachable crochet stitches, making the project a rewarding next step for beginners.
Whether you choose the original sport-weight cotton version or experiment with thicker plush yarn, Elio is a delightful handmade creature that can become a treasured gift or a favorite addition to your crochet collection.
Happy crocheting!