Crochet Maple Leaf Banner Pattern

There is something about maple leaves that instantly makes a home feel ready for fall.
As soon as the weather starts cooling down and the trees begin changing color, I find myself wanting to bring those warm, natural autumn details indoors. Pumpkins are always beautiful, of course, but handmade leaves have a charm of their own—especially when they are crocheted with all those little points and ridges that make a maple leaf so recognizable.
This Crochet Maple Leaf Banner is a gorgeous way to do exactly that.
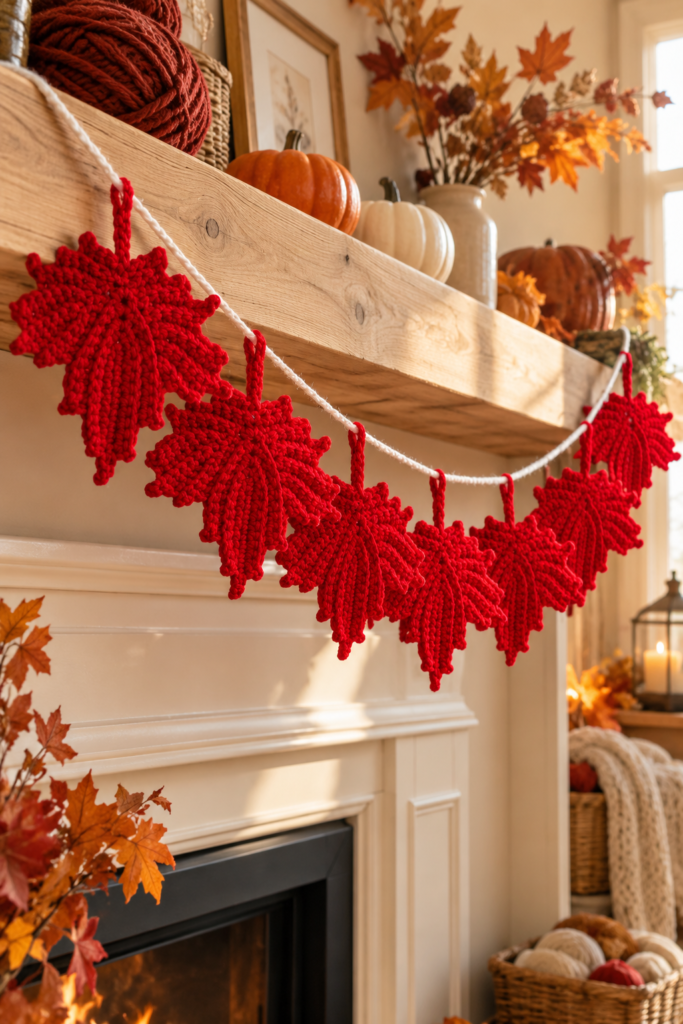
The original design features seven large crocheted maple leaves strung across a simple contrasting chain to create a decorative garland. Each leaf measures approximately 7 inches high by 6½ inches wide, so these aren’t tiny appliqués. They are substantial statement leaves that show off their shape beautifully when hanging from a mantel, shelf, doorway, or wall.
The completed banner measures approximately 70 inches (178 cm) long. RHC0518-019465M
The photographed version uses rich Cherry Red leaves and a Soft White hanging chain. Against the dark fireplace mantel shown on pages 1 and 2, that combination looks bold, cozy, and wonderfully seasonal.
And the leaves aren’t limited to garlands.
The original pattern specifically suggests crocheting them in autumn colors for fall decorating or even using individual leaves as coasters. RHC0518-019465M
The project was designed by Susan Badgley and is rated intermediate. The leaf construction is more involved than a simple flat appliqué, but that’s also what gives it such a beautifully defined shape.
If you’re looking for a handmade fall decoration that you can bring out year after year, this is a lovely project to add to your crochet list.
About the Crochet Maple Leaf Banner
The construction of this maple leaf is fascinating because it isn’t simply crocheted around a basic circle.
Each leaf is built in sections.
You begin with the Leaf Center, creating the long central structure and pointed upper section.
Next comes the:
Left Half
followed by the:
Right Half
Finally, you crochet across the lower portion to create the:
Bottom and Stem
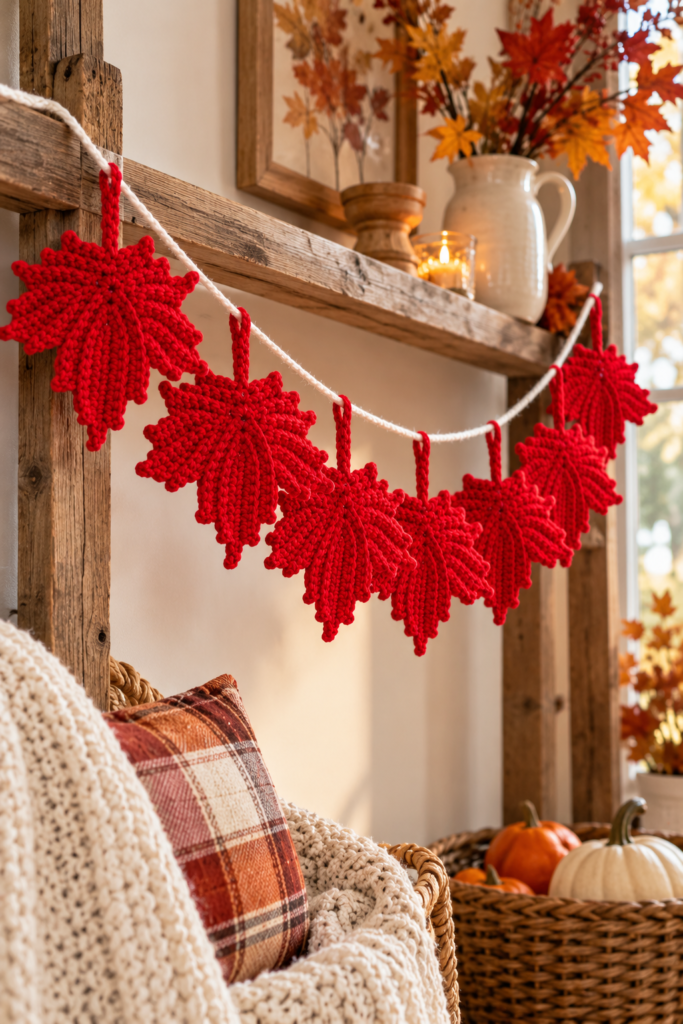
The little loop incorporated into each stem serves an important purpose later—it allows the white banner chain to pass through the leaf.
After seven leaves are complete, you crochet a long chain with the larger hook, thread it through the stem loops, and sew the leaves into their final positions.
The close-up photograph on page 2 is particularly helpful because it clearly shows how the stem loops sit around the white chain and how the deeply textured rows create the maple leaf’s distinctive lobes.
Pattern at a Glance
Project: Crochet maple leaf garland
Designer: Susan Badgley
Skill Level: Intermediate
Number of Leaves: 7
Banner Length: Approximately 70″ / 178 cm
Leaf Size: Approximately 7″ / 18 cm high × 6½” / 16.5 cm wide
Main Leaf Hook: 5 mm / U.S. H-8
Banner Hook: 6 mm / U.S. J-10
Main Technique: Single crochet
Special Technique: Back-loop-only crochet
Suggested Uses: Fall garland, mantel decoration or individual coasters
Why I Love This Maple Leaf Crochet Pattern
The texture is what really makes these leaves stand out.
The pattern uses almost entirely single crochet, but those stitches are generally worked through the back loop only.
That creates visible ridges across the surface.
Looking at the finished leaves in the photographs, those ridges radiate outward from the center almost like the veins of a real maple leaf.
The shaping is also surprisingly dimensional.
Instead of producing a smooth oval with a few decorative points, the pattern uses short sections, chain-3 extensions, slip stitches, and changes in direction to create the familiar pointed maple-leaf silhouette.
It is a perfect example of how basic crochet stitches can become something much more elaborate when they are arranged creatively.
Materials You’ll Need
The original Maple Leaf Banner uses RED HEART Super Saver yarn.
You will need:
Color A – 319 Cherry Red: 1 skein
Color B – 316 Soft White: 1 skein
You will also need:
- 5 mm / U.S. H-8 crochet hook
- 6 mm / U.S. J-10 crochet hook
- Yarn needle
- Scissors
- Optional blocking supplies
The smaller hook is used for the leaves, while the larger 6 mm hook is used for the long banner chain. RHC0518-019465M
Crochet Gauge
Using the 5 mm / U.S. H-8 hook and working in back loops only:
16 sc = 4″ / 10 cm
and
17 rows sc = 4″ / 10 cm
The pattern recommends changing your hook size if necessary to achieve the correct gauge. RHC0518-019465M
Gauge will affect the finished size of your leaves, so it is worth checking if you want to reproduce the original 7 × 6½-inch dimensions.
Crochet Abbreviations
This pattern uses relatively few abbreviations:
A – Color A
B – Color B
Blo – Back loop only
Ch – Chain
Sc – Single crochet
St/Sts – Stitch/Stitches
Slip st – Slip stitch
Cm – Centimeters
Mm – Millimeters
Important Pattern Note
There is one instruction you need to remember throughout the project:
All single crochet stitches are worked in the back loop only unless the pattern specifically tells you otherwise.
The source also says:
Do not fasten off unless instructed.
These two notes are essential because the leaf is constructed continuously across several differently shaped sections. RHC0518-019465M
How to Crochet the Maple Leaf
You need to make:
7 maple leaves
using Color A – Cherry Red.
Use the:
5 mm / U.S. H-8 hook.
Crochet the Leaf Center
Begin by chaining:
13
Leaf Center Row 1
Turn the foundation chain over.
Rather than working into the usual top loops, insert your hook into the back bar of each chain.
Beginning in the second chain from your hook:
Work 1 sc in that chain and in the next 11 chains.
Chain:
2
Do not turn.
Now work back along the opposite side of the foundation chain.
Insert your hook under the top two loops of the chains.
Work:
1 sc in the next 10 chains
Chain 1.
Turn.
At the end of this row you should have:
12 sc, one ch-2 space, and 10 sc
This unusual construction creates the central axis of the maple leaf.
Leaf Center Row 2
Work:
Sc in next 10 sc
Then in the chain-2 space work:
(sc, ch 2, sc)
Continue:
Sc in next 10 sc
Chain 1.
Turn.
You should have:
11 sc, one ch-2 space, 11 sc
Leaf Center Row 3
Sc in the next:
11 sc
Into the chain-2 space work:
(sc, ch 2, sc)
Then:
Sc in next 8 sc
Chain 1.
Turn.
You should have:
12 sc, one ch-2 space, 9 sc
Leaf Center Row 4
Sc in the next:
9 sc
In the chain-2 space work:
(sc, ch 3, sc)
Then:
Sc in next 9 sc
Chain 1.
Turn.
You now have:
10 sc, one ch-3 space, and 10 sc
This completes the main center section and prepares you to build the pointed side lobes. RHC0518-019465M
Crochet the Left Half of the Maple Leaf
Now you will work directly into Row 4 of the Leaf Center.
Left Half Row 1
Sc in the next:
5 sc
Slip stitch into the next sc.
Chain 1.
Turn.
You should have:
5 sc and 1 slip stitch
Row 2
Sc in the back loop only of the slip stitch.
Sc in the next:
2 sc
Chain:
3
Turn.
You should have:
3 sc and a ch-3
Row 3
Skip the first chain.
Sc into the top loop only of the next two chains.
Sc in the next:
3 sc
Slip stitch into the next stitch of Leaf Center Row 4.
Chain 1.
Turn.
Row 4
Sc in the back loop of the slip stitch.
Sc in the next:
5 sc
Chain 3.
Turn.
Row 5
Skip the first chain.
Sc in the top loop only of the next:
2 chains
Then:
Sc in next 6 sc
Slip stitch into the next sc of Leaf Center Row 4.
Chain 1.
Turn.
You should have:
8 sc and 1 slip stitch
Continue Shaping the Left Leaf Lobes
Row 6
Sc in the back loop of the slip stitch.
Sc in the next:
6 sc
Chain 1.
Turn.
You should have:
7 sc
Row 7
Sc in the next:
7 sc
Slip stitch into the next sc of Leaf Center Row 4.
Chain 1.
Turn.
Row 8
Sc in the back loop of the slip stitch.
Sc in the next:
4 sc
Chain:
3
Turn.
Row 9
Skip the first chain.
Sc into the top loop only of the next two chains.
Sc in the next:
5 sc
Slip stitch into the next sc of Leaf Center Row 4.
Chain 1.
Turn.
Row 10
Sc in the back loop of the slip stitch.
Sc in the next:
4 sc
Chain 1.
Turn.
You should have:
5 sc
Row 11
Sc in the next:
5 sc
Then work:
2 sc into the ch-3 space of Leaf Center Row 4
Do not turn.
You should have:
7 sc
The sequence of shorter and longer rows is what creates the characteristic jagged points on the left side of the maple leaf. RHC0518-019465M RHC0518-019465M
Crochet the Right Half of the Maple Leaf
Now work upward along the right side of Leaf Center Row 4.
The right half uses a similar technique but begins with a longer foundation section.
Right Half Row 1
Sc in the next:
7 sc
Chain:
3
Turn.
You should have:
7 sc and a ch-3
Row 2
Skip the first chain.
Sc in the top loop only of the next:
2 chains
Sc in the next:
3 sc
Slip stitch into the next sc of Right Half Row 1.
Chain 1.
Turn.
Row 3
Sc in the back loop of the slip stitch.
Sc in the next:
5 sc
Chain 3.
Turn.
Row 4
Skip the first chain.
Sc in the top loop only of the next:
2 chains
Sc in the next:
6 sc
Slip stitch into the next sc of Right Half Row 1.
Chain 1.
Turn.
You should have:
8 sc and 1 slip stitch
Right Half Row 5
Sc in the back loop of the slip stitch.
Sc in the next:
6 sc
Chain 1.
Turn.
Row 6
Sc in the next:
7 sc
Slip stitch into the next sc of Right Half Row 1.
Chain 1.
Turn.
Row 7
Sc in the back loop of the slip stitch.
Sc in the next:
4 sc
Chain 3.
Turn.
Row 8
Skip the first chain.
Sc in the top loop only of the next:
2 chains
Sc in the next:
5 sc
Slip stitch into the next sc of Right Half Row 1.
Chain 1.
Turn.
Row 9
Sc in the back loop of the slip stitch.
Sc in the next:
4 sc
Chain 1.
Turn.
You should have:
5 sc
The right-side instructions in the PDF continue the same ridged, pointed construction used on the opposite half. RHC0518-019465M
Crochet the Bottom and Stem
Once the upper and side lobes are complete, you will work across both sides of the leaf to shape its bottom and create the hanging stem.
Bottom and Stem Row 1
Work:
Sc in next 5 sc
Slip stitch in the back loop only of the next:
2 sc from Left Half Row 11
Then:
Sc in next 3 sc
Chain 1.
Turn.
Row 2
Sc in the next:
3 sc
Slip stitch in the back loop only of the next:
2 slip stitches
Sc in the next:
3 sc
Chain 1.
Turn.
Row 3
Sc in the next:
3 sc
Slip stitch in the back loop of the next slip stitch.
Now:
Chain 10
Skip:
5 chains
Slip stitch into the back bar of the next:
5 chains
Then slip stitch into the next slip stitch.
Fasten off.
Weave in the yarn ends.
This final chain creates the stem and, importantly, the loop used to hang the leaf from the banner chain. RHC0518-019465M
Make All Seven Maple Leaves
Repeat the entire leaf pattern until you have:
7 finished maple leaves.
This is a good project for assembly-line crocheting.
You might make all seven center sections first, then complete each leaf one at a time.
Alternatively, finish one complete leaf before beginning the next if you find the shaping instructions easier to remember that way.
How to Crochet the Banner Chain
Once all seven leaves are complete, switch to:
Color B – Soft White
and your larger:
6 mm / U.S. J-10 hook
Chain:
225
That’s all you need for the banner cord.
Fasten off.
Weave in the ends. RHC0518-019465M
The finished banner measures approximately 70 inches, giving you enough length to drape it naturally rather than stretching it tightly across a space.
How to Assemble the Maple Leaf Garland
Before attaching the leaves, block them if desired.
Blocking can be particularly helpful for this pattern because the many short rows and pointed lobes may curl slightly after crocheting.
Once you’re happy with their shapes, take the white banner chain.
Thread it:
through the loops of the maple leaf stems.
Arrange the seven leaves across the chain.
Then sew the leaves to the chain so they remain in position.
The source tells you to use the photograph as a guide for placement. RHC0518-019465M
How to Space the Leaves
The pattern does not provide an exact number of chain stitches between each leaf.
Instead, the photograph is the placement guide.
On page 1, the leaves are distributed across the white chain with visible spaces between them. The chain also extends beyond the outer leaves, giving you room to hang or tie the banner.
Page 2 provides a closer view of the stem loops and shows how the chain passes naturally through them.
Rather than obsessing over mathematically perfect spacing, lay the entire 225-chain cord on a table and arrange all seven leaves before sewing any of them down.
This allows you to adjust the overall composition visually.
Why Back-Loop Crochet Works So Well Here
The instruction to work single crochet through the back loops isn’t simply decorative.
It creates strong horizontal ridges.
On a flat rectangular project, those ridges would look like ordinary crochet texture.
But because the rows of this maple leaf travel in different directions, the ridges start to resemble natural leaf veins.
That’s one reason the finished design looks so detailed despite using primarily single crochet.
Autumn Color Ideas
The source uses Cherry Red because of the maple leaf’s association with Canada.
But it also specifically suggests using autumn colors for a fall accent.
You could make seven leaves in one warm shade, or create a mixed autumn garland using colors inspired by changing foliage.
Think about combinations such as deep red, burnt orange, mustard, rust, burgundy, warm brown, and golden yellow.
A cream or neutral banner chain can help bring several different leaf colors together.
Decorating with Your Crochet Maple Leaf Banner
The original photographs show the garland draped across a dark fireplace mantel.
That placement works beautifully because the white chain contrasts against the dark background while the red leaves become the focal point.
But a mantel isn’t your only option.
You could hang the banner across a bookshelf, entryway console, window, dining-room hutch, or blank wall.
It could also make a lovely handmade decoration for an autumn party or Thanksgiving gathering.
Use Individual Maple Leaves as Coasters
One detail I particularly like is that the pattern isn’t limited to banner-making.
The source specifically suggests using the maple leaves as coasters. RHC0518-019465M
At approximately 6½ inches wide, each leaf is large enough to work as a decorative surface protector.
Instead of making seven leaves plus a banner chain, you could crochet a set of four or six in different fall colors and use them on an autumn table.
Tips for Beautiful Crochet Maple Leaves
Remember the Back Loops
Unless specifically instructed otherwise, every single crochet goes through the back loop only.
This is essential to achieving the intended texture.
Don’t Fasten Off Too Early
The pattern tells you not to fasten off unless instructed.
The different leaf sections are connected through carefully placed stitches and slip stitches.
Pay Attention to Top-Loop Instructions
Several rows tell you to work into the top loop only of chain stitches.
Don’t automatically treat these like ordinary chains.
Block the Points
Blocking can dramatically improve the finished silhouette.
Pay particular attention to the outer lobes and central tip.
Make One Leaf Before Starting All Seven
If this is your first time using this style of construction, complete one entire maple leaf first.
Once you understand how the center, halves, bottom, and stem connect, the remaining six should feel much easier.
Frequently Asked Questions
Is the Crochet Maple Leaf Banner beginner-friendly?
The source rates it:
Intermediate.
The project uses mostly simple stitches, but the unusual leaf shaping, back-loop construction, short rows, slip-stitch attachments, and changes in working direction require careful pattern reading.
Who designed the Maple Leaf Banner?
The pattern was designed by:
Susan Badgley.
How many maple leaves do I need?
The original banner uses:
7 leaves.
How large is each maple leaf?
Approximately:
7″ / 18 cm high
by
6½” / 16.5 cm wide.
How long is the completed banner?
Approximately:
70″ / 178 cm.
What yarn does the pattern use?
The source uses:
RED HEART Super Saver
in Cherry Red and Soft White.
What hook do I use for the leaves?
Use:
5 mm / U.S. H-8.
What hook do I use for the banner chain?
Use:
6 mm / U.S. J-10.
What does BLO mean?
BLO means:
Back loop only.
Do I work every single crochet in the back loop?
Yes, unless the pattern specifically states otherwise.
How many chains make the banner?
Chain:
225
using Color B and the 6 mm hook.
How is each leaf attached?
The banner chain is threaded through the loop formed at the leaf stem.
The leaves are then sewn to the chain to secure their positions.
Do I need to block the leaves?
The pattern says blocking is optional:
“Block Leaves if desired.”
However, blocking can help define the pointed maple-leaf shape.
Can I make the leaves in colors other than red?
Yes.
The source itself suggests using autumn colors for a fall accent.
Can I use the leaves without making a garland?
Yes.
The original pattern suggests using them as coasters as another option.
Final Thoughts
This is one of those crochet projects that looks much more intricate than its basic stitch list would suggest.
You aren’t working with dozens of complicated specialty stitches.
Most of the leaf is simply single crochet.
But the magic happens in where those stitches are placed.
You work through back loops to create ridges.
You add short chain sections to form sharp points.
You attach rows with slip stitches to change direction.
Little by little, a simple chain of 13 becomes the center vein of a maple leaf. One side grows outward, then the other. The lower edges come together, and a final chain becomes the stem.
Make that leaf seven times, crochet one long white chain, and suddenly you have a full handmade autumn garland.
The red-and-white version shown in the original pattern is striking, especially across the dark fireplace mantel photographed on pages 1 and 2. But I also love the possibilities of making every leaf a different fall color and watching the garland gradually shift from golden yellow to orange, rust, burgundy, and deep red.
And if you don’t need another garland, skip the banner entirely and turn those oversized leaves into autumn coasters.
Either way, this is a wonderful example of how basic crochet stitches can be shaped into something wonderfully detailed and seasonal.
Make your first leaf slowly, pay attention to those back loops, and let the remaining six become easier as the construction starts to make sense.
By the time you thread that final leaf onto the banner chain, you’ll have a cozy handmade decoration ready for fall.
Happy crocheting!