Crochet Kitten Amigurumi

There’s a specific kind of amigurumi that goes viral the moment it’s posted — round, soft, impossibly cute, and holding something small and sweet. The Crochet Kitten Amigurumi, designed by marizzatoys, is exactly that kind of pattern: a plump, rounded white kitten with closed, smiling eyes, blushing pink cheeks, and a big pink crocheted heart clutched between her paws.
As the pattern’s introduction notes, this is “a pattern for beginners to make very easily thanks to detailed step by step crochet pattern instructions,” and it delivers on that promise — every piece (body, legs, arms, ears, tail, and heart) is built from simple, well-labeled rounds that don’t require any unusual techniques. It’s a lovely project whether you’re making “a handmade gift to your loved ones or a nice playmate for children,” and at a finished height of just 10 to 12 cm, it comes together relatively quickly for a project with this many separate parts.
Below is the complete pattern, reorganized with clear headings for every component, along with the full materials list, abbreviations, and a set of tips and frequently asked questions to guide you through the finishing touches.
About This Pattern

Designer: marizzatoys
Materials
- Yarn (Sport / 5 ply weight):
- Kitten color: white — Alize Cotton Gold, No. 55
- Heart color: pink — Alize Cotton Gold, No. 98
- Black and rose embroidery thread, for the face
- Crochet hook: 2.00mm
- Polyester fiberfill stuffing
- Finished size: approximately 10–12 cm tall
Abbreviations
| Abbreviation | Meaning |
|---|---|
| MR | Magic ring |
| st | Stitch |
| ch | Chain |
| sc | Single crochet |
| inc | Increase |
| dec | Decrease |
| (sc, inc) x n | Repeat everything in the brackets n times |
Crocheting the Body and Head
The body and head are worked as one continuous piece in white yarn, starting from an oval base and growing upward into the kitten’s rounded, chubby silhouette. Stuff the piece as you go, adding fill gradually rather than waiting until the opening is nearly closed.
Make 9 chains, starting in the 2nd chain from the hook.
- Rnd 1: 7 sc, 3 sc into the last stitch, then work back along the other side of the foundation chain: 6 sc, inc (18).
- Rnd 2: inc, 6 sc, 3 inc, 6 sc, 2 inc (24).
- Rnd 3: 1 sc, inc, 6 sc, (1 sc, inc) repeat 3 times, 6 sc, (1 sc, inc) repeat 2 times (30).
- Rnd 4: 2 sc, inc, 6 sc, (2 sc, inc) repeat 3 times, 6 sc, (2 sc, inc) repeat 2 times (36).
- Rnd 5: 3 sc, inc, 6 sc, (3 sc, inc) repeat 3 times, 6 sc, (3 sc, inc) repeat 2 times (42).
- Rnd 6: (6 sc, inc) repeat 6 times (48).
- Rnd 7: (7 sc, inc) repeat 6 times (54).
- Rnd 8: (8 sc, inc) repeat 6 times (60).
- Rnd 9: (9 sc, inc) repeat 6 times (66).
- Rnd 10–21: 66 sc (12 rounds).
- Rnd 22: (9 sc, dec) repeat 6 times (60).
- Rnd 23–24: 60 sc (2 rounds).
- Rnd 25: (8 sc, dec) repeat 6 times (54).
- Rnd 26–27: 54 sc (2 rounds).
- Rnd 28: (7 sc, dec) repeat 6 times (48).
- Rnd 29: 48 sc.
- Rnd 30: (6 sc, dec) repeat 6 times (42).
- Rnd 31–34: 42 sc (4 rounds).
- Rnd 35: (5 sc, dec) repeat 6 times (36).
- Rnd 36: (4 sc, dec) repeat 6 times (30).
- Rnd 37: (3 sc, dec) repeat 6 times (24).
- Rnd 38: (1 sc, dec) repeat 8 times (16).
- Rnd 39: 6 dec (8).
Close the opening and hide the yarn tail inside the body.
Crocheting the Legs
Crochet with white yarn, stuffing as you go.
- Rnd 1: 6 sc in MR (6).
- Rnd 2: 6 inc (12).
- Rnd 3–8: 12 sc (6 rounds).
Fasten off, leaving a long tail for sewing. Sew the legs onto the body between Rows 3 and 6, with 6 stitches of distance between the two legs.
Crocheting the Arms
Crochet with white yarn, stuffing as you go.
- Rnd 1: 6 sc in MR (6).
- Rnd 2: 6 inc (12).
- Rnd 3–11: 12 sc (9 rounds).
Fasten off, leaving a long tail for sewing. Sew the arms onto the body between Rows 21 and 25, with 28 stitches of distance between the two arms.
Crocheting the Ears
Crochet with white yarn, stuffing as you go.
- Rnd 1: 6 sc in MR (6).
- Rnd 2: 6 sc (6).
- Rnd 3: (1 sc, inc) repeat 3 times (9).
- Rnd 4: (2 sc, inc) repeat 3 times (12).
Fasten off, leaving a long tail for sewing. Sew the ears in place with 3 to 4 stitches of distance between them at the top of the head.
Crocheting the Tail
Crochet with white yarn, stuffing as you go.
- Rnd 1: 6 sc in MR (6).
- Rnd 2: 6 inc (12).
- Rnd 3–13: 12 sc (11 rounds).
Fasten off, leaving a long tail for sewing. Sew the tail onto the back of the body between Rows 5 and 6.
Crocheting the Heart
The heart is made from two identical lobes that are joined together partway through, then shaped into a single rounded heart with a decrease sequence at the end. Crochet with pink yarn, stuffing as you go, and make two pieces using the following instructions:
- Rnd 1: 6 sc in MR (6).
- Rnd 2: 6 inc (12).
- Rnd 3: (3 sc, inc) repeat 3 times (15).
- Rnd 4: 15 sc.
On the first piece, fasten off, leaving a tail for sewing. On the second piece, do not cut the yarn — continue crocheting directly from here.
- Rnd 5: 15 sc across the first piece, then join the second piece and crochet 15 sc across it as well (30).
- Rnd 6: 30 sc.
- Rnd 7: (8 sc, dec) repeat 3 times (27).
- Rnd 8: (7 sc, dec) repeat 3 times (24).
- Rnd 9: (6 sc, dec) repeat 3 times (21).
- Rnd 10: (5 sc, dec) repeat 3 times (18).
- Rnd 11: (4 sc, dec) repeat 3 times (15).
- Rnd 12: (3 sc, dec) repeat 3 times (12).
- Rnd 13: (2 sc, dec) repeat 3 times (9).
- Rnd 14: 4 dec (5).
Close the opening and hide the yarn tail inside. Sew the finished heart to the kitten’s hands/paws so it sits held between them, just as shown in the reference photos.
Adding the Face
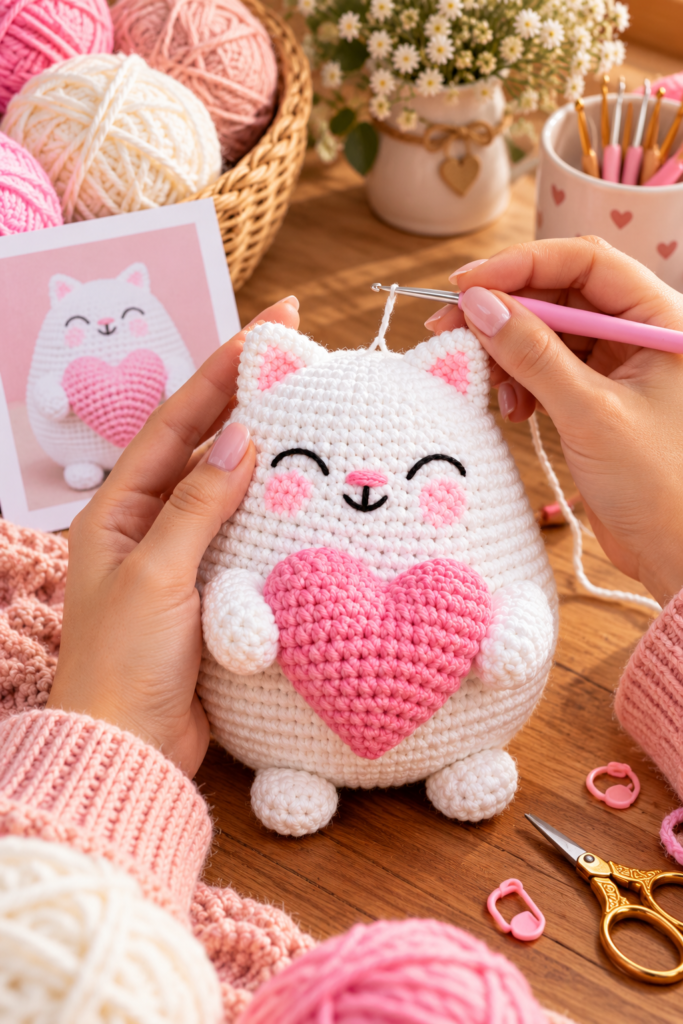
- Embroider the eyes using black thread on Row 31, spacing them 4 stitches apart.
- Embroider the nose between Rows 30 and 31.
- Embroider the mouth on Row 29.
- Paint the cheeks with pink eyeshadow or pastel, and color the front of the ears with the same pigment for a soft, blushing finish.
Once the face and heart are in place, your crochet kitten amigurumi toy is completely ready.
Tips for Crocheting the Kitten Amigurumi
- Stuff continuously, not all at once. Every single piece in this pattern — the body, legs, arms, ears, tail, and heart — includes a note to stuff as you go. Adding fill gradually as each piece grows, rather than trying to stuff it fully once the opening is small, will give you a firmer, more evenly rounded result.
- Measure stitch spacing carefully before sewing. Since the legs, arms, and ears are all attached with specific stitch-distance measurements (6 sts between legs, 28 sts between arms, 3–4 sts between ears), it helps to count out and mark these spacing points with a scrap of yarn or a pin before you start sewing, rather than eyeballing it.
- Use the reference photo when placing the heart. Because the heart is sewn to the hands rather than the body itself, positioning it so it looks naturally “held” between the two front paws takes a bit of adjustment — pin it in place first and check it from the front before committing to permanent stitches.
- Consider eyeshadow or blush pastel for the cheeks over embroidery. The pattern specifically calls out painting the cheeks with pink eyeshadow or pastel rather than stitching them, which gives a soft, diffused blush look that’s harder to achieve with thread alone.
- Take your time on the face placement. With the eyes on Row 31 spaced 4 stitches apart, the nose between Rows 30–31, and the mouth on Row 29, these three features sit very close together. A light pencil or fabric-safe marker sketch beforehand can help you commit to placement before embroidering permanently.
Frequently Asked Questions
Who designed this pattern? The Crochet Kitten Amigurumi was designed by marizzatoys and shared as a free pattern.
What size is the finished toy? The finished kitten measures approximately 10 to 12 cm tall, making it a nice compact size for a shelf, a gift, or a small child’s hands.
What yarn weight and hook size does this pattern use? The pattern calls for sport-weight (5 ply) yarn — specifically Alize Cotton Gold in white and pink — worked with a small 2.00mm crochet hook, which is typical for fine-detail amigurumi work at this scale.
Is this pattern good for beginners? Yes, the designer specifically describes it as suited to beginners, thanks to detailed, step-by-step instructions throughout. All of the techniques used (magic ring, single crochet, increases, and decreases) are foundational amigurumi skills.
How is the heart attached to the kitten? The heart is sewn directly onto the kitten’s hands/paws rather than the body, positioned so it looks like the kitten is cradling it, matching the look shown in the reference photos.
Why are the cheeks painted instead of embroidered? The pattern specifically suggests using pink eyeshadow or pastel to color both the cheeks and the front of the ears, which creates a soft, blended blush effect that reads differently than solid embroidered cheek circles would.
How many separate pieces do I need to make? In total, you’ll crochet: one body/head piece, two legs, two arms, two ears, one tail, and two heart lobes (which are joined into a single heart) — seven individual components plus the joined heart piece.
Can I substitute a different yarn weight? You can, though keep in mind the pattern’s finished 10–12 cm size and the small 2.00mm hook are calibrated for a sport/5-ply weight yarn. Substituting a bulkier yarn would produce a noticeably larger finished toy and may require adjusting your hook size accordingly.
A Kitten Worth Holding Onto
Between her rounded, chubby silhouette, sleepy smiling eyes, soft blushed cheeks, and the little pink heart she holds so sweetly, this crochet kitten amigurumi is the kind of project that feels like it was designed purely to be adored. It’s approachable enough for a first amigurumi project, yet detailed enough in its finishing touches — the painted cheeks, the carefully spaced facial features, the joined heart — to feel like a genuinely finished, gift-worthy toy once it’s done.
Congratulations — once you’ve followed each of these steps, your crochet kitten amigurumi toy is completely ready. For more free amigurumi and crochet patterns like this one, be sure to check out Lovelycraft.com.