Crochet Christmas Tree Duo Pattern
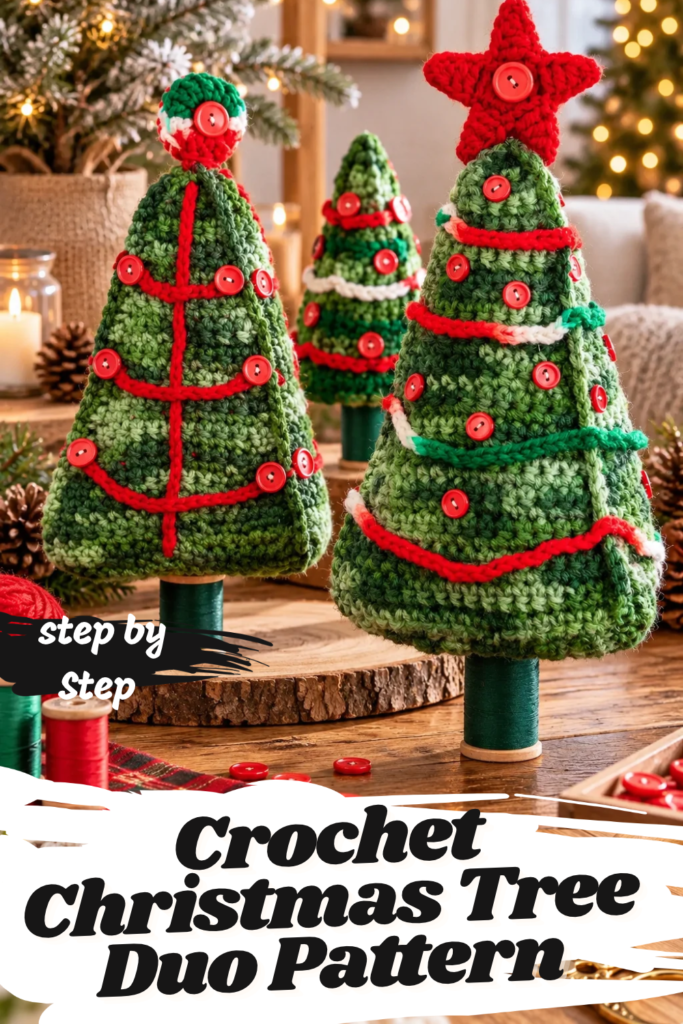
There is something incredibly charming about handmade Christmas decorations, especially the little ones that can sit on a mantel, brighten a bookshelf, or bring a festive touch to an ordinary corner of your home.
If you love cozy Christmas crafts, colorful yarn, and decorations that feel a little nostalgic, this Crochet Christmas Tree Duo is a wonderful project to add to your holiday crafting list.
Designed by Sharon Mann for Red Heart, this pattern features two miniature Christmas trees with completely different personalities. Both have softly textured green crochet bodies, cheerful red button ornaments, and creative decorations made from simple crochet chains.
The first tree has a traditional Christmas look, complete with a bright red star topper and colorful garland wrapped around its branches. The second tree has a playful, almost storybook appearance, with a circular topper and red yarn arranged into a decorative tree-branch design.
What makes these little trees especially interesting is their construction. Rather than crocheting in continuous rounds, you’ll create three triangular crochet panels for each tree, attach them to a matching bottom piece, add stuffing, and join the edges to form a dimensional Christmas tree.
Even the trunks have a clever handmade detail: they’re created using wooden dowels and empty thread spools.
The finished trees measure approximately 8½ inches tall, with a base measuring 5½ inches in diameter.
The original pattern is rated Intermediate, making it a satisfying project for crocheters who are comfortable with single crochet, increasing stitches, shaping flat pieces, and assembling dimensional crochet decorations.
RHC0518-022348M.pdf
Whether you display the trees together or place them in different rooms, this Christmas Tree Duo adds handmade color, texture, and personality to your holiday home.
About the Crochet Christmas Tree Duo
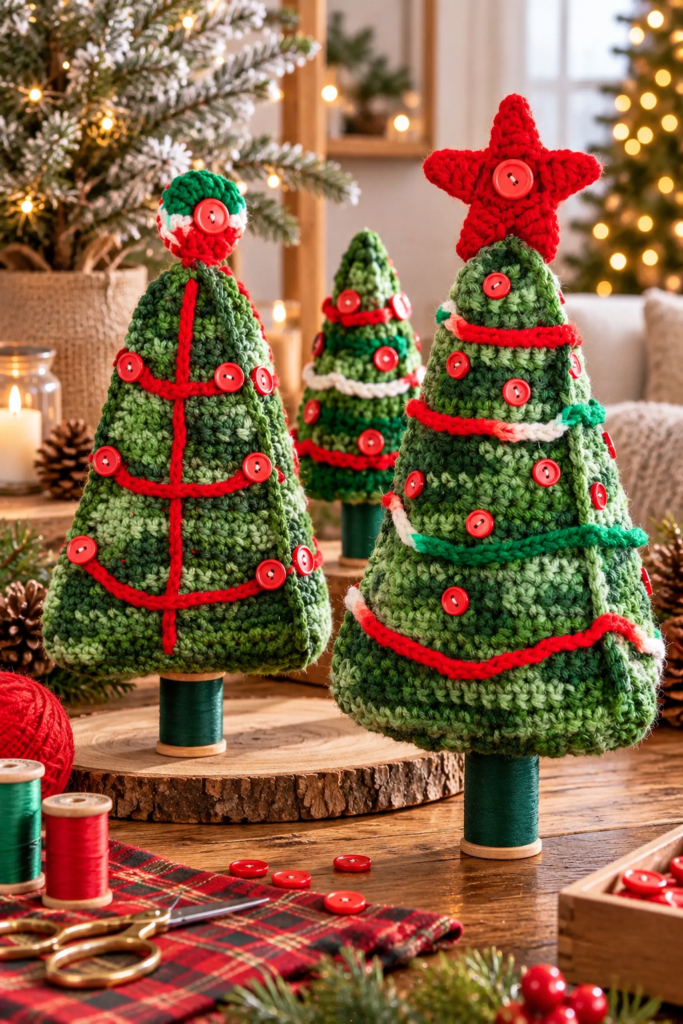
The Christmas Tree Duo pattern was designed by Sharon Mann and published by Red Heart. The PDF carries a 2011 copyright and was last updated in August 2019.
The original design uses three yarn colors:
- Green Tones for the tree bodies
- Mistletoe for the decorative garlands
- Cherry Red for the stars, stems, and branches
Both trees share the same basic construction, but their embellishments make them look different.
The photograph on page 1 shows the two finished trees standing on spool-and-dowel trunks. One has a red star at the top, while the other has a round topper and red yarn decorations arranged across its green surface.
Their textured crochet fabric and bright button ornaments create a cheerful cottage-style appearance.
Unlike flat crochet ornaments, these trees have a three-dimensional structure that allows them to stand as decorative tabletop pieces when properly assembled and supported.
Crochet Christmas Tree Duo Pattern at a Glance
| Project detail | Information |
|---|---|
| Pattern | Christmas Tree Duo |
| Designer | Sharon Mann |
| Brand | Red Heart |
| Skill level | Intermediate |
| Finished height | 8½ inches |
| Base diameter | 5½ inches |
| Yarn | Red Heart Super Saver |
| Yarn weight | Medium 4 |
| Hook size | 5 mm / U.S. H-8 |
| Gauge | 16 stitches and 16 sc rows = 4 inches |
| Construction | Three panels and one bottom per tree |
| Decorations | Buttons, chains, star or circle |
| Trunks | Wooden dowels and thread spools |
Materials You’ll Need
The original pattern calls for Red Heart Super Saver yarn in three colors.
Yarn Colors
| Color | Yarn |
|---|---|
| A | Green Tones (629) |
| B | Mistletoe (979) |
| C | Cherry Red (0319) |
You’ll need one skein of each color for the project.
The yarn information in the source lists Red Heart Super Saver solid-color skeins at 7 oz (198 g), 364 yd (333 m), with multicolor, heather, and print varieties available in 5 oz (141 g), 244 yd (223 m) skeins.
RHC0518-022348M.pdf
Crochet and Assembly Supplies
You’ll also need a 5 mm / U.S. H-8 crochet hook, a yarn needle, a sewing needle, red sewing thread, tacky glue, and stuffing for the tree bodies.
For the trunks, gather two spools of Coats Cotton Machine Quilting Thread in color #8975 and two wooden dowels measuring ⅛ inch wide by 7½ inches long. The original pattern also allows one set of wooden chopsticks as an alternative.
Buttons for Tree 1
The star-topped Christmas tree requires:
- 21–24 small red buttons measuring 7/16 inch
- 2 larger red buttons measuring ¾ inch
Buttons for Tree 2
The second Christmas tree requires:
- 18 red buttons measuring 9/16 inch
- 2 larger red buttons measuring ¾ inch
The larger buttons decorate both sides of the tree toppers, while the smaller buttons act as Christmas ornaments.
Crochet Gauge
The pattern gauge is:
16 stitches = 4 inches
16 rows of single crochet = 4 inches
The original instructions emphasize checking your gauge and adjusting the hook size if necessary.
Because the tree panels must fit together during assembly, consistent stitch size is important.
If one panel is noticeably larger than the others, the finished tree may look uneven.
For the best results, use the same hook, yarn, and tension when making all three panels for each tree.
Crochet Abbreviations
Here are the abbreviations used throughout the pattern.
| Abbreviation | Meaning |
|---|---|
| A, B, C | Yarn colors |
| Ch | Chain |
| Sc | Single crochet |
| Hdc | Half double crochet |
| Dc | Double crochet |
| Sl st | Slip stitch |
| St/Sts | Stitch/Stitches |
| Rep | Repeat |
An asterisk indicates that the following instructions should be repeated as directed.
Brackets indicate a group of instructions that should be worked the specified number of times.
Understanding the Christmas Tree Construction
Before beginning, it helps to understand how the trees are assembled.
Each tree is made from three matching triangular crochet sides and one bottom piece.
The triangular panels are worked from the bottom upward.
They begin with only three single crochet stitches and gradually become wider through increases at both ends of selected rows.
Although the pattern starts at the bottom, the increasing stitch counts mean the wider portion of each panel is at the later rows. The panels are then oriented during assembly to create the intended tree shape.
Once the panels are completed, their bottom edges are attached to the three edges of the triangular bottom piece.
The side edges are joined with single crochet, and stuffing is added before the final seam is closed.
This creates a dimensional tree body with three decorated faces.
Both trees use this same construction, so you only need to learn the basic shaping technique once.
How to Crochet the Christmas Tree Body
The original instructions specify making two trees.
For each tree, you’ll crochet three matching side panels and one bottom piece.
Step 1: Crochet the First Tree Side
Using Color A, Green Tones:
Chain 2.
Row 1
Work 3 single crochets into the second chain from your hook.
Turn.
You should have 3 single crochet stitches.
Row 2
Chain 1.
Work one single crochet into every stitch across.
Turn.
You still have 3 stitches.
Row 3
Chain 1.
Work 2 single crochets into the first stitch.
Work one single crochet into the next stitch.
Work 2 single crochets into the final stitch.
Turn.
You should now have 5 single crochets.
This row establishes the increase technique used throughout the tree panel.
Rows 4–6
Chain 1.
Work one single crochet into every stitch across.
Turn after each row.
These rows maintain the current stitch count without adding width.
Row 7
Chain 1.
Work 2 single crochets into the first stitch.
Continue working one single crochet into each stitch until you reach the final stitch.
Work 2 single crochets into the last stitch.
Turn.
You should now have 7 single crochet stitches.
Rows 8–27
Repeat the sequence from Rows 4–7 five more times.
That means working three even rows followed by one increase row.
This gradual shaping creates the tree panel’s triangular appearance.
Rows 28–32
Repeat Row 4, working one single crochet into each stitch across.
Fasten off after Row 32.
Your first tree panel is complete.
RHC0518-022348M.pdf
Step 2: Make Two More Tree Sides
Repeat the same instructions twice more.
Each tree requires three matching side panels.
Try to keep your tension consistent so all three panels are the same size.
Once completed, place them beside one another and check that the edges align reasonably well.
Minor differences can often be eased into the seams, but significant size differences may affect the final shape.
How to Crochet the Tree Bottom
The bottom piece gives the tree a foundation and provides the edges where the three side panels will be attached.
Using Color A, Green Tones:
Chain 2.
Bottom Row 1
Work 3 single crochets into the second chain from your hook.
Turn.
Bottom Row 2
Chain 1.
Work one single crochet into each stitch across.
Turn.
Bottom Row 3
Chain 1.
Work 2 single crochets into the first stitch.
Single crochet across until the final stitch.
Work 2 single crochets into the last stitch.
Turn.
You should have 5 stitches.
Bottom Row 4
Chain 1.
Work one single crochet into each stitch across.
Turn.
Bottom Rows 5–16
Repeat Rows 3 and 4 six times.
At the end of Row 16, you should have 17 single crochet stitches.
Fasten off, leaving a long yarn tail for sewing.
The bottom piece is now ready for assembly.
RHC0518-022348M.pdf
How to Assemble the Crochet Christmas Tree
Once you have three side panels and the bottom piece, it’s time to create the three-dimensional tree.
Step 1: Attach the Bottom
Place the pieces with their wrong sides facing as directed in the original pattern.
Sew the bottom edge of each of the three tree sides to a corresponding edge of the tree bottom.
Work carefully around the corners to keep the shape balanced.
Step 2: Join the Side Panels
With the right side facing, use single crochet to join two neighboring tree panels along their edges.
Continue joining the panels until only the final opening remains.
Step 3: Add Stuffing
Before closing the last seam, fill the tree with stuffing.
Add enough to give the body a full shape without stretching the stitches excessively.
Distribute the stuffing evenly, especially near the upper sections.
Step 4: Close the Final Seam
Single crochet the remaining two panel edges together, adding more stuffing as needed.
Weave in all loose yarn ends.
You now have the basic dimensional crochet tree.
The original finishing instructions use this same process for both trees.
RHC0518-022348M.pdf
Tree 1: Crochet Christmas Tree With Star and Garland
The first design features a traditional red star topper, crocheted garlands, and small red button ornaments.
The star is made from two matching pieces that are sewn together.
How to Crochet the Star Topper
Using Color C, Cherry Red:
Chain 4.
Join with a slip stitch into the first chain to form a ring.
Star Round 1
Chain 1.
Work 10 single crochets into the ring.
Join with a slip stitch into the first single crochet.
You should have 10 stitches.
Star Round 2
Chain 1.
Single crochet into the first stitch.
Then repeat the following sequence around the circle:
Chain 5.
Single crochet into the second chain from your hook.
Half double crochet into the next chain.
Double crochet into each of the next two chains.
Skip the next single crochet from Round 1.
Single crochet into the following stitch.
Continue until five points have been created.
Join with a slip stitch and fasten off, leaving a long sewing tail.
Assemble the Star
Make a second matching star.
Place the two stars together with their right sides facing, matching the stitches.
Sew them together.
Attach the completed star to the top of the Christmas tree.
Using red sewing thread, sew one ¾-inch red button into the center of each side of the star.
Weave in the remaining yarn ends.
The finished topper adds a bright traditional Christmas detail to the green tree.
Crochet the Decorative Garland
Using Color B, Mistletoe, make four crochet chains in different lengths.
The original pattern does not specify exact chain counts for these garlands. Instead, the lengths should be adjusted to wrap around the tree.
Fasten off each chain, leaving a yarn tail for sewing.
Beginning near the top or bottom, arrange the garlands around the tree.
Space the garlands approximately 1½ inches apart.
Sew the chains into position.
Then use a sewing needle and red thread to attach the 7/16-inch red buttons between the garlands on each side of the tree.
The finished effect resembles a miniature Christmas tree decorated with garland and ornaments.
RHC0518-022348M.pdf
RHC0518-022348M.pdf
Tree 2: Crochet Christmas Tree With Red Branch Decorations
The second design uses the same green crochet tree body but features a circular topper and decorative red yarn branches.
This creates a different look without requiring a new tree construction technique.
How to Crochet the Circular Topper
Using Color B, Mistletoe:
Chain 2.
Round 1
Work 6 single crochets into the second chain from your hook.
Join with a slip stitch into the first single crochet.
You should have 6 stitches.
Round 2
Chain 3, which counts as a double crochet.
Work one double crochet into the first single crochet.
Then work 2 double crochets into each remaining single crochet around.
Join with a slip stitch into the top of the beginning chain 3.
You should have 12 double crochets.
Fasten off, leaving a sewing tail.
Assemble the Circular Topper
Make a second matching circle.
Place the circles together with right sides facing.
Sew them together, matching the stitches.
Attach the assembled circle to the top of the tree.
Sew one ¾-inch red button into the center of each side.
This creates a rounded topper that contrasts with the pointed star on Tree 1.
Crochet the Decorative Tree Stems
The second tree uses red crochet chains to create a simple branching design across its green surface.
Using Color C, Cherry Red:
Make three center stems.
For each stem, chain 33.
Fasten off, leaving a long sewing tail.
Each center stem will be attached to one side of the tree.
Crochet the Tree Branches
You’ll make three different branch lengths.
For each length, create three matching pieces.
| Branch | Chain length | Quantity |
|---|---|---|
| Branch 1 | Chain 15 | 3 |
| Branch 2 | Chain 19 | 3 |
| Branch 3 | Chain 23 | 3 |
Use Cherry Red yarn for every branch.
Fasten off each chain, leaving enough yarn for sewing.
Attach the Branches
Sew one center stem vertically onto each side of the tree.
Arrange the shorter, medium, and longer branches along the stems to create a triangular Christmas tree shape.
Use the page 1 photograph as a guide for positioning.
Sew the branches securely into place.
Finally, attach one 9/16-inch red button at the end of each branch.
The original pattern uses this arrangement to create a stylized tree-within-a-tree design.
RHC0518-022348M.pdf
How to Make the Christmas Tree Trunks
Both crochet trees use the same trunk construction.
Instead of crocheting a separate trunk, the design uses wooden dowels and thread spools.
This gives the trees a handmade, slightly rustic appearance.
Step 1: Prepare the Spool
Take one thread spool and insert a wooden dowel into its center opening.
The spool becomes the visible base of the tree trunk.
Step 2: Add Glue
Apply tacky glue to the top of the spool.
Step 3: Attach the Crochet Tree
Insert the exposed dowel into the center bottom of the stuffed crochet tree.
Press the spool against the underside of the tree so the glued surfaces make contact.
Allow the glue to dry thoroughly before standing the decoration upright.
Repeat the same process for the second tree.
The original pattern specifies this spool-and-dowel method for both decorations.
RHC0518-022348M.pdf
Why These Crochet Christmas Trees Look So Charming
The beauty of this project comes from its combination of soft yarn, simple shapes, and unexpected decorative details.
The tree bodies use basic single crochet stitches, creating a dense, textured surface.
The red button ornaments add small pops of color.
The crocheted chains imitate traditional Christmas garlands and branches.
And the thread spool trunks make the trees feel like something created in a cozy home craft room rather than purchased from a store.
The original photograph on page 1 also shows how beautifully the two designs complement each other.
Although their embellishments differ, they share the same colors, dimensions, and general construction.
Tips for Making Your Christmas Tree Duo Look Beautiful
Keep All Three Panels the Same Size
Because each tree uses three matching panels, consistency is essential.
Count your stitches carefully and check that the finished pieces are similar in length.
Stuff the Trees Evenly
Uneven stuffing can make one side bulge more than another.
Distribute the filling gradually while closing the final seam.
Arrange Decorations Before Sewing
Before permanently attaching garlands or branches, position them on the tree to check their spacing.
This makes it easier to achieve a balanced design.
Use Strong Thread for Buttons
The buttons are decorative, but they should still be attached securely.
Use the red sewing thread specified in the pattern.
Keep these button-decorated trees away from very young children, as small buttons can present a choking hazard.
Let the Glue Dry Completely
The trunk connection needs time to become secure.
Avoid moving or displaying the trees until the adhesive has dried.
Check the Stability of the Base
Thread spools are relatively small supports.
Place the finished decorations on a flat, stable surface where they are unlikely to be knocked over.
Creative Ways to Display Your Crochet Christmas Trees
These little trees are especially suitable for small holiday displays.
Place the duo together on a mantel, surrounded by pinecones, evergreen branches, or other handmade Christmas decorations.
They can also brighten a bookshelf, side table, entryway console, or home office desk.
The original pattern even suggests displaying them in a work cubicle.
For a cozy cottage-inspired arrangement, combine them with wooden decorations, handmade ornaments, and soft holiday textiles.
Because the trees are compact, they can bring a festive touch to spaces where a larger Christmas tree would be impractical.
Frequently Asked Questions
Is the Christmas Tree Duo pattern beginner-friendly?
The original pattern is rated Intermediate.
It uses mostly basic crochet stitches, but shaping, assembling three-dimensional pieces, making toppers, and attaching decorations require additional skills.
Who designed the Christmas Tree Duo?
The pattern was designed by Sharon Mann.
How tall are the finished trees?
Each tree measures approximately 8½ inches tall.
How wide is the base?
The base measures approximately 5½ inches in diameter.
What yarn does the pattern use?
The original pattern uses Red Heart Super Saver in Green Tones, Mistletoe, and Cherry Red.
What crochet hook size is needed?
Use a 5 mm / U.S. H-8 crochet hook, or another size needed to obtain gauge.
How many crochet panels are needed?
Each tree requires three matching side panels.
For the complete duo, you’ll make six side panels.
Do the trees need stuffing?
Yes. The original assembly instructions include stuffing the tree bodies before closing the final seam.
Are the trunks crocheted?
No. The original design uses wooden dowels inserted into thread spools.
How many stars do I make for Tree 1?
Make two matching stars and sew them together to create one topper.
How many circles do I make for Tree 2?
Make two matching circles and sew them together for the rounded topper.
How many garlands does Tree 1 need?
The pattern specifies four crocheted chains in different lengths.
How many center stems does Tree 2 need?
Make three center stems, each beginning with chain 33.
How many decorative branches are needed?
Make three branches of each length: chain 15, chain 19, and chain 23.
That’s nine branch chains in total.
Can I use different yarn colors?
Yes. You can adapt the color palette while following the same stitch and assembly instructions.
Can these trees be used as Christmas gifts?
Yes. They make thoughtful handmade decorations for friends, family members, coworkers, or anyone who enjoys crochet and festive home decor.
Final Thoughts
The Crochet Christmas Tree Duo is a delightful way to turn simple crochet stitches into festive decorations with plenty of personality.
Both trees begin with the same construction: three shaped green crochet panels, a matching bottom, careful seaming, and soft stuffing.
From there, the designs become wonderfully different.
One tree features a traditional red star, crocheted garlands, and bright button ornaments.
The other uses a circular topper and red yarn chains arranged into decorative branches.
The thread spool trunks add a creative finishing touch that makes the entire project feel nostalgic and handmade.
At approximately 8½ inches tall, these little trees are large enough to stand out on a holiday mantel but small enough to decorate a desk, shelf, or side table.
And because the two trees share the same basic construction, the second one gives you another opportunity to practice the techniques learned while making the first.
If you’re looking for a colorful crochet Christmas decoration that combines traditional stitches with creative embellishments, this charming duo is a lovely project to try.
Make both, display them together, and enjoy adding a little handmade Christmas magic to your home.
Happy crocheting and happy holidays!