Crochet Both Sides Now Hexi-Cardi
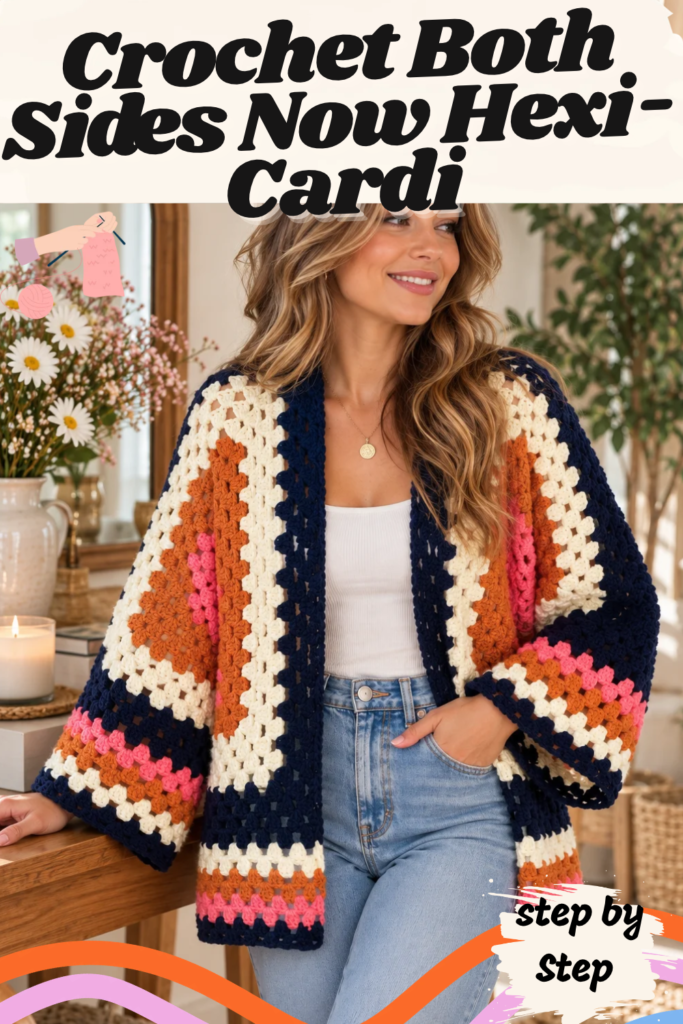
There is something almost magical about a crochet project that begins as a simple shape and, with a few folds and seams, suddenly turns into something you can actually wear.
That is exactly what happens with this Crochet Both Sides Now Hexi-Cardi.
At first glance, the finished cardigan looks like a much more complicated garment. It has wide relaxed sleeves, an open front, a roomy silhouette, bold granny-stitch stripes, contrasting cuffs, and a colorful lower hem. But the construction is surprisingly approachable: the cardigan begins with just two oversized crochet hexagons.
Yes—two hexagons.
You crochet them in rounds, let them become wonderfully wavy, fold each one into an upside-down L shape, seam the tops to create sleeves, join the two pieces down the center back, and then add the lower hem and sleeve cuffs.
The original pattern specifically reassures you that the growing hexagons will not lie flat. That waviness is intentional and necessary for the garment construction, so this is one of those projects where you really do have to “trust the process.” BRC0129-034957M
Even better, the pattern is rated Beginner, despite producing a cardigan that looks wonderfully impressive when finished. BRC0129-034957M
The sample uses four beautiful colors—Peony Pink, Masala, Natural, and Navy—to create broad bands of color around the hexagons. The page 1 photograph shows how those stripes travel dramatically around the body and sleeves once the pieces are folded.
If you’ve wanted to try a crochet hexagon cardigan but felt intimidated by garment construction, this pattern is a fantastic place to start.
About the Both Sides Now Hexi-Cardi
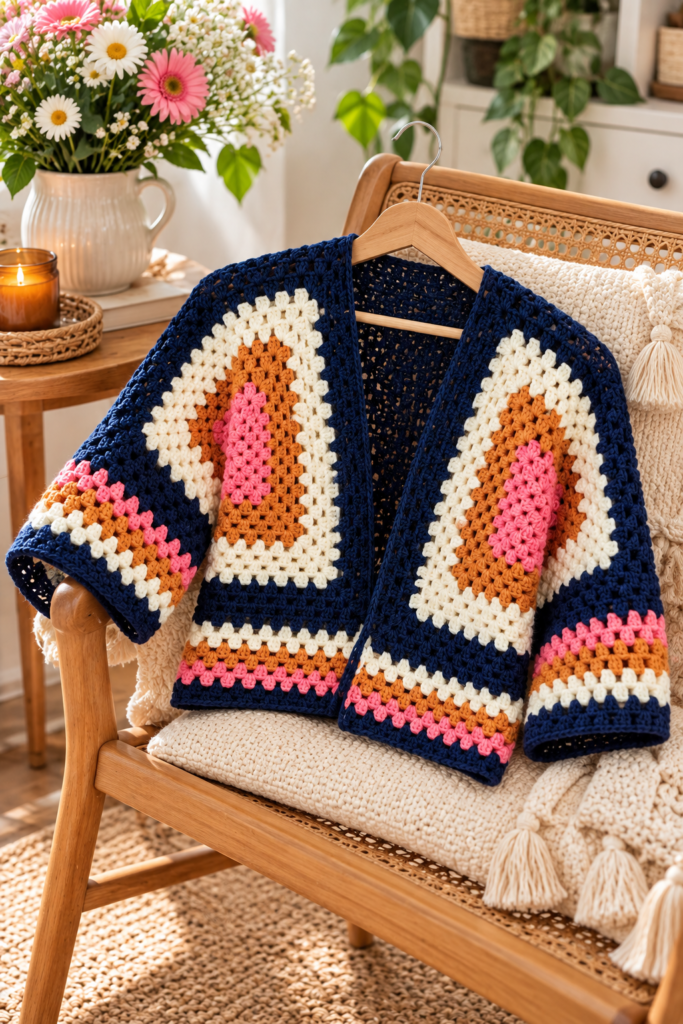
The basic construction is wonderfully clever.
Instead of separately crocheting:
a back panel, two front panels, two sleeves, and shoulders,
you make:
two large hexagons.
Each hexagon has six sides and is worked outward in granny-style clusters.
As the piece grows, the additional stitches at each of its six corners prevent it from lying flat. Normally that might look like a problem.
Here, it’s exactly what we want.
Once the hexagon reaches the correct size, it folds into an upside-down L shape.
Part of that folded shape becomes a sleeve.
Another part becomes the body.
Make a second identical hexagon for the opposite side, seam the two together, and you suddenly have the foundation of a cardigan.
The folding diagram on page 8 makes this transformation especially clear, showing the wavy hexagon folded into the recognizable L-shaped garment section.
Pattern at a Glance
Pattern: Crochet Both Sides Now Hexi-Cardi
Skill Level: Beginner
Construction: Two folded hexagons
Sizes: XS/S, M/L, XL/2/3XL, 4/5XL
Main Hook: 5 mm / U.S. H-8
Main Stitch: Double crochet granny clusters
Colors: Four
Seaming: Whipstitch
Finishing: Bottom hem and sleeve cuffs
Available Sizes
The pattern includes four size ranges.
XS/S
To fit chest:
28–34″ / 71–86.5 cm
Finished chest:
38″ / 96.5 cm
M/L
To fit chest:
36–38″ / 91.5–96.5 cm
Finished chest:
42″ / 106.5 cm
XL/2/3XL
To fit chest:
44–54″ / 112–137 cm
Finished chest:
56″ / 142 cm
4/5XL
To fit chest:
56–60″ / 142–152.5 cm
Finished chest:
66″ / 167.5 cm
These measurements show that the finished cardigan is intended to have noticeable positive ease for its relaxed shape. BRC0129-034957M
Materials You’ll Need
The original pattern uses Bernat Super Value yarn.
Each skein contains approximately:
7 oz / 197 g
and
426 yds / 389 m
The four colors used are:
Contrast A – Peony Pink
XS/S: 182 yds / 166 m
M/L: 195 yds / 178 m
XL/2/3XL: 228 yds / 208 m
4/5XL: 295 yds / 270 m
Contrast B – Masala
XS/S: 195 yds / 178 m
M/L: 205 yds / 187 m
XL/2/3XL: 295 yds / 230 m
4/5XL: 395 yds / 361 m
Contrast C – Natural
XS/S: 228 yds / 208 m
M/L: 262 yds / 240 m
XL/2/3XL: 341 yds / 480 m
4/5XL: 484 yds / 440 m
Contrast D – Navy
XS/S: 341 yds / 312 m
M/L: 398 yds / 364 m
XL/2/3XL: 450 yds / 411 m
4/5XL: 560 yds / 512 m
For yarn quantities, I would follow the original pattern table exactly as printed; the PDF’s Natural-yardage entry for XL/2/3XL appears internally unusual because it pairs 341 yards with 480 meters, but the source itself does not resolve that discrepancy.
You will also need:
- 5 mm / U.S. H-8 crochet hook
- Stitch markers
- Yarn needle
- Tape measure
The pattern recommends changing hook size when necessary to obtain the required gauge. BRC0129-034957M
Gauge – Don’t Skip This Step
Gauge is especially important for this cardigan.
The pattern gives two gauges:
13 sc × 14 rows = 4″ / 10 cm
and
6 rounds in pattern = 4″ / 10 cm
More importantly, the instructions specifically state that the project’s success depends on achieving the correct row gauge. BRC0129-034957M BRC0129-034957M
For that reason, the pattern begins with an entire granny gauge swatch.
Crochet Abbreviations
Beg – Beginning
Ch – Chain
Cont – Continue/continuity
Dc – Double crochet
Dec – Decrease
Rem – Remaining
Rep – Repeat
RS – Right side
Rnd/Rnds – Round/Rounds
Sc – Single crochet
Sc2tog – Single crochet two together
Sl st – Slip stitch
Sp/Sps – Space/Spaces
St/Sts – Stitch/Stitches
Tog – Together
WS – Wrong side
Yoh – Yarn over hook
Step 1: Make the Granny Gauge Swatch
Before starting either hexagon, make the swatch shown in the diagram on page 3.
Using Color A:
Chain 4.
Join with a slip stitch into the first chain to create a ring.
Gauge Swatch Round 1
Chain:
6
Then repeat:
3 dc in ring, ch 3
three times.
Work:
2 dc in ring
Join with a slip stitch into the third chain of the beginning chain 6.
Gauge Swatch Round 2
Slip stitch into the chain-3 space.
Chain 6.
Work:
3 dc in the same chain-3 space
Then repeat the granny-square structure around, using chain-1 spaces along the sides and:
3 dc, ch 3, 3 dc
in each corner.
Gauge Swatch Round 3
Continue in the established pattern.
Each new round introduces another 3-double-crochet group between the corner spaces.
Gauge Swatch Rounds 4–6
Continue the established granny pattern through Round 6.
Fasten off.
The page 3 stitch diagram provides a useful visual map of how the clusters and chain spaces stack from round to round. BRC0129-034957M
How to Measure Your Gauge Swatch
Lay the swatch flat.
Measure from:
the center of the square to the top of the final round.
Six rounds should measure:
4″ / 10 cm.
If your measurement is slightly smaller, the source suggests gently tugging the square to open the stitches.
If it measures:
3½” / 9 cm or less
move up one or two hook sizes and make another swatch.
If it measures more than 4 inches, you may need a smaller hook.
Continue testing until six rounds equal approximately four inches. BRC0129-034957M
Step 2: Crochet the First Hexagon
You need to make:
2 hexagons.
The photographic tutorial begins on page 4, while page 7 contains the full stitch diagram.
Using Color A – Peony Pink:
Chain 4.
Join with a slip stitch to create a ring.
Hexagon Round 1
Chain:
3
This counts as your first double crochet.
Work:
2 dc in ring
Then:
Ch 2
Now repeat:
3 dc, ch 2
five times into the same ring.
Join with a slip stitch into the top of your beginning chain 3.
At the end you should have:
6 groups of 3 dc
and
6 chain-2 spaces. BRC0129-034957M BRC0129-034957M
These six spaces become the six corners of your hexagon.
Hexagon Round 2
Slip stitch through the next two double crochets until you reach the corner chain-2 space.
Chain 3.
In that same corner work:
2 dc, ch 2, 3 dc
Now:
Ch 1
Skip the next three double crochets.
In the next corner chain-2 space work:
3 dc, ch 2, 3 dc
Continue this sequence around all six corners.
Join with a slip stitch to the beginning chain 3.
Hexagon Round 3
Slip stitch across to the corner chain-2 space.
Chain 3.
Work:
2 dc, ch 2, 3 dc
in that same corner.
Then:
Ch 1
Skip 3 dc.
Work:
3 dc in the next ch-1 space
Chain 1.
Skip the next 3 dc.
At the next corner work:
3 dc, ch 2, 3 dc
Continue around.
Join.
Every subsequent round adds another granny cluster between the corners. BRC0129-034957M
Don’t Worry When Your Hexagon Starts Looking Wavy
This deserves its own section because it is probably the moment when many crocheters start wondering whether something has gone wrong.
Your hexagon is not supposed to lie flat.
The source says this repeatedly.
As it grows, the six-sided piece begins gathering and rippling because of the way the corners increase.
That’s intentional.
Those extra folds provide the fabric required for the sleeve and body once the hexagon is folded.
So don’t try to block the waviness out.
Don’t remove increases.
Don’t start over because it resembles a floppy star instead of a perfect flat hexagon.
The pattern’s own page 6 photos show the piece beginning to buckle and specifically reassure you that this is part of the process. BRC0129-034957M
Continue Color A
Repeat the established hexagon round:
3 (3, 5, 5) more times
for XS/S (M/L, XL/2/3XL, 4/5XL).
Remember that every subsequent round has one additional 3-dc group between the corners.
Fasten off Color A.
Add Color B – Masala
Join Color B with a slip stitch into a corner chain-2 space.
Continue the established hexagon round:
4 (4, 4, 5) more times.
Fasten off after the final Color B round. BRC0129-034957M
Add Color C – Natural
Join Color C into a corner chain-2 space.
Continue the same hexagon pattern:
3 (4, 4, 5) more times.
Add Color D – Navy
Join Color D into a corner chain-2 space.
Continue the established round:
3 (4, 5, 6) more times.
Fasten off after the final round.
Your hexagon should now contain a total of:
16 (18, 22, 24) rounds
depending on your size. BRC0129-034957M
Repeat the entire process for the second hexagon.
Step 3: Fold Each Hexagon Into Cardigan Shape
Now comes the fun part.
Take one finished hexagon and fold it according to the diagram on page 8.
The hexagon transforms into an:
upside-down L shape.
Suddenly, what looked like a wavy crochet shape begins looking like half a cardigan.
One section becomes the sleeve.
Another becomes the front/back body section.
The page 8 diagram and photograph are especially useful here because they show both the original folded hexagon and the simplified L-shaped outline.
Check the Cardigan Measurement Before Seaming
Measure from the:
Center Back to the side
as shown in the page 8 diagram.
The measurement should be:
XS/S: 10½” / 26.5 cm
M/L: 12″ / 30.5 cm
XL/2/3XL: 14½” / 37 cm
4/5XL: 16½” / 42 cm
If you haven’t reached the correct measurement for your size, the pattern says you can add another round using Color D before seaming. BRC0129-034957M
This is an important fit checkpoint.
Step 4: Sew the Shoulder and Sleeve Seams
Once both hexagons are folded correctly, you’ll create the sleeves.
The pattern uses:
whipstitch
for seaming.
The sample photographs on page 9 deliberately use contrasting yarn so the sewing technique is easier to see, but your actual cardigan should be seamed with matching yarn for a nearly invisible finish. BRC0129-034957M
Cut a length of Color D approximately:
twice the length of the top of the sleeve.
Thread your yarn needle.
With right sides facing, align the stitches along the top of the sleeve.
Begin by passing your yarn through the corresponding corner chain-2 spaces on the front and back.
Continue whipstitching through matching:
- double crochet stitches
- chain-1 spaces
- corner spaces
until you reach the end.
Keep your tension relaxed.
The source warns against pulling too tightly because that can cause the seam to pucker. BRC0129-034957M
Repeat for the second sleeve.
Step 5: Sew the Center Back
Now place the left and right cardigan halves together at the center back.
Thread your yarn needle with Color D.
Use approximately:
twice the length of the back seam.
Join through the corresponding top corner chain-2 spaces.
These are the same corner spaces associated with the shoulder seams.
Whipstitch down the entire center back using the same technique as before.
Fasten off at the lower chain-2 space and secure your yarn end. BRC0129-034957M
At this stage, your two giant crochet hexagons have officially become a wearable cardigan.
Step 6: Crochet the Bottom Hem
The lower hem adds length while repeating the same open granny texture used throughout the cardigan.
The page 11 diagram is especially useful because it shows how the rows travel continuously from the right front, across the center-back seam, and toward the left front.
Start with the right side facing.
Join:
Color C – Natural
with a slip stitch into the bottom corner chain-2 space of the Left Front.
Bottom Hem Row 1
Chain:
3
This counts as a double crochet.
Work:
2 dc in the same corner space
Then repeat across:
Ch 1
Skip the next 3 dc
3 dc in the next ch-1 space
Continue across the entire bottom edge.
At the center-back seam, follow the source placement carefully so the granny clusters continue cleanly from one half of the cardigan to the other.
Turn. BRC0129-034957M
Bottom Hem Row 2
With the wrong side facing:
Chain:
4
This counts as:
1 dc + ch 1
Repeat:
Skip next 3 dc
3 dc in next ch-1 space
Ch 1
Continue until the final three double crochets.
Skip the next two dc.
Work:
1 dc in the final dc
Fasten off Color C.
Bottom Hem Row 3
With the right side facing:
Join Color B into the beginning chain-1 space from the previous row.
Chain 3.
Work:
2 dc in the same space
Continue the granny pattern across using chain-1 spaces between each 3-dc group.
Turn.
Bottom Hem Row 4
Using Color B:
Work the same basic structure as Row 2.
Fasten off Color B.
Join Color A.
Rows 5 and 6
Using Color A:
Repeat the structures of Rows 2 and 3.
Fasten off Color A.
Join Color D.
Rows 7 and 8
Using Color D:
Again repeat Rows 2 and 3.
Fasten off.
Your bottom hem is now complete.
The page 11 photograph shows the finished sequence beautifully: Natural transitions into Masala, then Peony Pink, and finally the dark Navy border. BRC0129-034957M
Step 7: Crochet the Sleeve Cuffs
The cuffs repeat those same four colors and make the wide sleeves even more dramatic.
Lay one sleeve flat with the right side facing.
Join:
Color A – Peony Pink
into a chain-1 space along the final sleeve row at the bottom of the sleeve.
The pattern includes one important note for crossing the shoulder seam: work the final granny cluster before the seam, chain 1, then continue into the corresponding space on the other side. BRC0129-034957M
Sleeve Cuff Round 1
Chain:
3
This counts as a double crochet.
Work:
2 dc in the same chain-1 space
Then repeat around:
Ch 1
Skip next 3 dc
3 dc in next ch-1 space
Continue all the way around.
Chain 1.
Join with a slip stitch into the top of your beginning chain 3.
Sleeve Cuff Round 2
Slip stitch across the next two double crochets and into the chain-1 space.
Chain 3.
Work:
2 dc in that same space
Then continue:
Ch 1
Skip 3 dc
3 dc in next ch-1 space
around.
Join.
Break Color A.
Sleeve Cuff Rounds 3 and 4
Join:
Color B – Masala
Repeat the previous two rounds.
Break Color B.
Sleeve Cuff Rounds 5 and 6
Join:
Color C – Natural
Again repeat the previous two rounds.
Break Color C.
Sleeve Cuff Rounds 7 and 8
Join:
Color D – Navy
Repeat the established cuff rounds.
Fasten off after Round 8.
Repeat the entire cuff for the other sleeve.
Finally:
weave in all ends.
The finished cuff sequence and stitch diagram appear across pages 12 and 13. BRC0129-034957M BRC0129-034957M
Understanding the Color Placement
One of the reasons this cardigan looks so striking is that the colors aren’t added as ordinary horizontal stripes.
Because the original fabric is crocheted as a hexagon, each new color follows the six-sided shape.
After folding, those bands travel around the garment in unexpected directions.
The page 1 photograph shows this particularly well.
Peony Pink sits toward the inner areas, surrounded by Masala, then Natural, while Navy creates the strong dark outer border.
The hem repeats the colors in a different sequence, while the cuffs echo the same striped palette.
This gives the cardigan a coordinated appearance without every stripe lining up in the conventional way.
Why the Hexagon Cardigan Construction Works
If you’ve never made a hexagon cardigan, the process can feel strange until you physically fold the first piece.
A normal flat crochet hexagon would not provide enough fabric to create both a body and sleeve.
This pattern intentionally creates a hexagon that becomes increasingly wavy.
When you fold it, that extra fabric creates the right-angle shape required for half of the cardigan.
Two folded hexagons then mirror each other.
Sew the sleeve tops.
Join the backs.
Suddenly the geometry makes sense.
That’s why the instruction to “trust the process” is so important here.
Tips for Making Your Hexi-Cardi Successfully
Make the Gauge Swatch
This is probably the most important tip in the entire pattern.
The source specifically says the success of the project depends on row gauge.
Don’t skip it just because the cardigan has a relaxed fit.
Track Your Size Carefully
The pattern is written for XS/S first, with changes for larger sizes shown afterward.
Choose your size before beginning and highlight the corresponding number.
Count Your Corners
A hexagon needs:
six corners.
Each corner uses the chain-2 space and receives the appropriate increase.
If you accidentally skip a corner, the entire geometry can change.
Don’t Fight the Waviness
The growing hexagon is supposed to buckle.
If it lies beautifully flat like a traditional granny hexagon, that may actually indicate you’re not creating the intended garment shape.
Measure Before Seaming
Use the page 8 measurement checkpoint.
If the folded hexagon is too small, add the recommended extra round before sewing.
It’s much easier to adjust at this stage.
Keep Your Whipstitch Relaxed
Tight seams can pucker the shoulder and back.
The source specifically tells you to use relaxed tension.
Weave Ends as You Go
Four colors across two large hexagons, a hem, and two cuffs can create plenty of yarn ends.
Weaving some of them in during natural stopping points can make final finishing much easier.
Frequently Asked Questions
Is the Both Sides Now Hexi-Cardi beginner-friendly?
Yes.
The source rates the project:
Beginner.
Although the construction looks unusual, the crochet itself relies heavily on repeated granny-style groups of double crochet stitches.
How many hexagons do I make?
You make:
2 hexagons.
Each one forms approximately half of the cardigan.
Why won’t my crochet hexagon lie flat?
Because it isn’t supposed to.
The pattern specifically states that the hexagon becomes wavy as it grows and should not lie flat before folding.
That extra fabric is necessary for the cardigan construction.
What yarn does the pattern use?
The original uses:
Bernat Super Value
in four colors:
Peony Pink, Masala, Natural, and Navy.
What crochet hook do I need?
The recommended hook is:
5 mm / U.S. H-8
or whatever size is required to obtain gauge.
What is the pattern gauge?
The source gives:
13 sc × 14 rows = 4 inches
and
6 pattern rounds = 4 inches.
What sizes are included?
The cardigan includes:
XS/S
M/L
XL/2/3XL
4/5XL
What are the finished chest measurements?
They are:
38, 42, 56, and 66 inches
depending on size.
How many rounds are in each completed hexagon?
Before any optional adjustment round, the pattern specifies:
16 (18, 22, 24) total rounds
for the four size ranges.
How do I know whether my hexagon is large enough?
Fold it into the upside-down L shape and measure from the center back to the side.
The target is:
10½ (12, 14½, 16½) inches
depending on size.
If necessary, the source allows you to add another Color D round before seaming.
How are the cardigan pieces joined?
The shoulder/sleeve seams and center-back seam are sewn using:
whipstitch.
How many rows are in the bottom hem?
The bottom hem contains:
8 rows.
How many rounds are in each sleeve cuff?
Each sleeve cuff contains:
8 rounds.
Is the cardigan worked entirely in one piece?
No.
Two separate hexagons are crocheted first.
Each is folded and seamed, and the two halves are then joined at the center back.
The hem and cuffs are added afterward.
Can I change the colors?
The PDF provides instructions for the four specified contrasts. A different color palette would be a creative modification rather than part of the source pattern, but the four-color structure makes it easy to imagine many combinations.
Final Thoughts
The Both Sides Now Hexi-Cardi is one of those crochet projects that becomes much easier to understand once you stop thinking of it as a traditional cardigan.
You aren’t crocheting a back.
You aren’t making two conventional front panels.
You aren’t even crocheting ordinary sleeves.
You are making two giant, wonderfully wavy hexagons.
That is the secret.
Start with a tiny chain-4 ring.
Build six granny-style corners around it.
Continue adding clusters.
Watch your little hexagon grow larger and larger.
Then watch it start to ripple.
And when it refuses to lie flat on the table, don’t panic—that is exactly what the pattern says should happen.
After the color changes from Peony Pink to warm Masala, then Natural and finally Navy, you fold that strange wavy shape into an upside-down L.
And suddenly there is a sleeve.
Make another one, seam the shoulders, connect the center back, add eight rows to the bottom and eight colorful rounds to each cuff, and those two crochet hexagons become the relaxed cardigan shown on page 1.
The diagrams throughout the PDF are especially helpful here. Page 7 maps the growing hexagon, page 8 shows exactly how it folds into garment shape, pages 9 and 10 demonstrate the whipstitch seams, and pages 11–13 illustrate the hem and cuff construction.
For a pattern officially rated beginner, it is an incredibly satisfying introduction to crochet garment construction.
The stitches stay repetitive enough to relax into, while the construction gives you that wonderful moment where a flat-ish crochet project suddenly becomes clothing.
Check your gauge carefully, follow the size-specific round counts, embrace the wavy hexagons, and most importantly—
trust the process.
Happy crocheting!