Crochet a Mini Potted Succulent
A little handmade greenery can brighten a desk without taking up much space. This crochet succulent pairs soft sage leaves with a terracotta-colored pot, creating a small decorative plant that feels warm, natural, and full of texture. Set it beside your yarn basket, tuck it onto a bookshelf, or wrap it as a thoughtful handmade gift.
The entire piece is crocheted, including the pot and the brown soil surface. Its fourteen leaves are worked flat in three sizes, then layered into a small rosette. A little stuffing supports the planter, while the leaves stay unstuffed so their stitch texture and pointed silhouettes remain visible.
This newly drafted project takes inspiration from the succulent theme in the supplied PDF. It changes the scale, yarn, leaf construction, arrangement, base, and expression: there is no face, and the plant sits in a separate crocheted pot. The counts have been checked mathematically, but the design has not been physically crocheted or tested. All photographs are AI-generated concept illustrations; follow the written counts rather than trying to copy the generated stitches exactly.
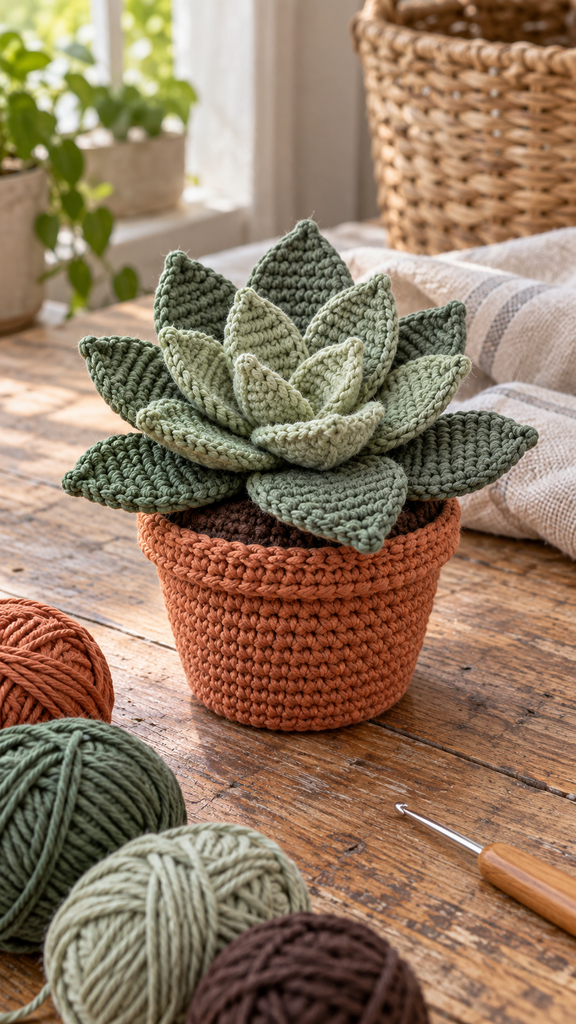
A Smaller, Different Succulent Project
The reference uses a large plush construction with stuffed leaves. This version uses smooth cotton and flat, pointed leaves. Six large outer leaves, five medium leaves, and three small inner leaves create a layered rosette above a brown crochet disk.
The terracotta pot provides the base and is filled with light craft stuffing. A folded rim gives it a recognizable planter shape. No real soil, plant stem, ceramic container, wire, or glue is required.
Most of the crochet uses single crochet, with simple increases and decreases shaping the leaves. Assembly takes a little patience because the leaf bases need to be positioned neatly before they are sewn down.
Project Details and Finished Size
| Detail | Guide |
|---|---|
| Skill level | Confident beginner with basic crochet and sewing experience |
| Terminology | US crochet terms |
| Construction | Stuffed crochet pot, soil disk, and fourteen flat leaves |
| Pot size target | Approximately 6 cm wide and 4–5 cm tall |
| Overall size target | Approximately 10–12 cm across and 7–10 cm tall |
| Leaf arrangement | 6 large, 5 medium, and 3 small leaves |
| Hook starting point | 3 mm with smooth medium-weight cotton |
| Pattern status | Newly drafted; count-checked, not physically tested |
The dimensions are planning targets rather than measurements from a completed sample. A working gauge around 20 sc and 22 rows per 10 cm is a starting point. Yarn thickness, tension, leaf angle, and stuffing can change both the width and height.
Materials and Supplies
- Terracotta cotton: allow approximately 35–50 metres for the pot and rim.
- Dark sage cotton: approximately 25–35 metres for six large leaves.
- Medium sage cotton: approximately 15–25 metres for five medium leaves.
- Pale sage cotton: approximately 10–15 metres for three small leaves.
- Dark-brown cotton: approximately 10–15 metres for the soil disk.
- A 3 mm crochet hook, adjusted to produce a fabric you like.
- A little polyester craft stuffing, a blunt yarn needle, scissors, and stitch markers.
- Optional contrasting basting thread for positioning the leaf layers.
Yarn quantities are estimates, not measured consumption from a tested project. Keep the yarn thickness similar across the leaves and pot so their proportions work together. You can use one green shade throughout if you prefer a simpler palette.
Choose a Firm but Flexible Fabric
The pot needs stitches close enough to contain its stuffing. The leaves should be flexible enough to curve gently without becoming floppy. Make a small sample before starting, and adjust the hook if necessary.
Very thick chenille yarn would create a different result from this cotton version. If you change yarn weight, expect a new scale and test the leaf shapes before making the full set.
Abbreviations and Helpful Notes
| Abbreviation | Meaning |
|---|---|
| MR | Magic ring |
| ch | Chain |
| sc | Single crochet |
| sl st | Slip stitch |
| inc | Work 2 sc in the same stitch |
| dec | Decrease 2 stitches into 1 sc |
| BLO | Back loop only |
| FLO | Front loop only |
| rnd | Round |
| st / sts | Stitch / stitches |
Rounds for the Pot, Rows for the Leaves
Work the pot and soil disk in continuous rounds unless a join is specified. Mark the first stitch and move the marker after every round. An instruction such as “(3 sc, inc) × 6” means repeat three single crochets followed by an increase six times.
The leaves are worked back and forth in rows. Chain one and turn before every row after Row 1. This turning chain never counts as a stitch. Work into the first actual stitch of the row and keep the last stitch easy to identify.
Use a regular sc2tog for the flat leaf decreases: insert the hook into each of the next two stitches, drawing up a loop from each, then yarn over and pull through all three loops. Leave long sewing tails at the narrow starting bases of the leaves.
Crochet the Terracotta Pot
Make the Base and Sides
With terracotta:
- Rnd 1: 6 sc in an MR. 6 sts.
- Rnd 2: Inc in every stitch. 12 sts.
- Rnd 3: (1 sc, inc) × 6. 18 sts.
- Rnd 4: (2 sc, inc) × 6. 24 sts.
- Rnd 5: (3 sc, inc) × 6. 30 sts.
- Rnd 6: Sc BLO in every stitch. 30 sts.
- Rnds 7–10: Sc through both loops in every stitch. 30 sts per round.
- Rnd 11: (4 sc, inc) × 6. 36 sts.
- Rnds 12–14: Sc in every stitch. 36 sts per round.
Round 6 helps define the change from the bottom to the sides. Round 11 widens the upper pot slightly. Keep the bottom reasonably flat while working; do not pull it into a bowl before the side rounds are added.
Add a Folded Rim
Rnd 15: Sc FLO in every stitch. 36 sts. This leaves the back loops of Round 14 unused on the inside of the pot.
Rnd 16: Sc through both loops in every stitch. 36 sts. Join with a sl st to the first stitch of this round and fasten off.
Fold Rounds 15–16 gently outward over the pot’s upper sides. Preserve the unused back loops of Round 14: the soil disk will be sewn into those loops. If the folded rim lifts, tack it lightly to the outside with a few terracotta stitches, keeping the inner attachment loops accessible.
Crochet the Brown Soil Disk
A Flat Circle With 36 Edge Stitches
With dark brown:
- Rnd 1: 6 sc in an MR. 6 sts.
- Rnd 2: Inc in every stitch. 12 sts.
- Rnd 3: (1 sc, inc) × 6. 18 sts.
- Rnd 4: (2 sc, inc) × 6. 24 sts.
- Rnd 5: (3 sc, inc) × 6. 30 sts.
- Rnd 6: (4 sc, inc) × 6. 36 sts.
Fasten off with an approximately 40 cm sewing tail. Lay the disk flat and compare it with the pot opening. Both attachment edges contain 36 stitches. A small difference in diameter can ease into place, but a major mismatch deserves a tension check before sewing.
Crochet Six Large Outer Leaves
Dark Sage Leaves
Begin each leaf with a long starting tail for attachment. Chain 2.
- Row 1: Sc in the second chain from the hook. 1 st.
- Row 2: Ch 1, turn. Inc in the stitch. 2 sts.
- Row 3: Ch 1, turn. Inc in both stitches. 4 sts.
- Row 4: Ch 1, turn. Inc, 2 sc, inc. 6 sts.
- Row 5: Ch 1, turn. Inc, 4 sc, inc. 8 sts.
- Row 6: Ch 1, turn. Sc in every stitch. 8 sts.
- Row 7: Ch 1, turn. Dec, 4 sc, dec. 6 sts.
- Row 8: Ch 1, turn. Dec, 2 sc, dec. 4 sts.
- Row 9: Ch 1, turn. Dec twice. 2 sts.
- Row 10: Ch 1, turn. Dec. 1 st.
Fasten off at the tip. Weave the tip tail down the back of the leaf without pulling it tight. Keep the long starting tail free. The Row 1 end is the attachment base; the Row 10 end becomes the outward-pointing tip.
Make six matching leaves. Do not stuff them or add a border, since extra edging would change their size and shape.
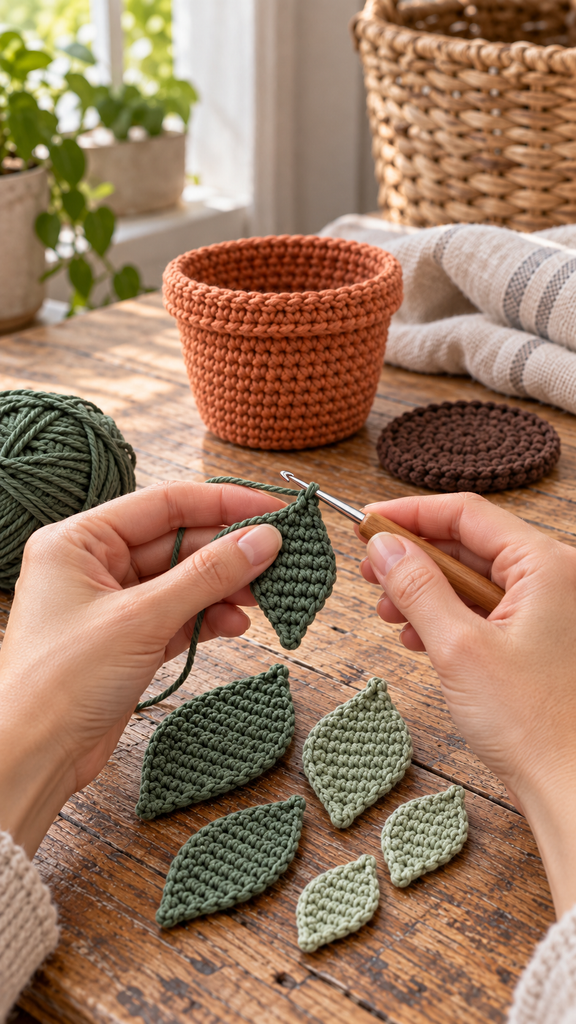
Crochet Five Medium Leaves
Medium Sage Leaves
Chain 2, leaving a long starting tail.
- Row 1: Sc in the second chain from the hook. 1 st.
- Row 2: Ch 1, turn. Inc. 2 sts.
- Row 3: Ch 1, turn. Inc in both stitches. 4 sts.
- Row 4: Ch 1, turn. Inc, 2 sc, inc. 6 sts.
- Row 5: Ch 1, turn. Sc in every stitch. 6 sts.
- Row 6: Ch 1, turn. Dec, 2 sc, dec. 4 sts.
- Row 7: Ch 1, turn. Dec twice. 2 sts.
- Row 8: Ch 1, turn. Dec. 1 st.
Fasten off and weave in the tip tail. Keep the starting tail for sewing. Make five pieces, checking that their row counts match before arranging them.
Crochet Three Small Inner Leaves
Pale Sage Leaves
Chain 2, leaving a long starting tail.
- Row 1: Sc in the second chain from the hook. 1 st.
- Row 2: Ch 1, turn. Inc. 2 sts.
- Row 3: Ch 1, turn. Inc in both stitches. 4 sts.
- Row 4: Ch 1, turn. Sc in every stitch. 4 sts.
- Row 5: Ch 1, turn. Dec twice. 2 sts.
- Row 6: Ch 1, turn. Dec. 1 st.
Finish as for the larger leaves. Make three. Their smaller size creates a compact central group without requiring another stuffed component.
Assemble the Leaf Rosette
Sew the Outer Layer to the Soil Disk
Keep the brown disk separate from the pot while attaching the leaves. This lets you reach the underside and secure the sewing ends neatly.
Arrange the six large leaves evenly around the disk, with their starting bases roughly 1 cm from its center and their tips pointing outward. These positions are guides: check your actual leaf lengths before stitching. Tack Rows 1–2 of each leaf to the disk, leaving the wider section and tip free.
Add the Middle and Center Layers
Position the five medium leaves inside the outer group. Offset their tips between the large leaves where possible. Five leaves cannot align with all six outer gaps identically, so aim for a balanced, natural arrangement rather than perfect symmetry.
Sew their first two rows nearer the disk’s center. Then arrange the three pale leaves in the middle, with their tips angled upward and outward. A small loose stitch between neighboring inner bases can help them hold a lightly cupped shape.
Keep the outer leaf tips flatter and lift the inner ones gently with your fingers. These flat cotton shapes will not look like the stuffed tubular leaves in the original PDF. Avoid tightening attachment stitches so much that they gather the soil disk.
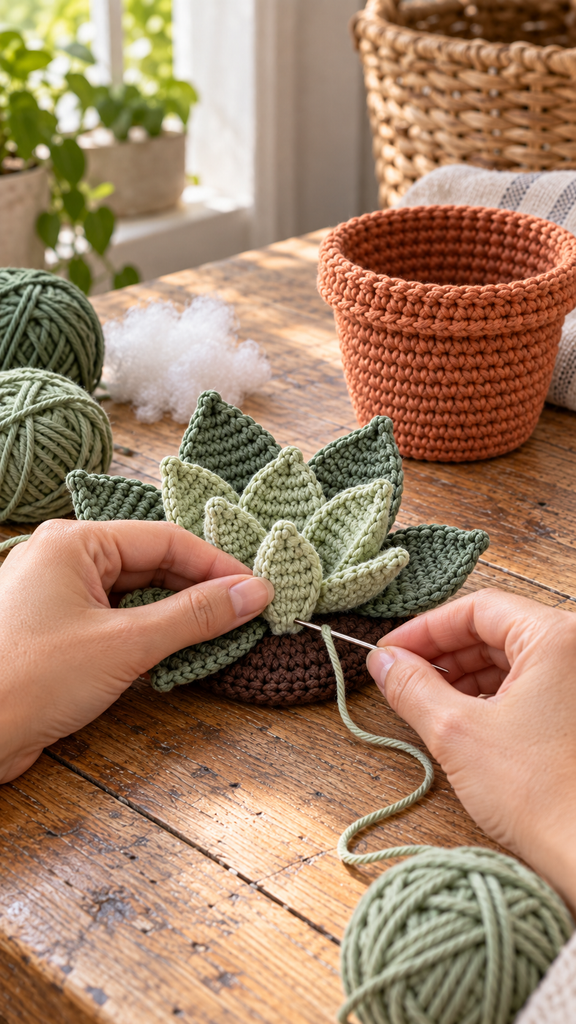
Fill the Pot and Attach the Plant
Add small pieces of stuffing to the pot. Distribute them around the base and sides, keeping the bottom level and leaving room beneath the soil disk. Do not pack the pot until it becomes a ball.
Place the decorated disk into the opening, with the leaf rosette above the rim. Match its 36 edge stitches to the 36 unused back loops of Pot Round 14. Use the brown sewing tail to whipstitch each disk-edge position to its matching inner pot loop.
After about three quarters of the seam, check the filling and add a little more if needed. Complete all 36 attachment positions, secure the tail, and bury it inside the pot. Keep the folded terracotta rim outside the seam.
Rest the plant on a level surface and adjust the filling gently through the fabric. Its stability depends on yarn, stuffing, and leaf placement; this untested draft does not guarantee a rigid or self-standing result. Display it with support if necessary.
Personalize Your Little Crochet Plant
Use one soft green for a quiet monochrome rosette, or try blue-green outer leaves with pale sage in the center. A cream or sandy-beige pot can give the same pattern a different look.
For a simpler version, keep all fourteen leaves but omit the extra cupping stitches in the central group. Changing the number of leaves affects the arrangement and coverage of the soil disk, so test their placement before sewing if you choose another combination.
Care and Common Problems
Follow the yarn and stuffing care instructions. Clean the leaves gently and support the pot’s shape while drying. Let the interior dry completely before storing the piece.
If the leaves curl too tightly, loosen the turning chains and weave-in tension. If the pot leans, check the distribution of stuffing. If the soil disk ripples after assembly, loosen the leaf-base stitches or the attachment seam. A flexible cotton plant will have natural variation rather than identical leaf angles.
Frequently Asked Questions
Is this suitable for a beginner?
It suits someone who can make a magic ring, count rounds, and work single-crochet increases and decreases. The individual leaves are short, manageable pieces. Assembly is the stage that needs the most patience.
Are the leaves stuffed?
No. All fourteen leaves are worked flat and left unstuffed. Only the crocheted pot contains filling. Their shape comes from the row increases, decreases, and attachment angle.
Do I need a real pot?
No. The terracotta container is part of the crochet pattern. The soil disk is sewn to its inner loops, enclosing the stuffing and supporting the leaf rosette.
Why are there unused loops inside the rim?
Working Pot Round 15 in FLO leaves the back loops of Round 14 free. Those 36 loops form the attachment line for the 36-stitch soil disk, while the rim folds outward.
Can I make the plant bigger?
You can develop a larger variation by changing yarn weight or recalculating the components. Changing only one part can disturb the proportions. Check pot, disk, and leaf fit together before committing to a complete larger set.
Is this the same succulent as the supplied PDF?
No. The reference is a large plush succulent with stuffed leaves and facial details. This version is a small cotton plant with flat leaves, a separate crochet pot, and no face. Its counts are checked on paper, but physical testing is still needed.