Crazy Dragon Amigurumi

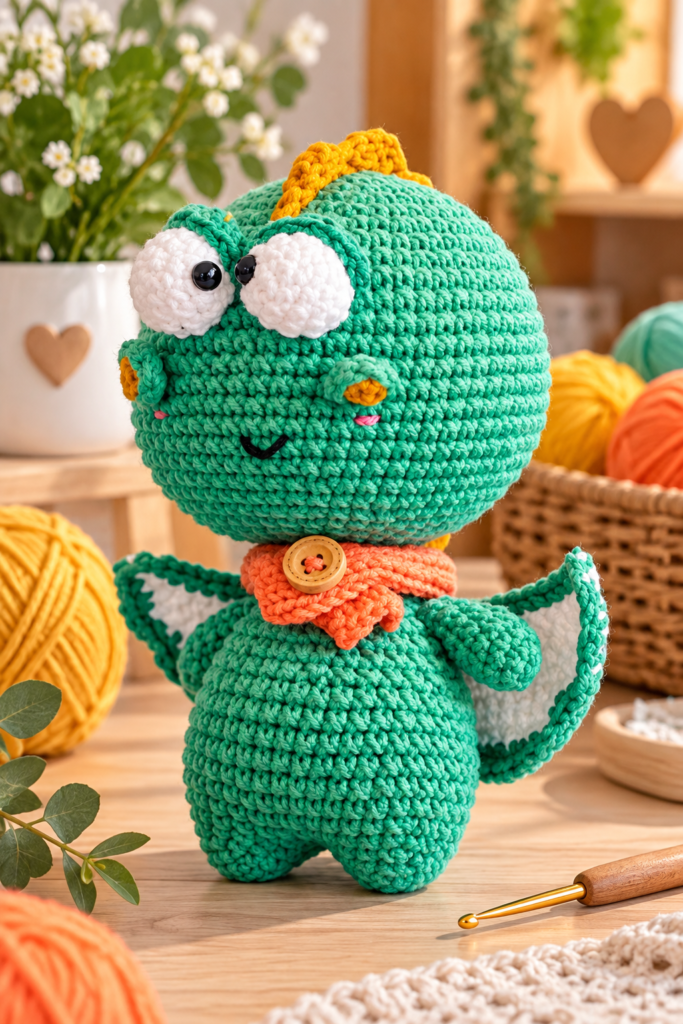
Not every dragon needs to breathe fire or guard a castle — sometimes a dragon just needs oversized googly eyes, a spiky orange mohawk, and a cozy knitted scarf. The Crazy Dragon Amigurumi, designed by aquariwool, is exactly that kind of dragon: a round, turquoise little creature with a wide, expressive face, fabric wings, a jagged back thorn, and a button-fastened scarf that gives him just a touch of extra character.
As the pattern’s introduction notes, this is “an ideal amigurumi pattern for beginners,” and thanks to detailed step-by-step instructions, it comes together quickly despite having quite a few individual pieces. Between the crocheted body parts and a hand-knit scarf worked separately on knitting needles, this project is also a nice opportunity to combine two different fiber crafts into one finished toy — perfect for keeping kids entertained, as the pattern points out.
Below is the complete pattern, reorganized with clear headings for every component, along with the full materials list, abbreviations, and a set of tips and frequently asked questions to guide you through the trickier construction details.
About This Pattern
Designer: aquariwool
Materials
Yarn colors:
- (A) Turquoise: Alize Cotton Gold 610 (100g, 330m)
- (B) Yellow: YarnArt Jeans 84 (50g, 160m)
- (C) Orange: YarnArt Jeans 23 (50g, 160m)
- (D) White: YarnArt Jeans 62 (50g, 160m)
Other materials:
- Crochet hook, size 2 to 2.5mm
- Knitting needles, size 3.5 to 4mm
- 1 pair of safety eyes, 6mm
- 1 wooden button
- Black and pink embroidery thread
- Tapestry needles, pins, stitch markers, scissors
Finished size: approximately 13 cm tall, when using the specified materials.
Abbreviations
| Abbreviation | Meaning |
|---|---|
| Ch | Chain |
| Sc | Single crochet |
| Inc | Increase |
| Dec | Decrease |
| Hdc | Half double crochet |
| Sl st | Slip stitch |
| MR | Magic ring |
| Dc | Double crochet |
| Tr | Treble crochet |
| Bobble | Bobble stitch (4 hdcs in the same stitch) |
| BLO | Back loop only |
| FLO | Front loop only |
| Rnd | Round |
| Sts | Stitches |
Crocheting the Legs (Make 2)
Yarn A.
- Rnd 1: 6 sc in MR (6).
- Rnd 2: (1 sc, inc) x3 (9).
- Rnd 3: (2 sc, inc) x3 (12).
- Rnd 4: (3 sc, inc) x3 (15).
Break the yarn. Make the second leg the same way, but this time don’t break the yarn — instead, connect the two legs together: sc 15 across Leg 1, plus sc 15 across Leg 2, for a total of 30 stitches. From here, move directly into the body.
Crocheting the Body
Yarn A.
- Rnd 1: (4 sc, inc) x6 (36).
- Rnd 2–7: sc 36 (6 rounds) (36).
- Rnd 8: (4 sc, dec) x6 (30).
- Rnd 9: sc 30 (30).
- Rnd 10: (3 sc, dec) x6 (24).
- Rnd 11: sc 24 (24).
- Rnd 12: (2 sc, dec) x6 (18).
- Rnd 13–16: sc 18 (4 rounds) (18).
Break the yarn, leaving a long tail. Stuff the body.
Crocheting the Tail
Yarn A.
- Rnd 1: 6 sc in MR (6).
- Rnd 2: sc 2, inc 2, sc 2 (8).
- Rnd 3: sc 3, inc 2, sc 3 (10).
- Rnd 4: sc 4, inc 2, sc 4 (12).
- Rnd 5: sc 5, inc 2, sc 5 (14).
- Rnd 6: sc 6, inc 2, sc 6 (16).
Break the yarn, leaving a long tail for sewing later, and stuff the tail.
Crocheting the Arms (Make 2)
Yarn A.
- Rnd 1: 6 sc in MR (6).
- Rnd 2–7: (1 sc, inc) x3 (9).
Break the yarn, leaving a long tail. Stuff lightly, then sew the two edges of the arm together to flatten it slightly before attaching to the body.
Crocheting the Head
Yarn A.
- Rnd 1: 6 sc in MR (6).
- Rnd 2: 6 inc (12).
- Rnd 3: (1 sc, inc) x6 (18).
- Rnd 4: (2 sc, inc) x6 (24).
- Rnd 5: (3 sc, inc) x6 (30).
- Rnd 6: (4 sc, inc) x6 (36).
- Rnd 7: (5 sc, inc) x6 (42).
- Rnd 8: (6 sc, inc) x6 (48).
- Rnd 9: (7 sc, inc) x6 (54).
- Rnd 10: sc 54 (54).
- Rnd 11: (8 sc, inc) x6 (60).
- Rnd 12–19: sc 60 (8 rounds) (60).
- Rnd 20: (8 sc, dec) x6 (54).
- Rnd 21: sc 54 (54).
- Rnd 22: (7 sc, dec) x6 (48).
- Rnd 23: (6 sc, dec) x6 (42).
- Rnd 24: (5 sc, dec) x6 (36).
- Rnd 25: (4 sc, dec) x6 (30).
- Rnd 26: (3 sc, dec) x6 (24).
- Rnd 27: (2 sc, dec) x6 (18).
Break the yarn, leaving a long tail for sewing later, and stuff the head.
Crocheting the Eyes (Make 2)
Yarn D.
- Rnd 1: 6 sc in MR (6).
- Rnd 2: (1 sc, inc) x3 (9).
- Rnd 3: (2 sc, inc) x3 (12).
- Rnd 4: (3 sc, inc) x3 (15).
- Rnd 5: (3 sc, dec) x3 (12).
Break the yarn, leaving a long tail. Attach the safety eyes, then stuff each eye piece — this is what gives the dragon his signature oversized, slightly bulging eye shape.
Crocheting the Eyelids (Make 2)
Yarn A.
- Row 1: Chain 8, starting on the 2nd stitch from the hook.
- Row 2: sc 1, hdc 1, dc 1, (dc 2), dc 1, hdc 1, sc 1.
Break the yarn, leaving a long tail for sewing later. These small curved pieces sit along the top edge of each eye, giving the dragon his sleepy, slightly mischievous expression.
Crocheting the Nose
Using Yarn B, sc 4 into a magic ring (make 2 of this piece). Using Yarn A, sc 6 into a magic ring (make 2 of this piece). Attach one Color A piece and one Color B piece together for each side of the nose.
Crocheting the Wings (Make 2)
Yarn D.
- Row 1: Chain 15, starting in the 2nd stitch from the hook, sc 14, turn (14).
- Row 2: ch 1, BLO, sc 14, turn (14).
- Rows 3–4: ch 1, BLO, sc 12, turn (2 rows) (12).
- Rows 5–6: ch 1, BLO, sc 10, turn (2 rows) (10).
- Rows 7–8: ch 1, BLO, sc 8, turn (2 rows) (8).
Break the yarn, then use Yarn A to crochet a row of sc all the way around the outer edge of each wing. Use a tapestry needle to sew the two finished wings onto the back of the body.
Crocheting the Thorn
Yarn B.
Crochet Round 1 with single crochet, running from the tail up to the first half of the head, following the reference photo for placement.
- Rnd 2: (skip 2, dc 5 into the same stitch, skip 2), repeating this sequence all the way to the end.
This repeated shell-like stitch pattern is what creates the jagged, spiky ridge running down the dragon’s back and over the top of his head.
Knitting the Scarf
Yarn C, worked on the knitting needles.
- Row 1: Cast on 6 sts (6).
- Row 2: K6 (6).
- Row 3: P6 (6).
Repeat Rows 2 and 3 until the scarf reaches 13 cm in length, then cast off. Break the yarn and hide the remaining tail.
Finishing Touches
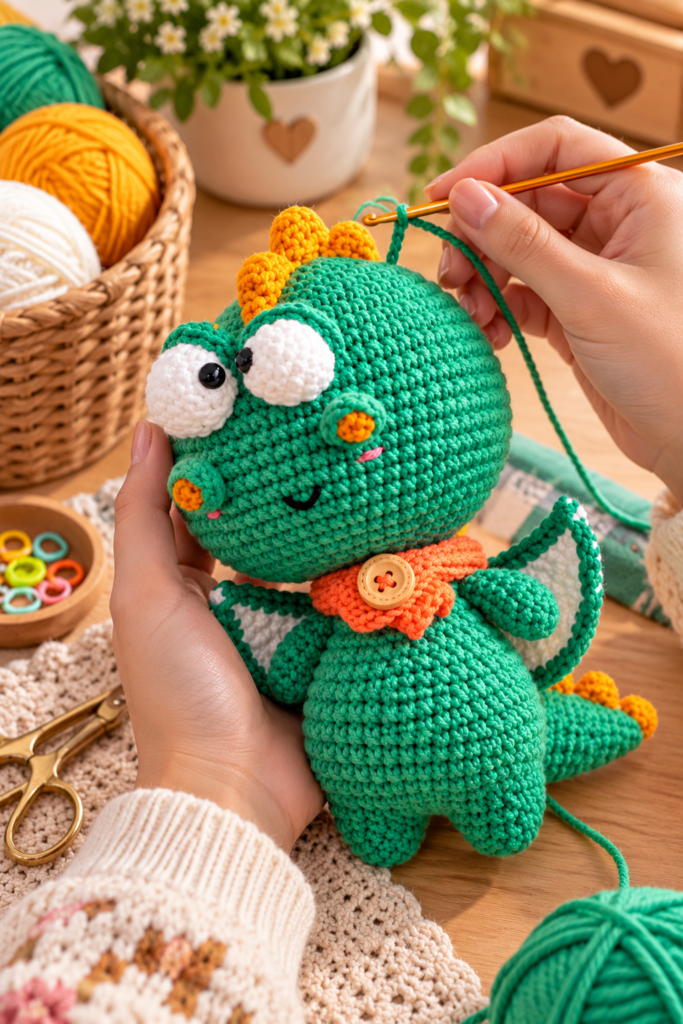
Use a tapestry needle to attach the wooden button to the scarf, then tie or wrap the finished scarf around the dragon’s neck. Use black thread to embroider the mouth, and pink thread to embroider the cheeks.
That’s it — congratulations, your crazy dragon amigurumi is complete!
Tips for Crocheting the Crazy Dragon Amigurumi
- Join the legs carefully. Since the two legs are connected into a single continuous round (15 sc across each leg, for 30 total) before starting the body, take a moment to make sure both legs are facing the same direction before you crochet across them, so the finished dragon stands evenly.
- Attach the safety eyes before fully stuffing the eye pieces. Because the eyes are a separate piece from the head, insert and secure the safety eyes first, then stuff the eye piece around them, rather than trying to force the hardware through already-firm stuffing.
- Work the wing rows in back loops only, consistently. Every row of the wing (aside from the first) is worked in BLO, which is what gives the wings their ribbed, membrane-like texture. Skipping this on even one row will create a visible inconsistency in the finished wing.
- Follow the reference photo closely for the Thorn. Because Round 1 of the thorn is worked “from tail up to the first half of the head” with placement described visually rather than by exact stitch count, keep the pattern’s photo nearby to match the starting and ending points correctly.
- Measure your scarf as you knit. Since the scarf pattern simply says to repeat the knit and purl rows “till you reach 13 cm,” check your length periodically with a ruler or measuring tape rather than guessing by row count, since gauge can vary between knitters.
Frequently Asked Questions
Who designed this pattern? The Crazy Dragon Amigurumi was designed by aquariwool and shared as a free pattern.
What size is the finished dragon? When made with the specified yarns and hook/needle sizes, the finished toy measures approximately 13 cm tall.
Do I need to know how to knit for this pattern? Yes, partially — while the dragon’s body, head, limbs, wings, and thorn are all crocheted, the scarf is worked separately on knitting needles using simple knit and purl stitches. If you’re not familiar with knitting, this small strip is a gentle way to try it out, since it only involves casting on 6 stitches and alternating two basic rows.
Why are the eyes made as a separate piece rather than sewn directly onto the head? Crocheting the eyes as their own stuffed, domed pieces (with the safety eyes inserted and secured within them) is what gives this dragon his distinctive oversized, slightly bulging eye look, rather than a flatter safety-eye placement directly into the head.
What is the “Thorn,” and how is it attached? The thorn is a spiky ridge worked in two rounds directly onto the finished dragon, running from the tail up over the first half of the head. Round 1 is a simple row of single crochet along that path, and Round 2 adds a repeated shell-stitch pattern (skip 2, dc 5 in the same stitch, skip 2) to create the jagged points.
How is the nose constructed? The nose is made from two small two-color pieces — a Color B (yellow) magic ring with 4 sc, and a Color A (turquoise) magic ring with 6 sc — attached together in pairs to form the two sides of the nose.
Is this pattern good for someone who has never made amigurumi before? The pattern’s own introduction specifically calls it “an ideal amigurumi pattern for beginners,” and the individual techniques used (magic ring, single crochet, increases, decreases, and basic shaping) are all foundational skills, though the number of separate pieces does mean it’s a longer project than a single-piece amigurumi.
Can I substitute different yarn colors? Certainly — while the pattern specifies turquoise, yellow, orange, and white for a particular color scheme, the same construction would work with any color combination if you wanted to design your own unique dragon.
A Dragon Worth Keeping Close
Between his oversized expressive eyes, spiky yellow mohawk-thorn, patterned wings, and a cozy hand-knit scarf fastened with a wooden button, this Crazy Dragon amigurumi has a level of personality that goes well beyond a typical stuffed toy. It’s a project that blends crochet and knitting into one finished piece, and the result — as the pattern’s own introduction promises — is a toy kids (and dragon-loving adults) are sure to love.
For more free amigurumi and crochet patterns like this one, be sure to check out Lovelycraft.com.