Cinnamon and Cream Crochet Button Cowl
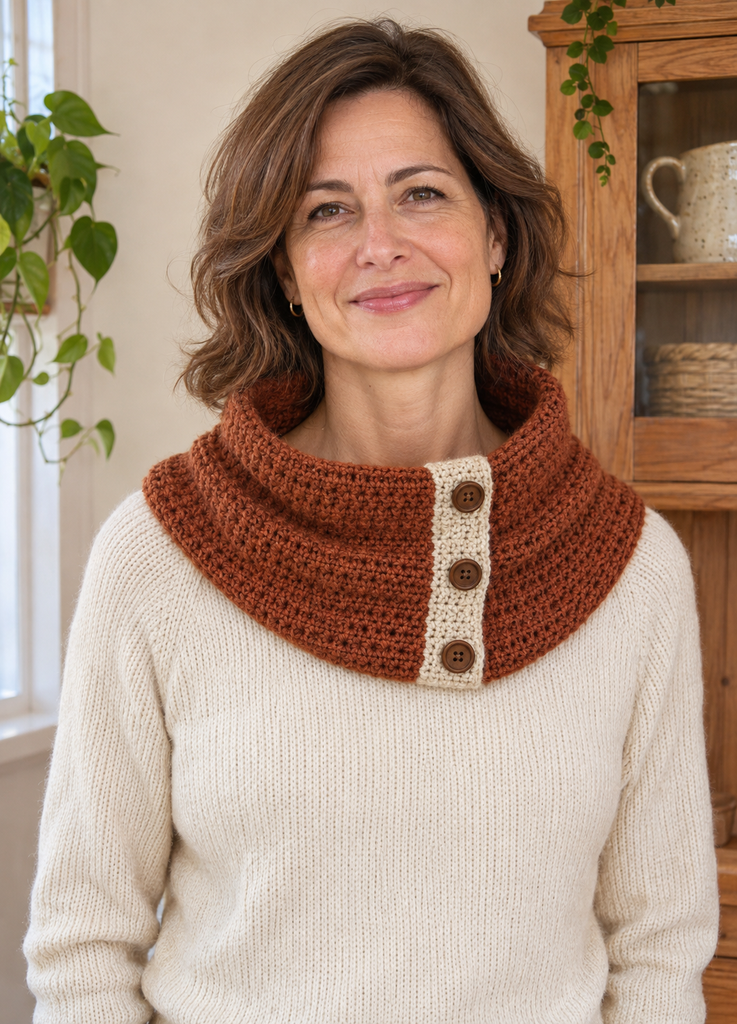
A warm crochet cowl is lovely on the days when a coat needs a little extra softness at the collar. This cinnamon and cream version has a generous, relaxed opening and three wooden buttons that turn an ordinary rectangle into an easy neck wrap. The cream ends make a small contrast against the cinnamon fabric, while the simple stitches let the yarn do most of the work. I would wear it with a plain sweater and let the button band sit slightly to one side.
The construction stays flat until the very end. Work a cream starting band, a longer cinnamon section, and a second cream band with three buttonholes. Once the buttons are sewn on, the short ends overlap to form the cowl. There is no permanent joining seam, so you can open it completely when putting it on.
Pattern status: This is a newly drafted, untested pattern. Stitch arithmetic and proposed measurements have been checked, but a physical sample has not been made. Yarn use, buttonhole fit, fabric stretch, and wearing comfort require sample testing. All four images are AI-generated concepts; stitch texture, drape, and proportions are illustrative. Follow the written draft rather than counting stitches in the pictures.

About the New Design
The supplied reference is a long gray scarf with post-stitch ridges and fringe. This project changes the format into a shorter, wider button cowl with a two-color layout, plain half double crochet, and an overlapping closure. It does not use the reference’s ridge stitch pattern, scarf measurements, or fringe instructions.
The proposed closed circumference is approximately 73 cm, giving a loose adult neck opening rather than a close-fitting collar. Its 28 cm height can settle into soft folds. This is a single-loop accessory: it is not intended to wrap twice around the neck.
| Project detail | Draft specification |
|---|---|
| Skill level | Confident beginner |
| Terminology | US crochet terms |
| Flat dimensions | Approximately 28 cm wide x 77 cm long |
| Closed circumference | Approximately 73 cm, depending on overlap and stretch |
| Main fabric | Half double crochet through both loops |
| Closure | Three buttons with three chain-space buttonholes |
| Construction | One rectangle in turned rows; no permanent end seam |
Materials and Yarn Choice
Use a smooth DK or light worsted wool blend that produces a soft fabric at gauge. A little spring helps the cowl recover its shape after wearing. Check the washed swatch against your neck before committing to a full project, since a yarn that feels pleasant in the hand may feel different at the collar.
- Cinnamon main color: approximately 300–400 m as a provisional allowance.
- Oatmeal cream: approximately 40–60 m.
- A 4 mm hook, or the size needed to obtain gauge.
- Three smooth buttons, approximately 18 mm across, subject to a buttonhole test.
- Sewing needle and strong matching thread for the buttons.
- Blunt yarn needle, scissors, measuring tape, and removable stitch markers.
Choose the two colors from the same yarn range where possible. Their thickness, stretch, and washing requirements should be compatible. The yardage ranges are estimates rather than measured sample consumption.
A smooth button with rounded edges is easier to pass through a soft crochet opening than a rough or sharply edged one. Keep your chosen buttons beside the swatch so you can test them before reaching the final band.
Gauge and Measurement Checks
Aim for 20 hdc stitches and 14 rows per 10 cm, measured after washing and drying according to the yarn label. Make a swatch larger than 10 cm and measure its center. Use the same turning method and both-loop insertion as the pattern.
At this gauge, 56 stitches give a width of 28 cm. A total of 108 rows gives a length of approximately 77.1 cm. Each six-row cream band measures approximately 4.3 cm along that length.
The button and buttonhole centers are planned about 102 rows apart on the flat piece. That corresponds to approximately 72.9 cm around the closed cowl. These calculations do not include changes from stretching, seam-like compression at the buttons, or different button placement. Measure and try the actual fabric before finalizing the closure.
If the swatch is too wide, try a smaller hook. If it is too narrow, try a larger hook. Also check row height, because the length and overlap depend on it. Choose a flexible fabric rather than forcing an unsuitable yarn to match only the stitch width.
Abbreviations and Pattern Notes
Ch means chain, hdc means half double crochet, sl st means slip stitch, and st/sts means stitch/stitches. RS is the preferred outside face and WS is the inside. US crochet terminology is used throughout.
For hdc, yarn over, insert the hook into the next stitch, yarn over and draw up a loop, then yarn over and draw through all three loops on the hook. Work through both top loops for every ordinary stitch.
The turning ch 1 does not count as a stitch. Work the first hdc into the first actual stitch and the last hdc into the last actual stitch. Every ordinary row contains 56 stitches. There are no increases, decreases, or post stitches.
The foundation chain runs across the cowl’s height. The rows build its length. When the short ends overlap, the three buttons run vertically from the upper edge toward the lower edge.
How to Crochet the Button Cowl
Step 1: Make a Small Buttonhole Test
Before the main piece, crochet a small cream swatch with at least two ordinary hdc rows. On the next row, work several hdc, ch 3, skip 3 stitches, and continue hdc. On the following row, work one hdc into each of the three chains individually, then add another ordinary row.
Wash and dry this test if the yarn changes noticeably when washed. Push one of your buttons through the opening several times. It should pass with a little resistance and remain reasonably secure when the fabric relaxes.
If the opening is unsuitable, first test a different button diameter or a different tension for the three chains. The written main pattern uses ch 3 and skips 3 stitches, preserving the stitch count. Changing the number of skipped stitches requires redistributing the buttonhole row and checking the next row’s count.
Step 2: Crochet the First Cream Band
With cream, ch 57 loosely.
Row 1: Hdc in the second chain from the hook and in every remaining chain: 56 hdc. Ch 1 and turn.
Rows 2–6: Hdc in each stitch across, ch 1, and turn. Keep 56 hdc in every row. On the final stitch of Row 6, complete the last yarn-over with cinnamon, then ch 1 with cinnamon and turn.
Cut the cream yarn with a tail long enough to weave securely. Mark this first cream band as the button band. It has no holes and will sit underneath the other cream band when the cowl is closed.
Step 3: Work the Cinnamon Center
Row 7: With cinnamon, hdc across all 56 stitches. Ch 1 and turn.
Rows 8–102: Continue the same plain hdc row, keeping 56 stitches across. This makes 96 cinnamon rows altogether, from Row 7 through Row 102 inclusive.
Place a marker at regular intervals if it helps you track the row count. Check the first and last stitch, and lay the rectangle flat occasionally to make sure it has not gradually narrowed or widened.
At the final stitch of Row 102, complete its last yarn-over with cream. Ch 1 with cream and turn. Cut the cinnamon yarn with a suitable tail for weaving.

Step 4: Begin the Second Cream Band
Rows 103–104: With cream, hdc in each stitch across: 56 hdc per row. Ch 1 and turn after each row.
Mark this end as the buttonhole band. The next row places three openings across the 56-stitch width. Those openings will become a vertical column when the cowl is worn.
Before continuing, check the total length against your washed gauge. If you deliberately changed the cinnamon section, keep the same six-row structure for this final cream band and note your revised row numbers.
Step 5: Make the Three Buttonholes
Row 105: Hdc in each of the first 7 stitches. Ch 3 and skip the next 3 stitches. Hdc in each of the next 16 stitches. Ch 3 and skip the next 3 stitches. Hdc in each of the next 16 stitches. Ch 3 and skip the next 3 stitches. Hdc in each of the final 8 stitches. Ch 1 and turn.
You have 47 hdc plus three ch-3 spaces. Counting the nine chain positions gives the same 56 positions across the row. The holes replace original stitch positions 8–10, 27–29, and 46–48, with their centers at positions 9, 28, and 47.
The edge margins differ by one stitch because 56 is an even number and the three identical holes are separated by equal 16-stitch sections. That small difference is intentional; do not add a stitch to make both margins look numerically identical.
Step 6: Complete the Buttonhole Band
Row 106: Hdc in each hdc and work one hdc into each individual chain of the three ch-3 groups. You return to 56 hdc. Ch 1 and turn.
Take care to work into the chains themselves rather than making one stitch around each whole chain space. Each opening needs three replacement hdc on this row to maintain the width.
Rows 107–108: Hdc in each of the 56 stitches. Ch 1 and turn after Row 107. Fasten off at the end of Row 108 without adding another turning chain.
The second cream band now contains six rows, including its buttonhole row. There is no separate edging or fringe in the base draft.
Step 7: Wash, Shape, and Match the Closure
Weave the color-change tails into the inside of matching sections. Wash or dampen the rectangle according to the yarn label, then dry it flat. Smooth the edges without stretching the holes or forcing the piece to a measurement it cannot comfortably hold.
Choose and mark a preferred RS. Form a loop without twisting the rectangle, bringing the two short cream ends together. Place the buttonhole band over the plain button band, with the right side facing outward. Align the two long edges and overlap the cream ends by approximately 4.3 cm.
Pin the overlap and mark a button position directly beneath the center of each hole. The proposed button line falls around Row 3 of the starting band, but actual alignment matters more than the row label. Because the work may be approached from opposite ends, do not rely on recounting columns from whichever edge happens to be nearest your hand.
Try the pinned wrap around your neck without fastening sharp pins against your skin; use temporary basting if needed. Confirm that it sits loosely and opens easily before sewing the buttons.
Step 8: Sew on the Buttons
Lay the piece flat and open. Sew the three buttons to the plain first cream band only, at the marks transferred from the holes. Use strong matching thread and catch several sound crochet loops under each button. Do not sew through the buttonhole band or permanently join the ends.
Leave enough clearance under each button for the thickness of the upper band. A button pulled tightly against the crochet can be difficult to fasten. Secure the thread inside and check that no rough thread ends remain against the neck.
Fasten each button through its corresponding hole. Open and close the cowl a few times, then assess the overlap and comfort again. All three buttons should align without pulling one edge out of shape.

Wearing and Styling the Finished Cowl
Let the fabric settle naturally instead of pulling it upward into a stiff collar. Turn the closure slightly to the side if you like, keeping the cream band visible as the small contrast detail. The opening is meant to remain relaxed around the neck.
The cinnamon color works nicely with cream, denim, olive, and dark brown. A pale gray body with a navy closure band would give the same construction a cooler look. Keep both yarns similar in weight so the color change does not alter the rectangle’s width.
This draft is for an adult accessory. Its detachable buttons and neck-wrap construction should not be treated as a children’s pattern by simply reducing the stitch count.
More Information and Customization
Change the Closed Circumference
At the proposed row gauge, adding 7 cinnamon rows adds approximately 5 cm to the closed circumference. Removing 7 cinnamon rows shortens it by approximately 5 cm. Keep both cream bands at six rows and retain the same buttonhole layout across the width.
For example, 103 cinnamon rows instead of 96 would produce 115 total rows and an estimated closed circumference near 78 cm with the same overlap. Label the final cream rows by their function rather than accidentally returning to the original absolute row numbers.
Make a measured change based on where you want the cowl to rest. Do not choose a close fit solely from a neck measurement; account for the thickness of the fabric, the underlayer, and comfortable movement.
Change the Height Carefully
The 56-stitch foundation determines the 28 cm height. Changing that count also changes the buttonhole distribution, so it is not enough to keep Row 105 unchanged. Plan three hole centers across your new width with suitable edge margins, then recalculate every worked and skipped stitch.
For a simpler first sample, keep the stated width and adjust only the cinnamon row count. Once you have seen how the fabric drapes, you can draft a shorter collar with a revised closure layout.
Keep the Closure in Good Condition
Check the button threads occasionally and repair looseness early. If a hole grows with use, a few careful sewing stitches around its inside edge may help stabilize it, but test that the button still passes comfortably.
Follow the yarn label when washing. Wooden buttons may have separate care needs, so choose washable ones or remove them before cleaning if their maker recommends it. Dry the cowl flat and store it folded rather than hanging it from the button band.
Frequently Asked Questions
Is this the same scarf as the PDF reference?
No. This is a shorter, wider cowl with cream end bands and a three-button closure. It uses plain half double crochet rather than the reference’s post-stitch ridge pattern, and it has no fringe.
Can a beginner make it?
The main rectangle is approachable once you can keep straight edges. Practice the chain-space buttonhole on a small swatch first, and count the stitches on the row immediately after the holes.
Why do I have fewer than 56 stitches after the buttonholes?
A chain space may have received only one stitch instead of three. On Row 106, work one hdc into each of the three chains individually, giving three replacement stitches per hole.
Can I sew the short ends together instead of adding buttons?
That creates a different, permanently closed cowl. You would need to choose a suitable seam and account for its take-up, and it would have to fit comfortably over the head. The written draft uses the opening closure and does not provide a seamed alternative.
Can I wear it as a long scarf?
It opens flat, but its approximately 77 cm length is much shorter than a conventional long scarf. It is designed to close once around the neck rather than hang with long tails.