Bluebell Crochet Cloche-Style Hat
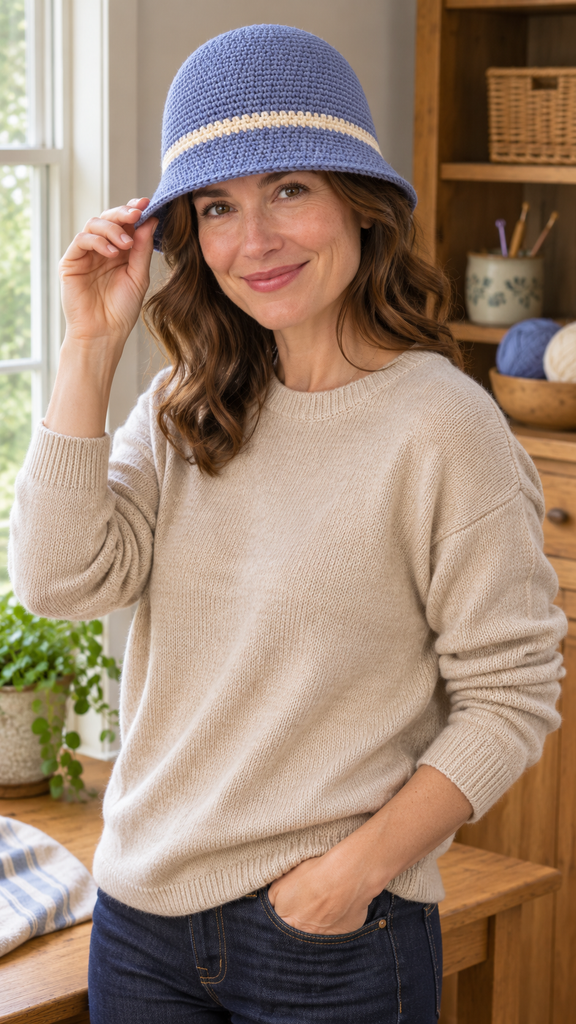
A short brim can change the whole feel of a handmade hat. This bluebell version has a simple crown, close single-crochet fabric, a narrow cream band, and a small downward brim. It is designed as an everyday layer that looks relaxed with a sweater or coat, without needing a pompom or extra decoration.
The starting inspiration was a family set of knitted beanies. This project changes the technique, construction, shape, and finishing. Instead of knitting a flat panel and sewing a back seam, you crochet from the crown downward in continuous rounds. The lower edge becomes a gently flared brim rather than a folded ribbed cuff.
Pattern status: this is a newly drafted, untested crochet pattern. Stitch increases, section totals, and brim counts have been checked, but no physical sample has been made. Fit, crown shape, gauge, yarn consumption, and drape still need checking in a real sample. All four images are AI-generated concepts, including the woman wearing the intended hat.

The Design: A Simple Crown and a Short Brim
The crown begins as a circular increase section. A back-loop round marks the transition into the sides, which continue without increases. Three cream rounds form the contrast band, followed by more blue fabric before the brim begins.
The brim adds only twelve stitches overall across two increase rounds. This creates a modest flare rather than a broad sunhat shape. Its final plain rounds let it fall softly downward, giving the hat a cloche-inspired outline.
The written version is an adult reference size, not a graded family pattern. Measure the intended wearer’s head and check the actual crown and body circumference before continuing. The small differences between yarns matter more for a hat than they do for an unstructured scarf.
Project Details
| Detail | Draft specification |
|---|---|
| Skill level | Confident beginner |
| Terminology | US crochet terms |
| Construction | Crown downward in continuous rounds |
| Main body count | 102 single crochet stitches |
| Calculated body circumference | Approximately 56.7 cm at the provisional gauge |
| Intended crown diameter | Approximately 17.5–18 cm |
| Intended finished depth | Approximately 21–22 cm including brim |
| Cream band | Three rounds |
| Brim | Five rounds, increasing to 114 stitches |
| Pattern status | Arithmetic checked; not physically crocheted or tested |
Materials and Yarn Choices
- Soft DK or light worsted yarn in dusty bluebell: provisionally 120–160 g.
- The same yarn in oatmeal cream: provisionally 15–25 g.
- A 4 mm crochet hook, adjusted to obtain the suggested fabric and gauge.
- A removable stitch marker, tapestry needle, scissors, and measuring tape.
Choose a yarn that feels comfortable against the forehead and has enough body for a small brim. A smooth wool blend or soft acrylic can work as a starting point. Very limp yarn may produce a floppy lower edge, while a stiff cord can make the hat uncomfortable and change the intended drape.
Use matching yarn thickness in both colors. The cream band should keep the same circumference as the blue body rather than acting as a tight belt. The yarn amounts are planning estimates, not measured consumption, so keep extra available if you add depth.
Gauge and Choosing the Reference Size
The provisional gauge is 18 sc and 20 rounds per 10 cm, measured in relaxed single crochet. Make a swatch, let it settle, and measure without stretching it. Because tension in rounds can differ from flat work, check the hat itself as it develops.
At that stitch gauge, 102 stitches give a circumference of approximately 56.7 cm. This may be a useful starting point for a head around 55–56 cm if you prefer a little ease, but fit depends on the yarn and fabric. Do not assume the same number suits every adult wearer.
Measure around the head where the hat will sit, usually across the forehead and above the ears. Compare that measurement with a relaxed sample tube or the emerging hat body. The opening should feel comfortable without relying on a strong stretch to fit.
The calculated crown diameter corresponding to 56.7 cm circumference is about 18 cm. That is a planning guide, not a reason to force the crochet circle to lie at a particular measurement. Check its count, shape, and fabric first.
Abbreviations and Working Notes
| Abbreviation | Meaning |
|---|---|
| ch | Chain |
| sc | Single crochet |
| inc | Work 2 sc into one stitch |
| BLO | Back loop only |
| sl st | Slip stitch |
| st / sts | Stitch / stitches |
| rnd | Round |
Work in a continuous spiral unless a finishing instruction says otherwise. Do not join or turn after every round. Put a marker in the first stitch, complete the round, and move the marker into the first stitch of the next round.
For BLO, insert the hook under only the loop farther from you along the top of the stitch. Work through both loops on every other round. Keep the outward face of the hat outside as the sides begin to grow.
The beginning of the round will show a small step at a color change because the fabric spirals. Place that marker area at the back when wearing the hat. A subtle step is preferable to adding unplanned stitches to disguise the transition.
The Crochet Hat Pattern
Part 1: Start the Blue Crown
With bluebell yarn, make a magic ring.
Round 1: Work 6 sc into the ring. Pull the center closed and mark the first sc. 6 sts.
Round 2: Inc in every stitch. 12 sts.
Round 3: Repeat (sc in the next stitch, inc in the next stitch) 6 times. 18 sts.
Round 4: Repeat (sc in the next 2 stitches, inc in the next stitch) 6 times. 24 sts.
Round 5: Repeat (sc in the next 3 stitches, inc in the next stitch) 6 times. 30 sts.
Round 6: Repeat (sc in the next 4 stitches, inc in the next stitch) 6 times. 36 sts.
Round 7: Repeat (sc in the next 5 stitches, inc in the next stitch) 6 times. 42 sts.
Round 8: Repeat (sc in the next 6 stitches, inc in the next stitch) 6 times. 48 sts.
Round 9: Repeat (sc in the next 7 stitches, inc in the next stitch) 6 times. 54 sts.
Round 10: Repeat (sc in the next 8 stitches, inc in the next stitch) 6 times. 60 sts.
Round 11: Repeat (sc in the next 9 stitches, inc in the next stitch) 6 times. 66 sts.
Round 12: Repeat (sc in the next 10 stitches, inc in the next stitch) 6 times. 72 sts.
Round 13: Repeat (sc in the next 11 stitches, inc in the next stitch) 6 times. 78 sts.
Round 14: Repeat (sc in the next 12 stitches, inc in the next stitch) 6 times. 84 sts.
Round 15: Repeat (sc in the next 13 stitches, inc in the next stitch) 6 times. 90 sts.
Round 16: Repeat (sc in the next 14 stitches, inc in the next stitch) 6 times. 96 sts.
Round 17: Repeat (sc in the next 15 stitches, inc in the next stitch) 6 times. 102 sts.
The crown increases by six stitches per round. A slightly six-sided outline is normal with increases stacked in the same places. It will soften when the sides develop, but strong rippling or deep cupping is a reason to check the count and gauge before continuing.
Set the crown on the table and measure it without pulling. If its size differs substantially from the intended diameter, reassess the hook and yarn rather than continuing with an obviously unsuitable crown. Weave the center tail securely through the foundation stitches.

Part 2: Turn Into the Hat Sides
Round 18: Sc BLO in every stitch. 102 sts. This leaves a small ridge around the crown transition and encourages the work to turn downward.
Rounds 19–29: Sc through both loops in every stitch. 102 sts each round. Work 11 plain rounds in this section.
After several rounds, check the emerging body circumference. It should stop increasing in width. If it keeps widening, count around the marker for an accidental extra stitch. The walls may feel soft in the hand, but their stitch total remains constant.
Try the unfinished hat gently before adding the cream band. Check whether it sits comfortably around the head and whether the crown shape suits the fabric. A small circumference problem will not be fixed by adding a wider brim later.
Part 3: Add the Cream Band
Change to cream on the final pull-through of the last stitch of Round 29.
Rounds 30–32: With cream, sc through both loops in every stitch. 102 sts each round.
The band is three rounds tall, approximately 1.5 cm at the provisional row gauge. Keep the same hook and a relaxed, consistent tension. Tight cream stitches can pull the body inward even when the count is correct.
Change back to bluebell on the final pull-through of the last stitch of Round 32.
Rounds 33–38: With bluebell, sc through both loops in every stitch. 102 sts each round. Work 6 rounds, giving approximately 3 cm of blue fabric below the cream band before the brim begins.
Part 4: Check the Depth
Before beginning the brim, try the hat on again. Check the position of the cream band and where the lower body reaches on the forehead. The five brim rounds will add another approximately 2.5 cm of fabric at the reference gauge, though their downward angle affects how that feels when worn.
For more depth, add plain blue rounds here. For less depth, remove some from this final blue section. Keep the body count at 102 and record the changed round numbers. The brim instructions below can then be worked as a separate five-round sequence.
Part 5: Make the Short Downward Brim
Round 39: Repeat (sc in the next 16 stitches, inc in the next stitch) 6 times. 108 sts.
Round 40: Sc in every stitch. 108 sts.
Round 41: Repeat (sc in the next 17 stitches, inc in the next stitch) 6 times. 114 sts.
Rounds 42–43: Sc in every stitch. 114 sts each round.
Sl st into the next stitch to finish and fasten off. The finishing slip stitch is not an extra stitch in the round total. Weave the tail along the inside of the brim without tightening its edge.
The brim increases by twelve stitches overall, from 102 to 114. It is intended to flare modestly and fall downward. Avoid adding a tight slip-stitch round around the entire edge, which can pull the flare back inward.

How to Wear the Finished Hat
Position the marker and color-change area at the back. Set the crown comfortably and let the short brim angle downward naturally. Smooth the cream band with your fingers rather than pulling it into a perfectly rigid line.
The woman in the styling image shows an imagined way to wear the hat. Her garment is AI-generated, so the image does not demonstrate a tested fit, exact brim angle, or the outcome of a particular yarn. Use your actual sample’s measurements and comfort to judge the final result.
More Information: Adjustments and Care
Change the Circumference Carefully
At the provisional gauge, six stitches change the body circumference by approximately 3.3 cm. Stopping the crown at 96 stitches or extending it to 108 therefore makes a meaningful size change, not a tiny adjustment.
Any such change also affects the brim repeats. For a body count of six times k, the first brim increase repeat is (sc in the next k minus 1 stitches, inc), worked six times. After one plain round, the second increase repeat uses k plain sc followed by inc, again six times. Swatch and check these adaptations rather than treating them as fully graded sizes.
Shape Without Stretching
Follow the yarn label if blocking is appropriate. Gently smooth the crown and arrange the brim at its natural angle, then dry completely. Do not force the hat over an oversized bowl to reach a target measurement; that can stretch both the cream band and the opening.
If the brim waves strongly, check its increase spacing and your tension. If it barely flares, evaluate the fabric before adding more increases. The draft aims for a short, soft edge, and a different yarn may change its behavior.
Try a Different Color Pairing
Muted sage with oatmeal gives the hat a quieter look, while rust with cream makes the band more prominent. Charcoal with pale gray is another simple option. Keep both colors in matching yarn so the band does not behave differently from the crown and brim.
Wash according to the yarn’s instructions and reshape the brim gently afterward. Store the hat with its crown supported lightly rather than folded hard through the same spot every time.
Frequently Asked Questions
Is this the same hat as the PDF?
No. The reference uses knitting, a ribbed cuff, a sewn back seam, and a pompom. This version uses continuous crochet rounds, a cream band, and a short downward brim. Its construction and outline are different.
Can a beginner follow the pattern?
It suits a confident beginner who can count rounds and recognize the back loop. Most of the hat is single crochet. Take your time with the crown increases and check the body size before finishing the brim.
Does the hat need a back seam?
No. It is worked in a continuous spiral. The marker tracks the round beginning, but the fabric is already joined by the crochet itself. Only the yarn tails need weaving in.
Why is Round 18 worked in the back loop?
It leaves a small visible ridge at the crown transition and changes how the fabric turns into the sides. All later rounds use both loops, including the cream band and brim.
Can I make the brim wider?
That is a separate adaptation. Extra plain rounds add depth but do not automatically create more flare. More increases change the angle and circumference, so test a revised brim on the actual hat rather than assuming the written fit will remain the same.