Midnight Snowflake Crochet Button Cowl
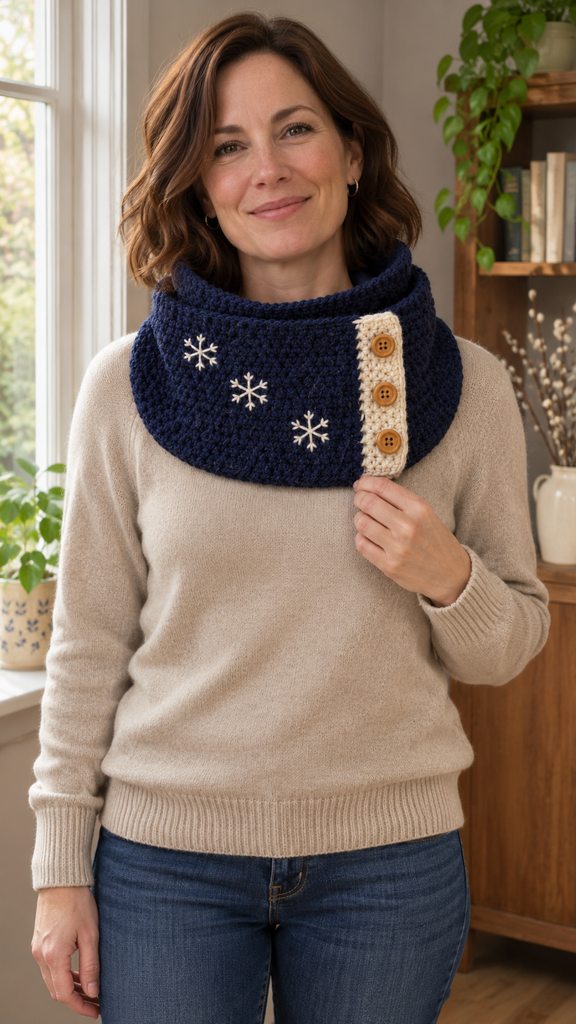
A few small snowflakes can give a simple winter accessory a seasonal feel without covering it in decoration. This midnight blue crochet cowl has a softly textured body, cream closure bands, and three wooden buttons. Delicate embroidered snowflakes sit on the front, where their pale stitches stand out against the dark yarn.
The starting inspiration was a snowflake-motif throw. This project takes the winter theme in a different direction: a short piece of neckwear worked as one rectangle, with a button opening instead of a permanent seam. The snowflakes are embroidered directly onto the crochet, rather than made as large joined motifs.
Pattern status: this is a newly drafted, untested crochet pattern. Stitch counts, section totals, and buttonhole arithmetic have been checked, but no physical sample has been made. Fit, gauge, yarn consumption, and closure behavior need checking in a real sample. All four images are AI-generated concepts, including the woman wearing the intended design.

The Design: A Textured Rectangle With a Winter Detail
Alternating single and double crochet creates a lightly pebbled fabric, often called lemon-peel stitch. The stitches change height, but every row keeps the same count. Short rows travel across the height of the cowl, while the repeated rows build its length around the neck.
Cream single-crochet sections finish both short ends. One band carries the buttonholes, and the other receives the buttons after you overlap the actual fabric. The top and bottom long edges remain navy; there is no separate cream trim around them.
The intended fit is a relaxed collar, not a close-fitting neckband. The opening lets you put it on without pulling it over your head. Check the finished rectangle around your neck over clothing before sewing the buttons, and leave enough ease for comfortable movement.
Project Details
| Detail | Draft specification |
|---|---|
| Skill level | Confident beginner, with simple embroidery |
| Terminology | US crochet terms |
| Construction | One flat rectangle with an overlapping button closure |
| Reference width | 36 stitches, approximately 22.5 cm |
| Calculated flat length | Approximately 60 cm before closure |
| Approximate overlap | 2.5–3 cm |
| Main sections | 6 cream rows, 76 navy textured rows, 6 cream rows |
| Decoration | Three flat embroidered six-spoke snowflakes |
| Pattern status | Arithmetic checked; not physically crocheted or tested |
Materials and Yarn Choices
- Soft worsted yarn in midnight navy: approximately 150–200 g.
- The same yarn in oatmeal cream: approximately 30–45 g, including the embroidery.
- A 5 mm crochet hook, adjusted for the suggested fabric and gauge.
- Three smooth buttons, approximately 15 mm across, plus suitable sewing yarn or strong thread.
- Tapestry needle, scissors, measuring tape, and removable stitch markers.
Choose a yarn that feels comfortable against the neck. A soft wool blend or acrylic is a useful starting point. Use matching yarn thickness and compatible care instructions in both colors. The cream bands should bend with the body rather than becoming stiff tabs at its ends.
The amounts are provisional estimates rather than measured sample consumption. Yarn length per gram varies, so keep extra available if you plan to increase the circumference. A highly textured or fluffy yarn may hide both the alternating stitches and the small embroidery branches.
Gauge and Calculated Size
The provisional body gauge is 16 stitches and 14 rows per 10 cm in alternating single and double crochet. For the cream bands, use approximately 16 sc and 22 rows per 10 cm as a planning reference. Measure both swatches relaxed; their row heights will differ.
At that stitch gauge, 36 stitches give a height of approximately 22.5 cm. The 76 navy rows suggest about 54.3 cm of length, and the twelve cream rows together add approximately 5.5 cm. That gives a flat rectangle around 60 cm long before allowing for the overlap.
With a 2.5–3 cm overlap, the calculated closed circumference is around 57 cm. This is a loose collar reference, not a universal adult size. Measure your sample, try its closure position gently, and adjust the length before making the final band if needed.
Abbreviations and Working Notes
| Abbreviation | Meaning |
|---|---|
| ch | Chain |
| sc | Single crochet |
| dc | Double crochet |
| st / sts | Stitch / stitches |
| ch-1 space | The opening beneath one chain |
To work dc, yarn over, insert the hook, yarn over and pull up a loop, yarn over and pull through two loops, then yarn over and pull through the final two loops.
Ch 1 and turn before every new row. That turning chain does not count as a stitch. Work into both loops throughout the cowl. Mark the first and last actual stitch if the dark yarn makes the edges difficult to see.
The navy stitch pattern uses an even stitch count. Each repeated pair is one sc followed by one dc. Beginning every turned navy row with sc places it into a dc from the previous textured row, while the next dc lands in a sc.
Before Starting: Test a Buttonhole
Make a short single-crochet swatch in cream and work a ch 1 opening over one skipped stitch. On the following row, put one sc into the chain space. Let the fabric relax, then test one of your actual buttons.
The button should pass with a little resistance and remain secure when the fabric is handled gently. If it slips straight through, try a larger button or a smaller hook for the bands. If it cannot pass, choose a smaller button or test a ch 2 opening while still skipping only one stitch underneath.
If you use ch 2 openings, the following row must still receive only one sc per opening to preserve the written width. Check this on the sample before making the cowl’s final band.
The Crochet Cowl Pattern
Part 1: Make the First Cream Band
With cream, ch 37.
Row 1: Sc in the second chain from the hook and in every remaining chain. 36 sts.
Rows 2–6: Ch 1, turn. Sc in every stitch. 36 sts each row.
You have six cream rows in total. This is the band that will receive the buttons later. Do not sew them on yet; their best positions depend on the finished overlap and the buttonhole placement.
On the last sc of Row 6, change to navy for the final pull-through. Leave tails long enough to weave in securely without tying a thick knot at the color transition.
Part 2: Establish the Navy Texture
Row 7: Ch 1, turn. Repeat (sc in the next stitch, dc in the next stitch) 18 times. 36 sts: 18 sc and 18 dc.
Row 8: Ch 1, turn. Repeat (sc in the next stitch, dc in the next stitch) 18 times. 36 sts. Your first sc lands in the last dc of the preceding row.
Rows 9–82: Repeat Row 8. 36 sts each row. Work 74 rows in this section after Rows 7 and 8, giving 76 navy rows altogether.
Keep the last dc visible at the turning edge. It can be easy to mistake the turning chain for another stitch or to skip the final stitch in dark yarn. Count the 18 pairs when necessary rather than trying to identify the texture by touch alone.
The raised appearance comes from the alternating stitch heights; there are no bobbles or post stitches in this draft. Keep an even tension and let the texture develop naturally instead of pulling the shorter stitches tight.

Part 3: Check the Length
At the end of Row 82, measure the relaxed work. Six more cream rows remain, adding approximately 2.7 cm at the provisional band gauge. Include that allowance when checking the future overlap around your neck.
For a longer cowl, add navy textured rows here. For a shorter one, remove rows from this section before beginning the final cream band. Changing the count by two rows keeps the alternating surface sequence consistent. Record the new row numbers if you depart from the reference.
Each two-row change adds or removes approximately 1.4 cm at the body row gauge. Actual measurements matter more than the calculation, particularly after the fabric has been handled or stretched.
Part 4: Crochet the Buttonhole Band
Change to cream on the final pull-through of the last navy stitch.
Rows 83–84: Ch 1, turn. Sc in every stitch. 36 sts each row.
Row 85: Ch 1, turn. Sc in the next 6 stitches, ch 1 and skip the next stitch, sc in the next 10 stitches, ch 1 and skip the next stitch, sc in the next 10 stitches, ch 1 and skip the next stitch, sc in the final 7 stitches.
You have 33 sc and three ch-1 spaces, occupying 36 positions. The openings replace original stitch positions 7, 18, and 29, counted in the direction this row was worked.
Row 86: Ch 1, turn. Sc in every sc and work 1 sc into each chain space. 36 sts.
Rows 87–88: Ch 1, turn. Sc in every stitch. 36 sts each row. Fasten off and weave in the tail.
If your swatch required ch 2 openings, use them in Row 85 while still skipping only one stitch under each. In Row 86, work just one sc into each opening, as described above.
Part 5: Position the Buttons
Choose the face you prefer as the outside. Wrap the rectangle comfortably around your neck without twisting it, placing the buttonhole band over the first cream band. Keep the upper and lower edges aligned and aim for approximately 2.5–3 cm of overlap.
Transfer each hole’s center onto the band beneath with a removable marker. Open the cowl and sew one button at each mark on the outward face of the first band. Use several secure passes and leave enough room beneath the button for the upper band to sit comfortably.
Fasten all three and test the fit. If one area pulls diagonally, reposition the relevant button rather than stretching a hole toward it. The closure should stay flat and the neck opening should feel relaxed.
Part 6: Embroider the Three Snowflakes
With the cowl temporarily fastened, mark a front-facing area of navy fabric beside the button band. Choose three centers about 6–7 cm apart, varying their height slightly for a gentle diagonal or staggered arrangement. Keep them clear of the closure and at least 2 cm from the long edges.
Open the cowl and lay it flat. For each snowflake, imagine a circle approximately 3 cm across. Mark its center and six evenly spaced points around it. With cream yarn, make six straight stitches from the center toward those points, creating six spokes.
Add two short diagonal branch stitches to each spoke, one on either side near its outer third. The branches should angle outward toward the spoke’s tip. Keep the stitches loose enough to rest against the surface without puckering the navy fabric.
Secure the tails on the inward face by weaving through nearby stitches. Do not carry a long tight strand from one snowflake to the next. Finish each separately so the cowl can still stretch and bend between them.

How to Wear the Cowl
Open the buttons, place the rectangle around your neck, and refasten it with the decorated section toward the front. Position the button band slightly to one side if you prefer. Let the upper edge fold softly or stand loosely, depending on the yarn and your comfort.
The woman in the model image shows an imagined styling arrangement. Her garment is AI-generated, so it does not demonstrate a tested fit, exact stitch texture, or the performance of the buttonholes. Use your real sample to decide the best position and amount of ease.
More Information: Adjustments and Care
Keep the Edges and Closure Flexible
If the cream band seems much narrower than the body, check its stitch tension before adding more decoration. The stitch count is the same, but a tight band can draw the end inward. A small hook adjustment may be appropriate after comparing the swatches.
The long edges remain unbordered in this draft. Adding another round can change their stretch or make them wave, so evaluate that variation on a sample rather than automatically finishing every edge with extra stitches.
Change the Height With an Even Stitch Count
For a shorter collar, reduce the foundation stitch count to another even number. Keep the navy rows as complete sc/dc pairs. You will also need to redistribute the three buttonholes across the new width, testing their spacing in a swatch first.
Length changes are simpler: add or remove navy rows before the second cream band. Preserve both six-row cream sections so the closure remains comparable to the reference.
Wash and Store Gently
Follow the yarn’s care instructions and check whether the chosen buttons tolerate the same washing method. Some wooden buttons may need to be removed before washing. Dry the cowl flat at its relaxed dimensions and smooth the embroidery without stretching the branches.
Check the buttons and their sewing threads occasionally. If an opening begins to loosen, repair it before the button starts slipping through. Store the cowl folded rather than hanging it from the buttonholes.
Frequently Asked Questions
Is this the same design as the snowflake throw?
No. The reference uses joined crochet motifs to make a blanket. This draft is a buttoned neck accessory made from one textured rectangle, with cream bands and small embroidered snowflakes. The source motif instructions and photographs are not reproduced.
Are the snowflakes crocheted separately?
No. They are sewn directly onto the navy surface with six spokes and short branch stitches. That keeps the decoration relatively flat and avoids adding large motif layers to the collar.
Can a beginner make this cowl?
It suits a confident beginner who can work single and double crochet. The texture is repetitive. Practice one buttonhole and one embroidered snowflake before committing to the full project.
Why does every navy row begin with sc?
The row has an even number of stitches and ends with dc. After turning, beginning with sc places the short stitch into a tall stitch, while the following dc goes into a sc. That creates the alternating texture without changing the stitch count.
Can I omit the embroidery?
Yes. The navy texture and cream button bands still make a complete cowl. Check the fit first, then decide whether to add one, three, or no snowflakes.