Terracotta Pumpkin Crochet Mug Rug
A pumpkin does not have to sit on a shelf to bring a little autumn into a room. This flat crochet mug rug puts the shape right beside your favorite cup: a warm terracotta body, a narrow cream edge, a short brown stem, and a small green curl. It is a modest project with enough detail to make a coffee corner feel seasonal without rearranging the whole house.
The starting inspiration was a group of stuffed knitted pumpkins. This design takes that autumn idea in a different direction, using crochet rows to create a flat, useful table accessory. There is no stuffing, gathered tube, or stacked centerpiece. The pumpkin outline comes from increases and decreases, and three embroidered curves suggest its familiar ribs.
Pattern status: this is a newly drafted pattern with checked stitch-count arithmetic. It has not been physically crocheted or tested. Measurements and yarn quantities are provisional. The three images are AI-generated design concepts, not photographs of a tested sample; use the written instructions for construction.
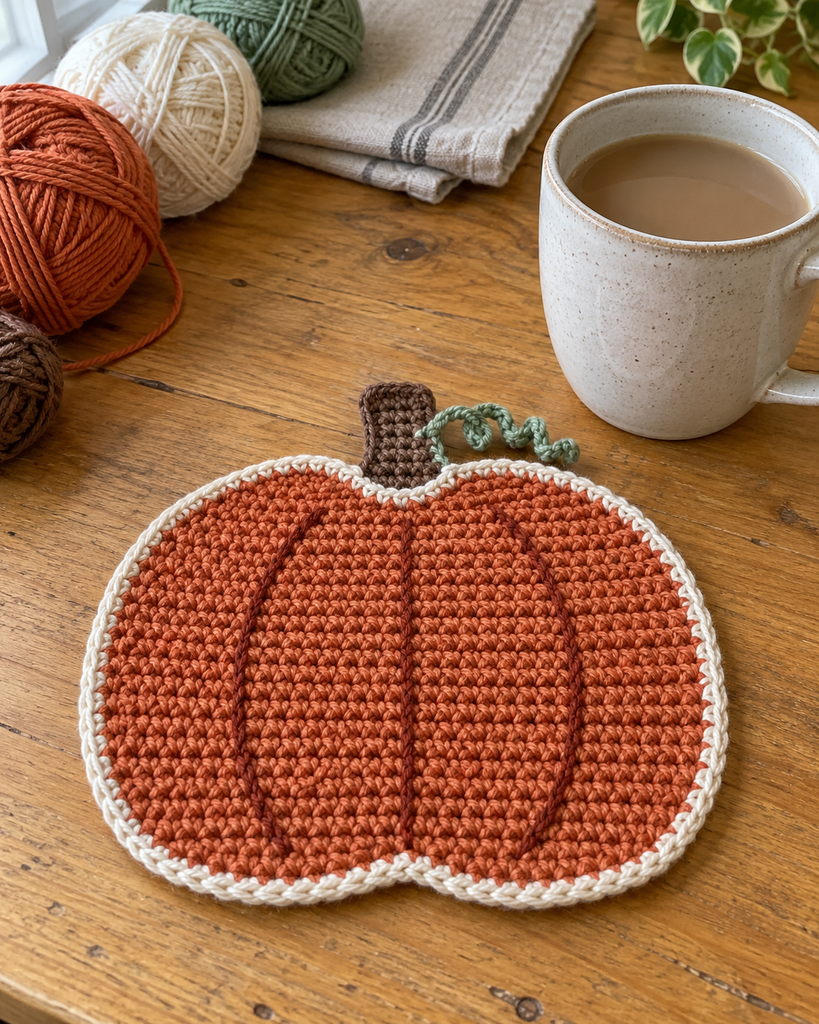
A Different Kind of Crochet Pumpkin
The main piece begins at its lower edge and grows wider as you work upward. After a straight middle section, decreases narrow the shoulders. Two short finishing sections form a shallow notch at the top, leaving a natural place for the little stem.
The cream border softens the outline and makes the warm orange stand out against a wooden desk or dining table. Surface embroidery adds the pumpkin ribs without extra fabric layers. The finished piece should remain soft and flat, with enough room for a mug and a small spoon depending on your gauge.
Use it as a decorative coaster or a small place marker at an autumn gathering. This draft is not a tested heat-protection product, so do not use it beneath hot cookware. Keep the stem and vine away from the area where the mug rests.
Project Overview
| Detail | Draft specification |
|---|---|
| Skill level | Confident beginner |
| Terms | US crochet terminology |
| Main construction | One flat panel worked in rows |
| Intended size | About 17–18 cm wide and 19 cm tall including stem |
| Main stitches | Single crochet, increases, decreases, slip stitch |
| Finishing | Cream border, sewn stem, embroidered ribs, optional curl |
| Pattern status | Counts checked; no physical sample made |
What You Will Need
- Smooth worsted cotton in terracotta: approximately 25–35 g.
- Matching cream cotton for one border: approximately 5–10 g.
- Small amounts of brown and sage cotton for the stem and curl.
- A length of darker rust cotton for subtle rib embroidery.
- A 4 mm crochet hook, adjusted if necessary for your gauge.
- Tapestry needle, scissors, measuring tape, and two removable stitch markers.
Choose yarns of comparable thickness so the edge does not pull the main fabric out of shape. Smooth cotton shows the stitch structure clearly and is a practical choice for a decorative washable coaster. Avoid a fluffy novelty yarn for the first attempt, because it can hide the decrease stitches and make the silhouette harder to judge.
The yarn amounts are estimates. They include a little allowance for swatching, but consumption depends on your yarn and tension. Use colorfast yarn if the mug rug may come into contact with condensation, and follow its care label when washing.
Gauge and Size Planning
The provisional gauge is 16 single crochet stitches and 18 rows per 10 cm. Make a swatch larger than the measurement area, let it relax, and measure across the middle. Aim for close, flexible fabric rather than a rigid board.
At this gauge, the widest 24-stitch row measures approximately 15 cm. The 27 rows reach roughly 15 cm before edging. A single border adds some width and height, giving an intended pumpkin body around 17 cm across and 16–17 cm tall. The short stem adds approximately 2–3 cm above the body.
These are calculations rather than measured sample results. If your swatch is wider, your pumpkin will also be wider. A mug rug is forgiving about exact dimensions, but check the base of your own mug against the central area before finishing.
Abbreviations and Pattern Notes
| Abbreviation | Meaning |
|---|---|
| ch | Chain |
| sc | Single crochet |
| sl st | Slip stitch |
| st / sts | Stitch / stitches |
| inc | Work 2 sc into one stitch |
| sc2tog | Single crochet 2 stitches together |
| RS | Right side, the face chosen for display |
For sc2tog, insert the hook into the next stitch and pull up a loop, repeat in the following stitch, then yarn over and pull through all three loops. Each sc2tog uses two old stitches and produces one new stitch.
Chain 1 and turn at the beginning of each new row unless told otherwise. The turning chain never counts as a stitch. Work into both loops throughout the panel. Mark the first and last stitch if you tend to lose them at the turning edge.
Choose the smoother-looking face as the right side after completing the body. Because the fabric is worked back and forth, there is no need to preserve one face during the early rows.
The Pumpkin Mug Rug Pattern
Step 1: Start the Lower Edge
With terracotta, ch 13.
Row 1: Sc in the second chain from the hook and in every chain across. 12 sts.
Row 2: Ch 1, turn. Inc in the first stitch, sc in the next 10 stitches, inc in the last stitch. 14 sts.
Row 3: Ch 1, turn. Inc in the first stitch, sc in the next 12 stitches, inc in the last stitch. 16 sts.
Row 4: Ch 1, turn. Inc in the first stitch, sc in the next 14 stitches, inc in the last stitch. 18 sts.
Row 5: Ch 1, turn. Inc in the first stitch, sc in the next 16 stitches, inc in the last stitch. 20 sts.
Row 6: Ch 1, turn. Inc in the first stitch, sc in the next 18 stitches, inc in the last stitch. 22 sts.
Row 7: Ch 1, turn. Inc in the first stitch, sc in the next 20 stitches, inc in the last stitch. 24 sts.
Your panel now widens toward the pumpkin’s rounded sides. It will look angular at this stage because the increases happen at the row ends. The edging later softens the steps; do not try to stretch them into smooth curves yet.
Step 2: Work the Broad Middle
Rows 8–20: Ch 1, turn. Sc in every stitch across. 24 sts in each row. Work 13 rows in this section.
Lay the fabric flat and count the rows from the foundation edge. The middle should remain the same width. If one edge leans sharply, check whether the turning chain has accidentally become an extra stitch or the last stitch has been skipped.
The body is intentionally broad enough to show its outline around a mug. Keep your tension consistent rather than tightening the outer stitches to force a curve. Stitch count creates the shaping; tension should stay comfortable and even.
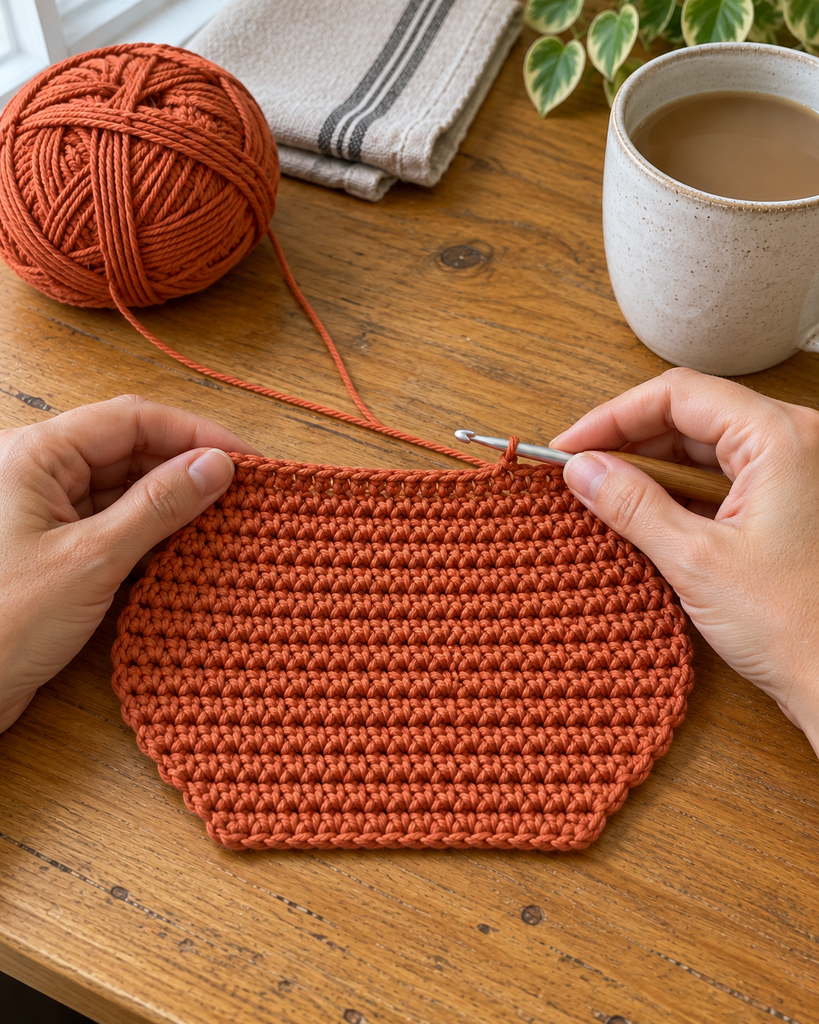
Step 3: Narrow the Pumpkin Shoulders
Row 21: Ch 1, turn. Sc2tog, sc in the next 20 stitches, sc2tog. 22 sts.
Row 22: Ch 1, turn. Sc2tog, sc in the next 18 stitches, sc2tog. 20 sts.
Row 23: Ch 1, turn. Sc2tog, sc in the next 16 stitches, sc2tog. 18 sts.
Row 24: Ch 1, turn. Sc2tog, sc in the next 14 stitches, sc2tog. 16 sts.
Row 25: Ch 1, turn. Sc2tog, sc in the next 12 stitches, sc2tog. 14 sts.
Row 26: Ch 1, turn. Sc2tog, sc in the next 10 stitches, sc2tog. 12 sts.
These six rows remove two stitches per row, returning the upper edge to the same stitch count as the foundation. The top notch is added separately rather than pulling the whole panel together with a gathering strand.
Step 4: Form the Two Upper Lobes
Row 27, first half: Ch 1, turn. Sc2tog over the first 2 stitches, sc in the next 2 stitches, sc2tog over the next 2 stitches. 4 sts made over the first 6 stitches. Leave the remaining 6 stitches unworked and fasten off.
Return the panel to the orientation it had at the start of Row 27. Join terracotta in the first of the 6 unworked stitches with a standing sc2tog over that stitch and the next: begin with a slip knot on the hook, pull up a loop in each of the two stitches, yarn over and pull through all three loops. Sc in the next 2 stitches, then sc2tog over the final 2 stitches. 4 sts made over the remaining 6 stitches. Fasten off.
The two four-stitch sections sit beside each other with a shallow dip between their inner ends. Both halves must be worked across the original Row 26 edge, not into the first half’s new stitches. Mark the center dip for the stem placement.
Step 5: Add the Cream Border
With the chosen right side facing you, join cream at the lower edge. Ch 1 and sc around the full outline. Work into the unused foundation loops along the bottom, the row ends along the sides, and the stitches across both upper lobes.
Begin with approximately 1 sc per row end, checking the fabric frequently. Add an extra sc where a convex turn needs room; skip a row-end position if the edging begins to wave. At the top dip, work a sl st into the low meeting point between the lobes to preserve the notch, then resume sc around the second lobe.
The border has no fixed stitch total because row-end spacing and corner placement depend on the actual fabric. Its goal is a flat outline, not a target number. Join to the first sc with a sl st, fasten off, and weave in the ends.
Step 6: Make the Brown Stem
With brown, ch 5.
Row 1: Sc in the second chain from the hook and in the remaining chains. 4 sts.
Rows 2–5: Ch 1, turn. Sc in every stitch. 4 sts each row. Fasten off with a long sewing tail.
Place the lower edge of this small rectangle behind the center notch, overlapping the pumpkin by approximately one row. Sew securely across the overlap, keeping the upper part free above the silhouette. The stem should be flat rather than stuffed or rolled.
Step 7: Embroider the Pumpkin Ribs
Thread a tapestry needle with darker rust yarn. Use loose running stitches to trace three gentle curves from the upper area toward the lower edge: one near the center and one on each side. Keep the outer curves inside the cream border.
Make short stitches that lie against the surface without pulling the fabric inward. Secure the ends on the back. This is decorative embroidery, not the tight sculpting used on a stuffed pumpkin. Lay the mat flat after each curve and loosen any stitch that creates a pucker.
Step 8: Add an Optional Green Curl
With sage, ch 13. Starting in the second chain from the hook, work 2 sc into every chain. 24 sc. Fasten off with a sewing tail. The increases encourage the narrow strip to curl; arrange it gently by hand if needed.
Sew one end near the stem and position the curl above the pumpkin’s main surface. Keep the raised detail outside the central mug area. If you prefer a simpler, flatter finish, leave the curl off entirely.
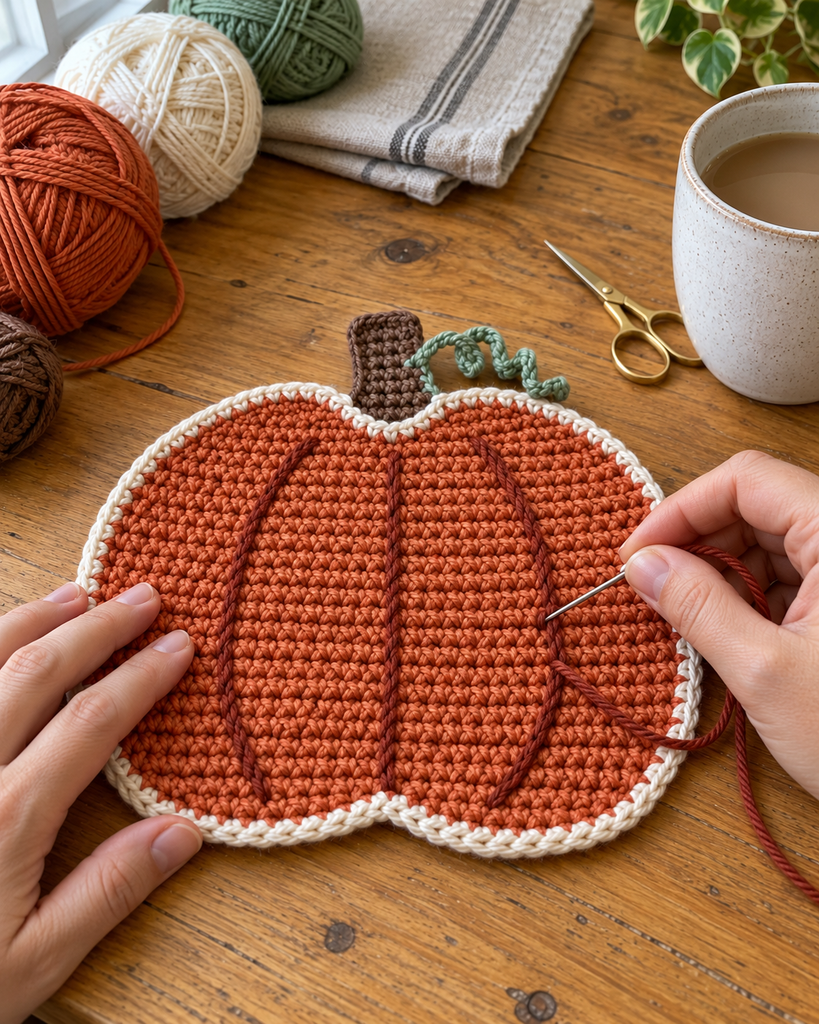
More Information and Finishing Tips
Help the Edges Lie Flat
Place the completed piece on a table before weaving away every last tail. If the cream edge ripples, it may contain too many stitches. If it pulls the orange body into a shallow bowl, it may need more space around the curves. Adjust that short section before fastening it permanently.
Light blocking can help the outline settle. Follow the yarn label, smooth the damp fabric into shape, and allow it to dry completely. Avoid stretching the notch or flattening the stem under a heavy object while it is damp.
Make a Small Autumn Set
Try one terracotta pumpkin, one mustard pumpkin, and one muted sage pumpkin, all with the same cream edge. The matching border links the set while the different body colors create a collected handmade look. Use the same yarn line and hook so their sizes stay reasonably consistent.
For gifting, stack the fully dry mats and tie them loosely with cotton ribbon. A small note with the yarn’s washing instructions is useful. Keep decorative ribbon separate when the coaster is being used.
Care and Everyday Use
Blot spills promptly rather than rubbing them into the stitches. Wash according to the yarn label and dry flat so the outline does not stretch. The back should stay free of bulky knots that could make a cup wobble. Test a cool, empty mug on the finished piece before regular use.
Frequently Asked Questions
Is this the same pumpkin as the PDF?
No. The reference uses knitting and stuffing to create three-dimensional centerpiece pumpkins. This project is a flat crocheted mug rug with row shaping, a contrasting border, surface embroidery, and a sewn flat stem.
Can a beginner make it?
The main fabric uses simple single crochet, but you should be comfortable finding row ends and working decreases. The split top and flexible border are the parts that need the most attention. Count the rows and mark the six stitches for each upper lobe before working them.
Can I use acrylic instead of cotton?
Acrylic can be used for a decorative mat if you like its feel and check your gauge, but this pattern has no tested heat-protection performance in any fiber. Cotton is the intended choice for the draft. Keep all versions away from hot cookware.
Why does the border not have an exact count?
The sides contain shaped row ends rather than a continuous row of stitch tops. Tension and the turning edges affect how many border stitches lie comfortably. Checking flatness as you work is more useful here than forcing a fixed perimeter count.
Can I make it larger?
You can change the yarn and hook together, then swatch to estimate the new size. Adding only middle rows makes the pumpkin taller without making it wider. A proportionally wider version needs a revised shaping sequence and should be treated as a separate adaptation.
Has the pattern been tested with a real sample?
No. The row arithmetic, lobe counts, stem, and curl counts have been checked, but drape, outline, yarn consumption, and practical use still need a physical sample. The images illustrate the intended style and may differ in stitch detail or proportions from your result.