Merry Snowman Crochet Cutlery Pocket
A small handmade detail can make a holiday place setting feel especially welcoming. This Merry Snowman Crochet Cutlery Pocket combines a white pouch, a green opening band, a tiny embroidered face, and a red scarf decoration. It is designed to hold the handles of a fork and spoon while their heads remain visible above the opening.
The supplied Crochet Snowman Basket PDF suggested the broad snowman theme. This project changes the function, scale, construction, colors, and facial details: a narrow folded table accessory replaces the round plant-pot basket. The new design uses a flat single-crochet panel, sewn side seams, separate scarf pieces, and embroidery. The source’s circular basket instructions, scarf construction, felt nose, button eyes, and photograph are not reproduced.
Pattern status: The panel schedule, fold, and scarf-piece counts have been reviewed mathematically. This newly drafted pattern has not been physically crocheted or sample-tested. Dimensions and yarn quantities are provisional. All three images are AI-generated concept illustrations; follow the written instructions and check the fit with your own cutlery.
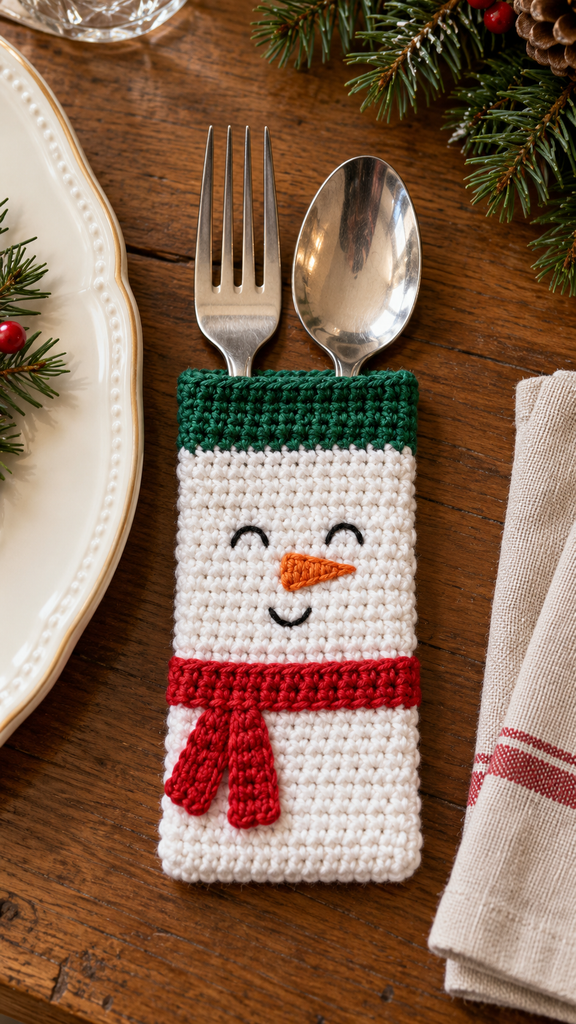
A Little Snowman Made From a Simple Fold
The main panel is a long rectangle with green rows at both short ends and white through the middle. Folding it at its midpoint brings the green bands together at the opening. Two side seams turn it into a shallow pocket without shaping a separate base.
The face is embroidered onto one half before the panel is folded. The scarf is decorative: a short red band and two small tails sit on the lower front. It does not wrap around the back or need to be tied around the cutlery.
Make one pocket to check the proportions before starting a full table set. Utensil handles vary in width and thickness, and the side seams reduce the usable interior slightly. A trial piece helps you choose the right width for the number of items you want to tuck inside.
Project Overview
| Detail | Planned specification |
|---|---|
| Project | Decorative fork-and-spoon pocket |
| Skill level | Confident beginner with basic sewing skills |
| Terms | US crochet terminology |
| Main panel | 16 sc across and 52 rows long |
| Color schedule | 4 green rows, 44 white rows, 4 green rows |
| Fold | Between Rows 26 and 27 |
| Approximate finished size | 8 cm wide × 12 cm tall / 3¼ × 4¾ inches |
| Face | Embroidered eyes, carrot nose, and smile |
| Scarf | One flat band and two short tails |
Materials and Color Planning
- Smooth DK cotton yarn in white A, forest green B, and red C.
- For one pocket, a provisional allowance of 45–60 m / 49–66 yd white, 8–12 m / 9–13 yd green, and 8–12 m / 9–13 yd red.
- Small amounts of black and orange yarn or suitable embroidery cotton for the face.
- A 3.5 mm crochet hook as a starting point, plus nearby sizes for adjusting the fabric.
- A blunt tapestry needle, scissors, tape measure, and removable stitch markers.
- The actual fork and spoon you intend to display.
Choose yarns with compatible thickness and care instructions. Smooth cotton makes the stitch rows easy to count and the face easier to embroider. A fluffy yarn can hide the stitches and create a bulky seam on this small accessory.
The quantities are estimates rather than measured sample consumption. If making several pockets, record how much yarn the first completed piece uses before multiplying the allowance. Keep a little extra for adjusting the width or remaking a scarf piece.
For a quieter palette, use oatmeal white, deep sage, and burgundy. A coordinated set can use the same base colors with slightly different embroidered expressions, while keeping the panel and seam counts consistent.
Abbreviations and Stitch Notes
- ch: chain.
- sc: single crochet.
- st / sts: stitch / stitches.
- RS / WS: right side / wrong side.
The turning ch 1 does not count as a stitch. Work the first sc into the first actual stitch beneath that chain and the last sc into the last actual stitch at the other edge. Turn after each row unless instructed to fasten off.
Work through both top loops throughout the panel and scarf pieces. Mark the first and last actual stitch if the edges are difficult to see. Every main-panel row contains exactly 16 sc.
To change color, begin the final sc of the old color, draw up a loop, then use the new color for the yarn-over that pulls through the two loops. Turn and make the next ch 1 with the new color. Cut the old strand, leaving a tail long enough to weave in securely.
Gauge and a Practical Fit Check
The planning gauge is approximately 20 sc and 22 rows per 10 cm / 4 inches, measured after washing and drying. This is a target rather than a measured result from a completed sample.
Make a single-crochet swatch at least 12 cm square. Wash and dry according to the yarn label, then measure the central area without stretching. Try a different hook if needed, but choose a fabric that folds comfortably as well as matching the numbers.
At the target gauge, 16 sc give an 8 cm panel width. Half of the 52-row panel gives about 11.8 cm of pocket height. The finished interior will be a little narrower because of the side seams.
Lay your fork and spoon handles side by side and compare their combined width with the intended pocket. Leave enough space that they slide in easily without stretching the crochet. If you want to include another utensil, increase the width after checking the actual arrangement rather than assuming it will fit.
Crochet the Main Panel
Step 1: Make the Front Opening Band
With green B, ch 17 loosely.
Row 1: Sc in the second chain from the hook and in each chain across. Turn. 16 sc.
Rows 2–4: Ch 1, sc in every stitch across. Turn. 16 sc per row. Change to white A in the final pull-through of the last stitch of Row 4.
Count the row before changing colors. The first four green rows form the front opening band when the panel is folded. If the foundation chain pulls noticeably tighter than the rows above it, remake it with looser tension or use a slightly larger hook for the chain only.
Step 2: Work the White Body
Rows 5–48: Ch 1, sc in all 16 stitches. Turn. 16 sc per row. This section contains 44 white rows.
Place a removable marker at each end of Row 26. The fold will sit between Rows 26 and 27, dividing the panel into two equal 26-row halves.
Rows 1–26 will become the decorated front. Rows 27–52 will become the back. Keep that orientation in mind when you embroider the face: the front opening is at Row 1, and the bottom fold is near Row 26.
Change to green B in the last pull-through of the final stitch of Row 48.
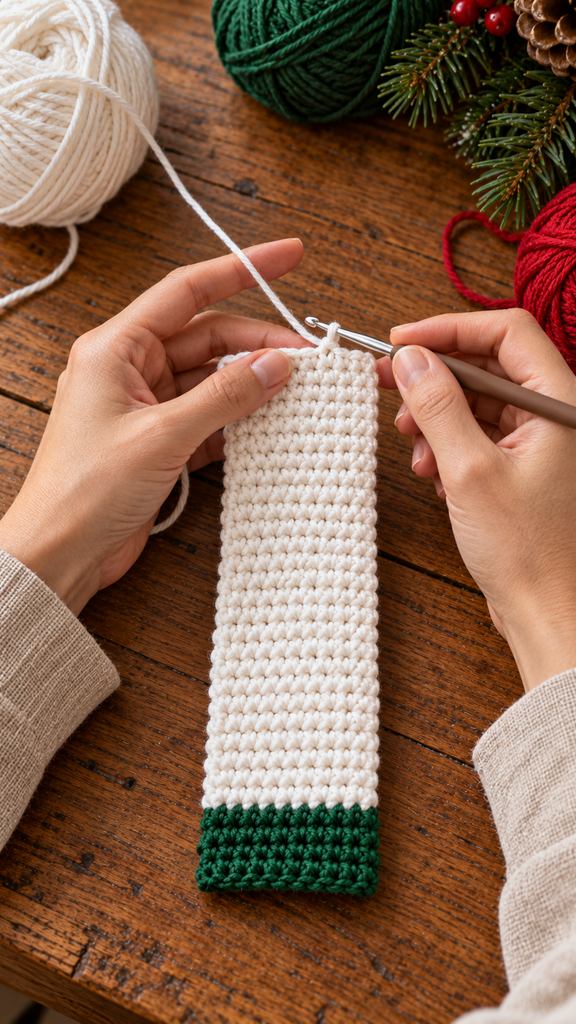
Step 3: Complete the Back Opening Band
Rows 49–52: Ch 1, sc across. Turn after Rows 49–51. 16 sc per row. Fasten off after Row 52.
The complete panel contains 4 green rows, 44 white rows, and 4 green rows, totaling 52 rows. Weave the color-change tails into the WS through matching-color stitch bases, changing direction without gathering the fabric.
Wash and block the panel using the method permitted by the yarn label. Shape it into an even rectangle and allow it to dry completely before decorating. Blocking should settle the fabric rather than force a strongly uneven panel into shape.
Embroider the Snowman Face
Lay the panel with its chosen RS facing up. Orient the first green band at the top and the fold markers below it. Work only on the front half, Rows 1–26.
Mark two eye positions around Rows 8–9, spaced approximately five stitches apart. With black yarn, embroider each eye as a shallow curve using three or four small backstitches. Keep the stitches relaxed so the fabric remains flat.
Position the carrot nose below the eyes, around Rows 10–12. With orange yarn, outline a small sideways triangle approximately three stitches wide and two rows high. Fill it with a few short stitches. The exact position can move slightly to suit your stitch size.
Add a small curved smile around Rows 13–14 using black backstitches. Keep the expression simple and leave room below for the red scarf. Avoid large knots or long loose floats on the inside, where they could catch the utensil handles.
Weave the embroidery tails through nearby stitch bases on the WS, changing direction before trimming. If a feature dimples the fabric, loosen or redo it before sewing the pouch together.
Crochet the Red Scarf Pieces
Scarf Band: Make One
With red C, ch 17.
Row 1: Sc in the second chain from the hook and across. Turn. 16 sc.
Rows 2–3: Ch 1, sc in each stitch across. Turn after Row 2. 16 sc per row. Fasten off, leaving a long sewing tail.
At the target gauge, the band is about 8 cm long and 1.4 cm high. It is designed to lie across the front of the pocket rather than encircle it.
Scarf Tails: Make Two
With C, ch 4.
Row 1: Sc in the second chain from the hook and across. Turn. 3 sc.
Rows 2–6: Ch 1, sc in each stitch across. Turn after Rows 2–5. 3 sc per row. Fasten off, leaving a long sewing tail.
Each tail is approximately 1.5 cm wide and 2.7 cm long at the target gauge. Keep both pieces flat. They are decorative strips and do not need fringe or stuffing.
Sew on the Scarf Decoration
Position the band across the front around Rows 18–20. Test the placement against the face before sewing. The band should sit below the smile and above the fold.
Place the two tails beneath the band’s left side. Let one hang nearly straight down and angle the other slightly outward. Keep their lower ends above the fold so they remain on the front after assembly.
Sew the upper ends of the tails to the panel first. Lay the band over those joins and sew its long edges in place with small matching stitches. Add a hidden stitch near each tail’s lower end to prevent it from flipping over during use.
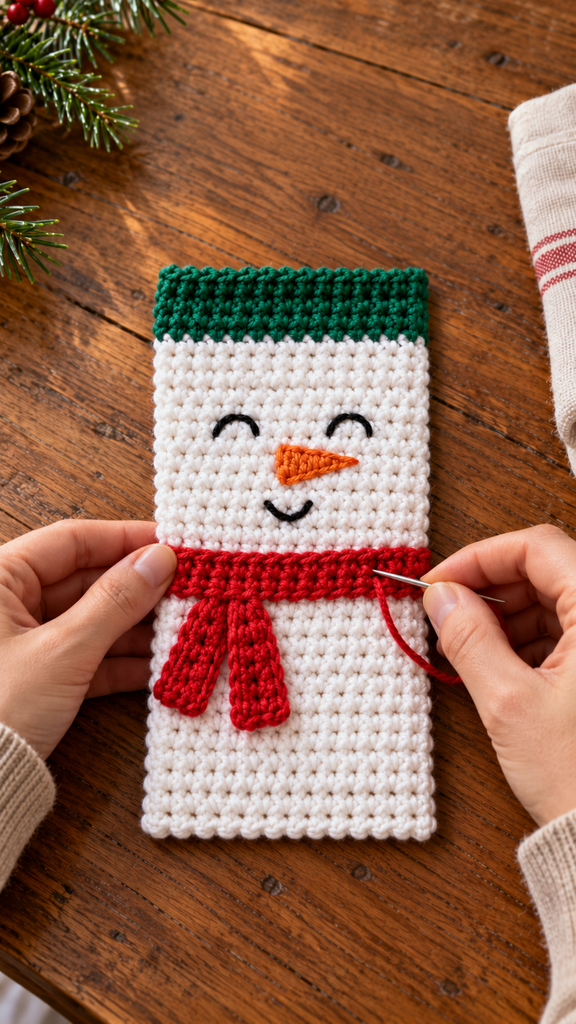
Keep the decoration relaxed against the panel. Do not pull the red band tighter than the white fabric beneath it. Check the reverse and secure every sewing tail before folding the pocket.
Fold and Join the Pocket
Fold the panel between Rows 26 and 27 with the WS together and the decorated front facing outward. The foundation edge of Row 1 and the top edge of Row 52 meet at the opening.
Align the row ends along one side. Row 1 pairs with Row 52, Row 2 with Row 51, and so on, ending with Row 26 beside Row 27 at the fold. There are 26 corresponding row-end pairs per side.
With a blunt needle and matching yarn, whipstitch through secure strands of each pair. Use green for the four pairs nearest the opening and white for the remaining twenty-two pairs. Keep the seam flexible and avoid leaving large loops inside.
Repeat on the other side. Leave the entire upper opening unsewn. Remove the fold markers, weave in the seam tails, and gently smooth the pocket flat.
Slide the intended fork and spoon handles into the opening. Their heads should remain visible and the green bands should sit comfortably around the handles. If the fabric strains, increase the width for the next version rather than forcing the utensils inside.
More Information: Resizing, Table Styling, and Care
To change the width, choose a new number of panel stitches N and begin with N + 1 chains. Maintain N sc on every row. The scarf band can use the same N-stitch count, though its actual fit should be checked after blocking.
To increase the height, add an equal number of white rows to each half so the total row count stays even. For example, adding four white rows gives 56 rows overall, with the fold between Rows 28 and 29. Move the facial and scarf positions to suit the revised front height.
For a full table set, make and wash one completed pocket before repeating it. Record the yarn use, finished size, and any placement adjustments. This is more reliable than making several untested panels at once.
Pair the pocket with plain plates and a linen napkin so the snowman remains visible. Tuck only the utensil handles inside, and use clean, dry cutlery. The crochet pocket is a decorative holder rather than a replacement for washing or drying utensils.
Follow the yarn label for care and test the red, green, orange, and black yarns for color transfer before washing the finished white piece. Reshape gently and dry completely before putting it away between holidays.
Frequently Asked Questions
Is this suitable for a beginner?
It suits someone comfortable with single crochet and keeping a straight edge. The face uses basic embroidery and the assembly uses simple side seams. Practice the eyes on a swatch if backstitch is new to you.
Why do the green bands not line up?
Check that each band contains four rows and the panel has 52 rows overall. Fold exactly between Rows 26 and 27. Unequal halves or an extra body row can make one opening edge sit higher.
Can I include a knife too?
Measure the actual handles together before deciding. A wider pocket may be needed. Keep any sharp blade outside the crochet and use an appropriate table arrangement for your utensils.
Can I use buttons for the eyes?
This draft uses embroidery, which keeps the front flatter and removes a separate hardware step. If you add buttons, their attachment and care requirements need to be considered separately.
Why is the front puckering under the scarf?
The red band or sewing thread may be too tight. Remove the affected stitches and reattach the band while the white panel rests flat. The decoration should sit on the surface without drawing the sides inward.
Are the photographs exact technical demonstrations?
They show the intended style and general working stages. They are AI-generated concepts and may not reproduce exact stitch counts or needle placement. Use the written instructions and your actual panel measurements.
Has the pattern been physically tested?
No. The arithmetic has been reviewed, but a complete sample is still needed to confirm yarn use, seam appearance, finished dimensions, and fit with the intended cutlery.