Crochet a Sweet Strawberry Wristlet
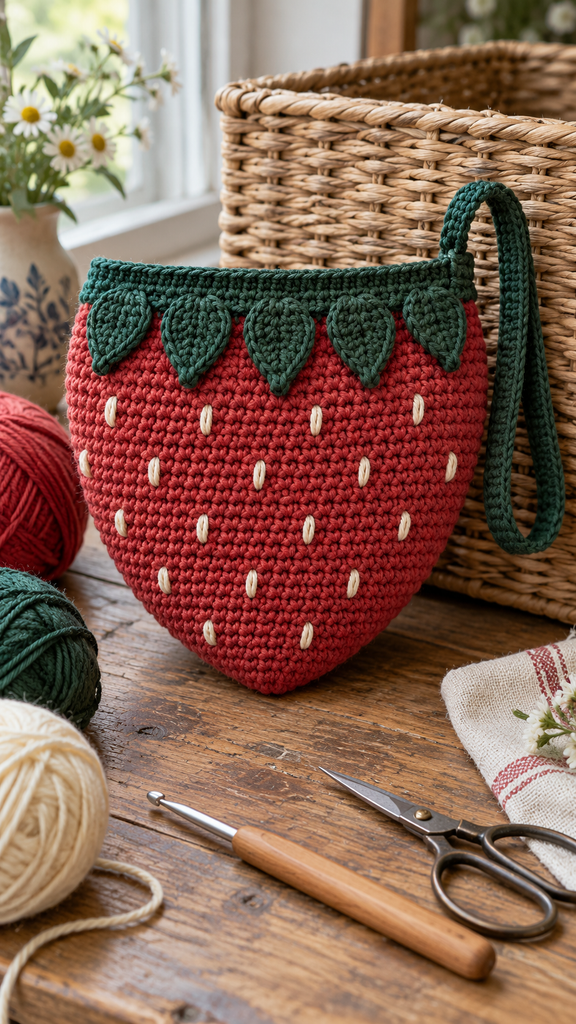
A strawberry-shaped bag is a lovely way to bring a little color to your crochet basket. This mini wristlet combines warm red cotton, tiny cream seed stitches, and a row of pointed green leaves. Its short wrist loop makes it easy to pick up, while the softly shaped panels keep the finished piece light and simple.
The project begins at the strawberry’s narrow bottom tip. Two flat panels widen into a broad berry shape, then narrow slightly at the shoulders. After sewing them together, you add a green opening band, five small crocheted leaves, and a flat wrist loop.
The supplied PDF is a cardboard-loom weaving project, rather than a crochet pattern. This article uses the strawberry-bag idea as inspiration for a newly drafted crochet design. The construction, materials, surface details, leaf trim, and strap are different. The counts below have been checked mathematically, but the project has not been physically crocheted or tested. All photographs are AI-generated concept illustrations; follow the written instructions for counts and placement.
A Small Strawberry Bag With a Different Construction
This version uses smooth cotton and ordinary single crochet instead of a cardboard loom and bulky woven yarn. Its leaves are crocheted separately, and the cream seeds are embroidered directly onto the front panel. The back remains plain red.
The short green strap forms a wrist loop rather than a shoulder strap. There is no felt flower or decorative button. The unfastened top stays accessible, making this a small open pouch for a few lightweight essentials or a handmade gift presentation.
Its shape is intentionally soft. It is not a rigid container or a fitted phone case, and its usable capacity will depend on your yarn, gauge, seams, and optional lining.
Project Details and Finished Size
| Detail | Guide |
|---|---|
| Skill level | Confident beginner with basic shaping and hand sewing |
| Terminology | US crochet terms |
| Construction | Two shaped panels joined on the sides and bottom |
| Panel height | 30 rows before the opening band |
| Widest panel row | 32 single crochet stitches |
| Final top edge | 28 stitches per panel; 56 around the opening |
| Size target | Approximately 16 cm wide and 14–15 cm tall |
| Gauge target | 20 sc and 22 rows per 10 cm / 4 inches |
| Wrist loop | About 28 cm of exposed strap, plus attachment overlaps |
| Pattern status | New draft; count-checked, not physically tested |
At the target gauge, the widest row is approximately 16 cm across. Thirty rows give about 13.6 cm of height before the green opening band. Seams, tension, and shaping can alter those dimensions. Check your actual panels before deciding whether the bag fits the items you want to carry.
Materials and Supplies
- Muted strawberry-red medium-weight cotton: allow approximately 90–130 metres.
- Forest-green cotton of similar thickness: approximately 35–50 metres for the rim, leaves, and wrist loop.
- A little cream cotton or smooth embroidery yarn for the seeds.
- A 3.5 mm crochet hook as a starting point, adjusted to meet the desired gauge.
- A blunt yarn needle, scissors, measuring tape, and removable stitch markers.
- Optional woven cotton lining fabric, sewing thread, a sewing needle, and plain paper for making a lining outline.
Yarn amounts are planning estimates rather than measured consumption from a completed sample. Smooth yarn makes the shaping easy to see and keeps the small leaves from looking overly bulky. Avoid mixing a very stretchy main yarn with a much firmer green trim without first checking their behavior together.
Make a Small Gauge Swatch
Chain 25. Work 24 sc across the first row, then continue for 26 rows, chaining one and turning between rows. Measure a central area without stretching it. Aim for 20 stitches and 22 rows in 10 cm.
Choose a fabric that feels firm enough for your intended contents. If you change hook size to make denser stitches, measure again rather than assuming the bag will retain the stated dimensions.
Abbreviations and Helpful Techniques
| Abbreviation | Meaning |
|---|---|
| ch | Chain |
| sc | Single crochet |
| sl st | Slip stitch |
| inc | Work 2 sc in the same stitch |
| dec | Work 2 stitches together as 1 sc |
| st / sts | Stitch / stitches |
| rnd | Round |
| RS / WS | Right side / wrong side |
Turning Chains and Edge Stitches
The turning chain does not count as a stitch. Work into the first actual stitch after turning, and finish in the last actual stitch. Mark the ends of each row while learning the increase sequence.
For a decrease, insert the hook into the next stitch and draw up a loop, then do the same in the following stitch. Yarn over and draw through all three loops. A decrease consumes two stitches and produces one.
Crochet the Strawberry Panels
Start at the Bottom Tip
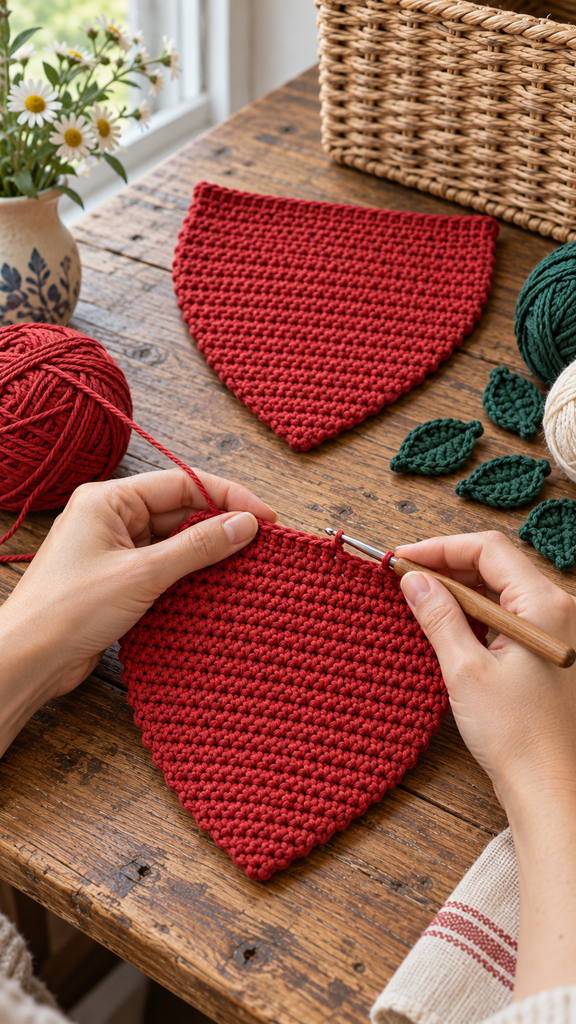
With red, chain 3.
Row 1: Sc in the second chain from the hook and in the remaining chain. 2 sc.
Row 2: Ch 1, turn. Inc in each stitch. 4 sc.
Row 3: Ch 1, turn. Inc in the first stitch, sc in the next two stitches, and inc in the last stitch. 6 sc.
Widen the Berry
Rows 4–16: Ch 1, turn. Inc in the first stitch, sc in every stitch until one stitch remains, then inc in the last stitch. Each row adds 2 stitches.
Useful checkpoints are 8 sc at Row 4, 16 sc at Row 8, 24 sc at Row 12, and 32 sc at Row 16. The sides should widen evenly from the small foundation edge. Count at the checkpoints before continuing.
Work the Upper Berry and Shoulders
Rows 17–28: Ch 1, turn. Sc in every stitch. 32 sc per row.
Row 29: Ch 1, turn. Dec, sc in the next 28 stitches, dec. 30 sc.
Row 30: Ch 1, turn. Dec, sc in the next 26 stitches, dec. 28 sc. Fasten off.
The final two rows gently narrow the top. The shape has a soft tapered bottom and a broad upper section, rather than a sharply pointed triangle. Do not add extra decreases unless you are prepared to recalculate the opening band.
Make the Second Panel
Repeat Rows 1–30 for the back. Compare both pieces before assembly: the heights, increase sections, and shoulder edges should match closely. Weave in the starting and ending tails on their wrong sides.
If your yarn permits gentle blocking, shape the panels consistently and let them dry completely. Do not stretch one piece to conceal a large tension difference.
Embroider the Strawberry Seeds
Decorate the Front While It Is Flat
Choose the neater side of one panel as the front. Keep Row 1 at the bottom and Row 30 at the top. Use cream yarn to make approximately twenty small seed dashes, arranged in four loose rows around crochet Rows 10, 15, 20, and 25.
Place five seeds across each of those areas. The lower row has fewer available stitches across the berry, so keep its marks closer together. Stagger the upper marks rather than creating a perfectly rigid grid.
Each seed can be a short vertical or slightly diagonal stitch about one crochet row tall. Keep the stitches soft and flat; do not build large knots or raised beads. Take small securing stitches through the reverse fabric between nearby seeds instead of leaving long floating strands.
Try the layout with a few temporary marks first. The number twenty is decorative guidance, not a structural requirement. A slightly irregular arrangement gives the little berry a natural handmade character.
Sew the Panels Together
Place the panels right sides together, aligning their foundation tips and row ends. Use markers at the lower tip, widest points, and top corners. Leave the two 28-stitch top edges open.
With red yarn and a blunt needle, whipstitch down one side, across the small bottom foundation edges, and up the other side. Pair corresponding row ends as you work, keeping the seam tension relaxed enough that the panels do not gather.
Turn the bag right side out. The narrow foundation becomes the bottom, and the shortened shoulder rows form the opening. Check that all 28 top stitches on each panel remain accessible, including the corner stitches.
Crochet the Green Opening Band
Round 1
With green and the bag’s right side facing outward, join yarn at a side of the opening. Ch 1; this does not count as a stitch. Sc in each of the front panel’s 28 top stitches and each of the back panel’s 28 top stitches. Join with a sl st to the first sc. 56 sc.
Do not add extra stitches into the side seams. The panel corner stitches are already included in the count.
Round 2
Ch 1. Sc in every stitch around. Join with a sl st to the first sc. 56 sc. Fasten off and weave in the ends.
Keep the rim flexible. If it contracts sharply, compare its tension with the panels and check for missed stitches. This band finishes the opening; it does not form a drawstring channel.
Crochet Five Pointed Leaves
Make the Green Leaf Trim
For each leaf, leave a long starting tail and chain 2.
- Row 1: Sc in the second chain from the hook. 1 sc.
- Row 2: Ch 1, turn. Inc in the stitch. 2 sc.
- Row 3: Ch 1, turn. Inc in both stitches. 4 sc.
- Row 4: Ch 1, turn. Sc in every stitch. 4 sc.
- Row 5: Ch 1, turn. Dec twice. 2 sc.
- Row 6: Ch 1, turn. Dec. 1 sc.
Fasten off at the tip and weave the ending tail down the back without pulling the leaf tight. Keep the starting tail for attachment. Make five pieces. Leave them flat and unstuffed, with no added border.
Attach the Leaves to the Front Rim
Number the front opening stitches from one side to the other. Position the leaf starting bases near stitches 4, 9, 14, 19, and 24, with their tips pointing downward over the red front.
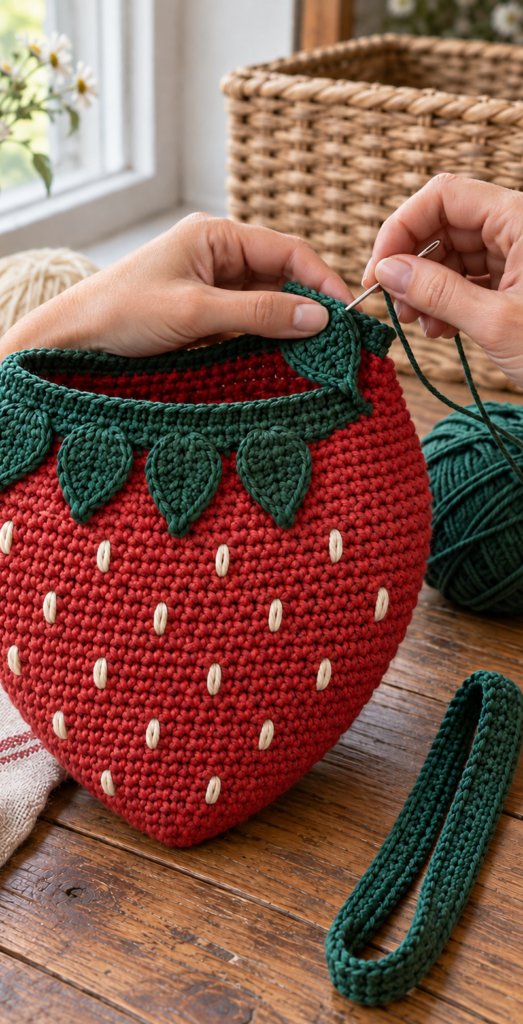
These positions are a guide. Adjust their spacing to suit the actual leaf widths, keeping the middle leaf centered. Sew the first two rows of each leaf to the outside of the green band, leaving the wider sections and tips free.
Catch only the front of the bag. Avoid sewing the opening closed or trapping the back panel. A little overlap between neighboring leaves is fine, but their attachment stitches should remain relaxed.
Crochet and Attach the Wrist Loop
Make a Flat Green Strip
With green, chain 6.
Row 1: Sc in the second chain from the hook and in every remaining chain. 5 sc.
Row 2 onward: Ch 1, turn. Sc in every stitch. 5 sc per row. Continue until the strip measures approximately 32 cm without stretching. Fasten off with a sewing tail.
Four centimeters are reserved for attachment: 2 cm at each end. This leaves approximately 28 cm of exposed strap, forming a loop with a drop of roughly 14 cm. Check the fit against your own wrist before sewing.
Secure Both Ends at One Side
Fold the strip into a loop without twisting it. At the upper-right side seam, overlap one end 2 cm down the outside of the front and the other end 2 cm down the outside of the back.
Sew around each overlap, then add diagonal stitches across the attachment area. Catch sturdy body stitches and the strap rather than only the free leaf tips. Keep the opening usable and check both attachments with light contents before carrying the bag.
Crochet can stretch under weight. The strap and seams in this untested design do not have a verified load rating. For a firmer version, sew narrow woven tape along the strap’s underside before attaching it, keeping both layers relaxed.
Add an Optional Shaped Lining
Lay an unfilled finished bag flat and trace its body outline onto plain paper. Exclude the wrist loop and leaf tips. Adjust the outline to sit slightly inside the crochet seams, then add a 1 cm seam allowance around the sides and bottom and 2 cm at the top for a double-fold hem.
Cut two matching woven cotton pieces. Sew their sides and bottom right sides together, leaving the top open. Turn the top down 1 cm twice and stitch the hem. Test the lining inside the crochet bag before permanently attaching it.
Keep the lining wrong side out and insert it into the right-side-out bag so the raw seams sit between the layers. Hand-sew its hem just below the green band. It should rest inside without pulling down on the rim.
Color Variations and Care
Try dusty coral with olive leaves, classic red with forest green, or a softer rose-and-sage combination. Keep the same stitch counts when changing only the palette. You can leave the back plain or add a few embroidered seeds before sewing the panels together.
Follow the yarn and lining care instructions. Shape the berry gently after cleaning and let it dry completely. If the leaves curl tightly, loosen their weave-in tension. If the opening narrows, check the band count and the tension of its joining stitches.
Frequently Asked Questions
Is the supplied PDF a crochet pattern?
No. It describes weaving a strawberry bag on a cardboard loom. This article presents a separate crochet interpretation using shaped single-crochet panels and crocheted leaf trim.
Is this suitable for beginners?
It suits someone who can work straight single-crochet rows, increases, decreases, and simple seams. The panel checkpoints make the shaping easier to follow. Practice the small leaf first if decreasing is new to you.
Do I need a cardboard template or felt?
No. The bag and leaves are crocheted, and the seeds are embroidered. Paper is needed only if you choose to make a fitted fabric lining.
Can I add a long shoulder strap?
You can develop that variation, but it needs a different finished length and attachment plan. This draft describes a short wrist loop attached at one side, with two 2 cm overlaps.
Why does the opening have 56 stitches?
Each panel finishes with 28 stitches. Working once around both top edges gives 56. Adding seam stitches or changing the shoulder decreases would alter that total.
Has the new pattern been tested?
The stitch arithmetic has been checked, including panel shaping, the opening count, and leaf increases and decreases. The design still needs physical crocheting and use testing before it can be described as a tested pattern.