Cozy Crochet Snowman Dishcloth
A little handmade detail can make a winter kitchen feel wonderfully welcoming. This crochet snowman dishcloth brings together soft white cotton, a cheerful carrot nose, and a teal scarf with a little cranberry stripe. It is a practical square cloth with a playful face, lovely for displaying beside the sink or adding to a homemade winter gift.
The main fabric is worked back and forth in simple single crochet. You crochet the scarf stripe directly into the square, then add a small nose and embroidered features. A separate scarf tail gives the finished piece an extra handmade touch, but you can leave it off for a flatter everyday cloth.
This project is inspired by the idea of a character dishcloth in the supplied PDF. Its snowman theme, square shape, row construction, integrated scarf, and finishing instructions are newly written rather than a reproduction of the deer pattern. The stitch counts have been checked mathematically; the design has not been physically crocheted or tested. The pictures are AI-generated concept illustrations, so use the written instructions for stitch placement and counts.

What Makes This Snowman Dishcloth Special?
The snowman face sits on a useful square instead of a shaped animal head. That makes the foundation straightforward to follow and easy to fold. Its scarf grows along with the main fabric, so there is no separate wide strip to stitch across the entire cloth.
The carrot nose introduces a little shaping without requiring complicated increases. Small embroidered eyes and a dotted smile finish the character. There are no rigid decorations, and the color palette works well with simple white dishes, wooden countertops, and cozy winter linens.
For a gift, fold the dry cloth and tie it with spare cotton yarn. Pair it with another plain cotton washcloth for a small handmade set. This decorated version is especially suited to display and gentle wiping; the optional tail adds texture that some makers may prefer to omit for frequent scrubbing.
Project Details Before You Begin
| Detail | Guide |
|---|---|
| Skill level | Confident beginner; basic embroidery and sewing are needed |
| Terminology | US crochet terms |
| Construction | Flat rows, one edging round, sewn nose, embroidered face |
| Intended size | Approximately 19 × 19 cm / 7½ × 7½ inches after edging, if gauge is met |
| Main fabric | 32 single crochet stitches across, 40 rows tall |
| Gauge target | 18 sc and 22 rows per 10 cm / 4 inches, measured before edging |
| Pattern status | Newly drafted, count-checked, not physically tested |
The size is a target rather than a guaranteed result. Cotton thickness, hook size, and individual tension all affect the dimensions. Measure your own work before deciding whether the finished cloth needs another edging round or a change in hook size.
Materials and Supplies
Choose smooth, washable medium-weight cotton yarn that makes the individual stitches easy to see. Check the yarn label for care instructions, especially when combining white yarn with a strong red accent.
- White cotton: allow approximately 90–120 metres.
- Muted teal cotton: approximately 15–20 metres, including the optional tail.
- Cranberry cotton: approximately 3–5 metres.
- Small scraps of orange cotton for the nose and black cotton for embroidery.
- A 4 mm crochet hook as a starting point; adjust to meet your gauge.
- A blunt yarn needle, scissors, measuring tape, and removable stitch markers.
These yarn amounts are planning estimates for this untested design. Have a little extra available if your cotton is thicker or if you add more edging. Use yarns of a similar thickness throughout so the colored rows do not noticeably change the width of the square.
Make a Small Gauge Swatch
Chain 23. Single crochet in the second chain from the hook and each remaining chain: 22 stitches. Work 26 rows, chaining one and turning between rows. Measure a central section without stretching the fabric. Aim for 18 stitches and 22 rows in 10 cm.
If you have more stitches per 10 cm, try a slightly larger hook. If you have fewer, try a smaller hook. Wash and dry the swatch according to the yarn label if you want a better estimate of the cloth’s dimensions after laundering.
Crochet Abbreviations and Helpful Techniques
| Abbreviation | Meaning |
|---|---|
| ch | Chain |
| sc | Single crochet |
| hdc | Half double crochet |
| dc | Double crochet |
| sl st | Slip stitch |
| st / sts | Stitch / stitches |
| RS / WS | Right side / wrong side |
Turning Chains and Stitch Counts
The turning chain never counts as a stitch. After turning, make the first single crochet in the first actual stitch. Work the last stitch into the final single crochet, not into the turning chain. Marking the first and last stitches helps keep the sides straight.
Every main-body row contains 32 single crochet stitches. The separate scarf tail contains five stitches in every row. Count before changing colors, because a missed edge stitch is easier to fix immediately than after several more rows.
How to Change Colors Neatly
Begin the last single crochet of the current row with the old color. When two loops remain on the hook, yarn over with the next color and pull through both loops. Chain one using the new color, turn, and continue.
Cut the old yarn, leaving a tail long enough to weave in securely. For this small project, separate tails make the reverse easier to tidy than carrying unused colors along long sections of the edge. Avoid pulling the change too tightly.
How to Crochet the Snowman Dishcloth
Step 1: Work the Lower White Section
With white, chain 33.
Row 1: Sc in the second chain from the hook and in each remaining chain. 32 sc.
Rows 2–7: Ch 1, turn. Sc in each stitch across. 32 sc in every row.
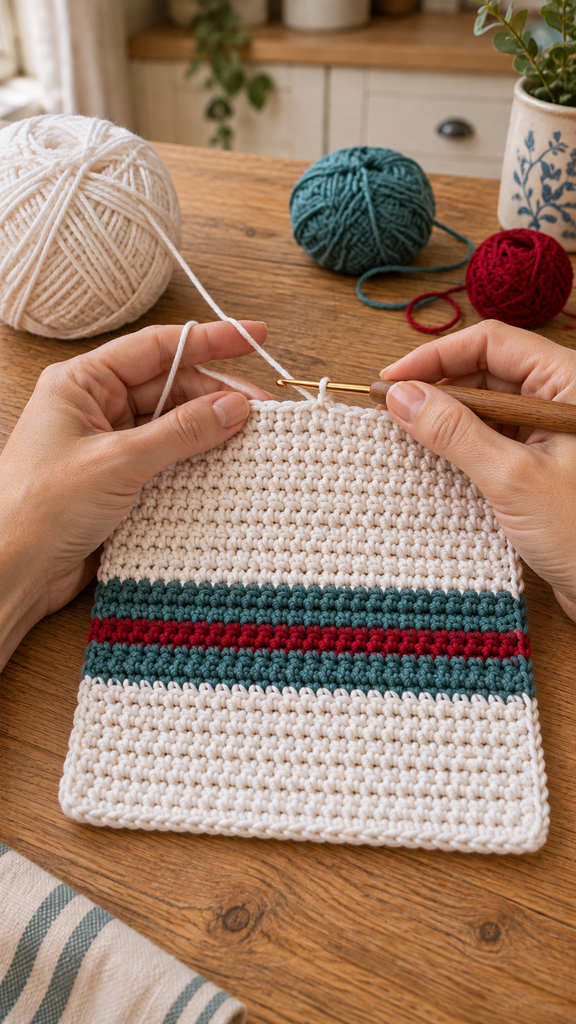
On the final stitch of Row 7, change to teal. You now have the white section that will sit below the scarf. Do not add increases or decreases: this design keeps a consistent rectangular foundation.
Step 2: Crochet the Scarf Stripe Into the Cloth
Rows 8–10, teal: Ch 1, turn. Sc in each stitch across. 32 sc per row. Change to cranberry on the final stitch of Row 10.
Row 11, cranberry: Ch 1, turn. Sc in each stitch across. 32 sc. Change back to teal on the final stitch.
Rows 12–14, teal: Ch 1, turn. Sc in each stitch across. 32 sc per row. Change to white on the final stitch of Row 14.
The scarf is seven rows tall: three teal rows, one cranberry row, and three more teal rows. Keep the red row the same tension as the others so it remains a narrow accent rather than drawing the fabric inward.
Step 3: Finish the White Face Section
Rows 15–40, white: Ch 1, turn. Sc in each stitch across. 32 sc per row.
There are 26 white rows above the scarf. After Row 40, fasten off. Lay the cloth flat and choose the neater-looking face as the right side. Position Row 1 at the bottom and Row 40 at the top, then mark the right side temporarily.
Before decorating, weave in the body tails on the wrong side. If the square needs shaping, gently dampen it and lay it flat according to the yarn’s care instructions. Do not pull it forcefully into a size that the stitches do not naturally support.
Step 4: Add a Plain White Border
With the right side facing you, join white in the first foundation stitch at the bottom-left corner. Chain one; this does not count as a stitch.
- Work 3 sc in that corner stitch, 1 sc in each of the next 30 foundation stitches, and 3 sc in the last foundation stitch. 36 sc along the bottom, including both bottom corners.
- Work 36 sc evenly up the 40 row ends of the right side. These go into row ends, not into the top corner stitch.
- Work 3 sc in the first stitch of Row 40, 1 sc in each of the next 30 stitches, and 3 sc in its last stitch. 36 sc along the top, including both top corners.
- Work 36 sc evenly down the 40 row ends of the left side. Join with a sl st to the first border sc. Fasten off. 144 border sc total.
For each side, use four groups of ten row ends: work one sc in nine of those ends and skip one near the middle of the group. Keep the spacing gentle and even. Move the skipped end within a group if necessary to avoid a visible gap. The side stitches should neither gather the cloth nor form a ruffle.
Step 5: Make the Carrot Nose
With orange, chain 7, leaving a short starting tail.
Work 1 sc in the second chain from the hook, 1 hdc in each of the next two chains, and 1 dc in each of the last three chains. 6 stitches total. Fasten off, leaving an approximately 25 cm sewing tail.
This makes a small tapered wedge: the single-crochet end is the narrow tip and the double-crochet end is the broad base. Do not stuff it. Arrange it on the face with the narrow tip pointing left, optionally angled slightly upward.
Step 6: Crochet the Optional Scarf Tail
With teal, chain 6.
Row 1: Sc in the second chain from the hook and in each remaining chain. 5 sc.
Rows 2–12: Ch 1, turn. Sc in every stitch across, keeping 5 sc per row. Use teal for Rows 1–3, cranberry for Row 4, teal for Rows 5–7, cranberry for Row 8, and teal for Rows 9–12. Change colors on the final stitch of the preceding row.
Fasten off, leaving a sewing tail. Weave in the other ends. The result is a narrow strip with two thin red accents. Leaving this piece off gives you a flatter cloth with the same snowman face.
Assemble and Embroider the Face
Place the Features Before Sewing
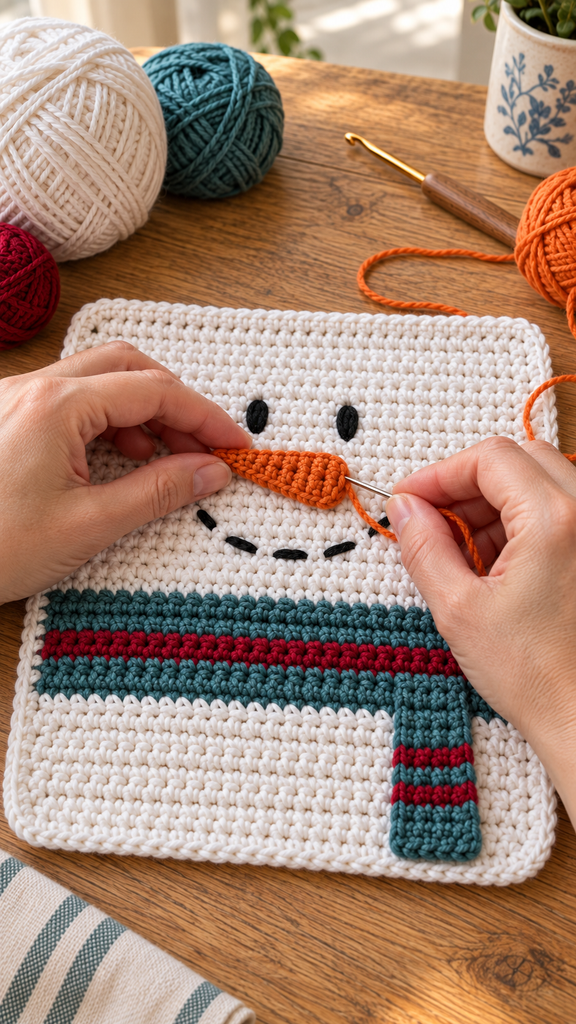
Lay the finished square right side up. Use the written row numbers as approximate guides, then adjust by eye to suit your actual gauge. Place both eyes around Rows 29–31, the nose around Rows 23–25, and the smile around Rows 19–21. The scarf occupies Rows 8–14.
Center the nose between the eyes. Make sure the smile sits comfortably above the scarf. Rest loose pieces in place and mark the embroidery positions before committing to stitches; small changes can give the snowman a very different expression.
Sew the Nose and Scarf Tail
With the orange sewing tail, stitch around the nose’s perimeter. Catch the crochet fabric without cinching it. Keep the nose flat and secure its tip as well as its broad end.
Place the scarf tail vertically near the right side, around stitches 25–29 across the body. Position its top at Row 14 and let it extend downward toward the bottom white section. Depending on gauge, its lower end should sit near Rows 2–4. Sew its top edge firmly to the scarf band and tack its sides lightly so it lies flat.
Embroider Soft Eyes and a Dotted Smile
Using black yarn, make two small vertical oval eyes with short satin stitches. Aim for eyes about two stitches wide and two rows tall. Keep their spacing balanced on either side of the nose.
Create the smile with five short, separated straight stitches arranged in a gentle upward curve. Avoid carrying long loose strands across the back. Weave the yarn through nearby stitches between each dash, then secure and bury the ends. Finish by removing markers and checking that the reverse has no dangling tails.
Easy Ways to Make the Design Your Own
Try navy and pale blue for the scarf, or forest green with a cream accent. Keep the same row sequence and change only the colors. A straight little mouth gives a quieter expression, while a wider curved smile looks more playful.
For everyday kitchen use, omit the scarf tail and embroider a small orange triangle instead of adding the crocheted nose. These choices reduce raised pieces while keeping the square’s construction unchanged. Changing the cloth’s stitch count or adding rows requires a new size calculation; the 144-stitch border applies only to the 32-stitch, 40-row version described here.
Care, Troubleshooting, and Finishing Tips
Follow the most restrictive washing instructions among the yarns you used. Test a red yarn scrap before combining it with white if you are unsure whether the dye will run. After use, rinse the cloth, remove excess water, and let it dry completely.
If the sides slope inward, check for missed first or last stitches. If the scarf narrows the square, loosen the color-change tension. A wavy border usually needs fewer stitches or less slack; a cupped border may need more relaxed tension or a better distribution of side stitches. Correct the edging before sewing on the decorations.
Frequently Asked Questions
Is this pattern suitable for beginners?
It suits beginners who already know single crochet and turning rows. The nose uses half double and double crochet, and the face needs simple sewing and embroidery. Make the square first, then practice the small nose separately if those stitches are new to you.
Can I use acrylic yarn instead of cotton?
You can use a washable acrylic for a decorative version, but this pattern is planned around cotton for a kitchen cloth. A different fiber can change the drape and finished size. Make a swatch and follow that yarn’s care instructions.
Do I need to match the gauge exactly?
Exact gauge matters if you want the stated approximate size. Otherwise, a small difference is acceptable for a dishcloth as long as the fabric feels useful and lies flat. Keep all 32 stitches and 40 rows if you want to follow the supplied border count.
Can I use it as a potholder?
This pattern is intended as a dishcloth or decoration, not as protective equipment for handling hot cookware. Its single layer and embroidered details have not been tested for heat protection.
Why is my square taller than it is wide?
Your row gauge may differ from the target. Check the swatch and hook size before starting another cloth. You can accept the slightly rectangular result, but changing the row count also means recalculating the side edging and feature placement.
Is this the same pattern as the supplied PDF?
No. The supplied project is a shaped deer character cloth. This newly drafted version uses a square snowman, flat rows, a crocheted-in scarf stripe, and different facial pieces. Its stitch counts are checked on paper, but physical testing is still needed before describing it as a tested pattern.