DIY Bow Tie Christmas Placemats

There is something about a beautifully decorated Christmas table that makes an ordinary meal feel like an occasion.
The candles are glowing, greenery runs down the center of the table, favorite dishes are waiting to be served, and every place setting has one small detail that makes guests stop and look.
These Bow Tie Christmas Placemats are exactly that kind of detail.
At first glance, they look like festive quilted placemats. But the clever part is the contrasting fabric band running through the center. The top of that band forms a loop, and when a folded fabric napkin is tucked through it, the napkin becomes an oversized bow.
The finished place setting looks almost like a beautifully wrapped Christmas present.
The original design uses metallic quilting thread for extra sparkle and is rated Beginner, with an estimated crafting time of one evening. Each finished placemat measures approximately 14 x 20 inches, and the supplied fabric quantities make a set of two. CCS0521-026674M
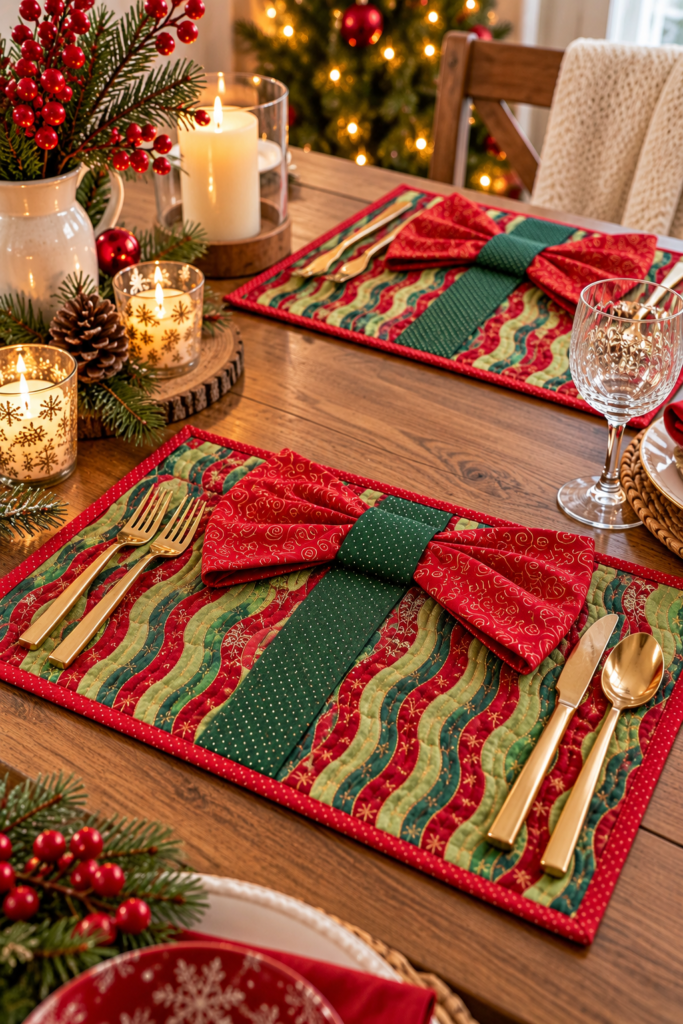
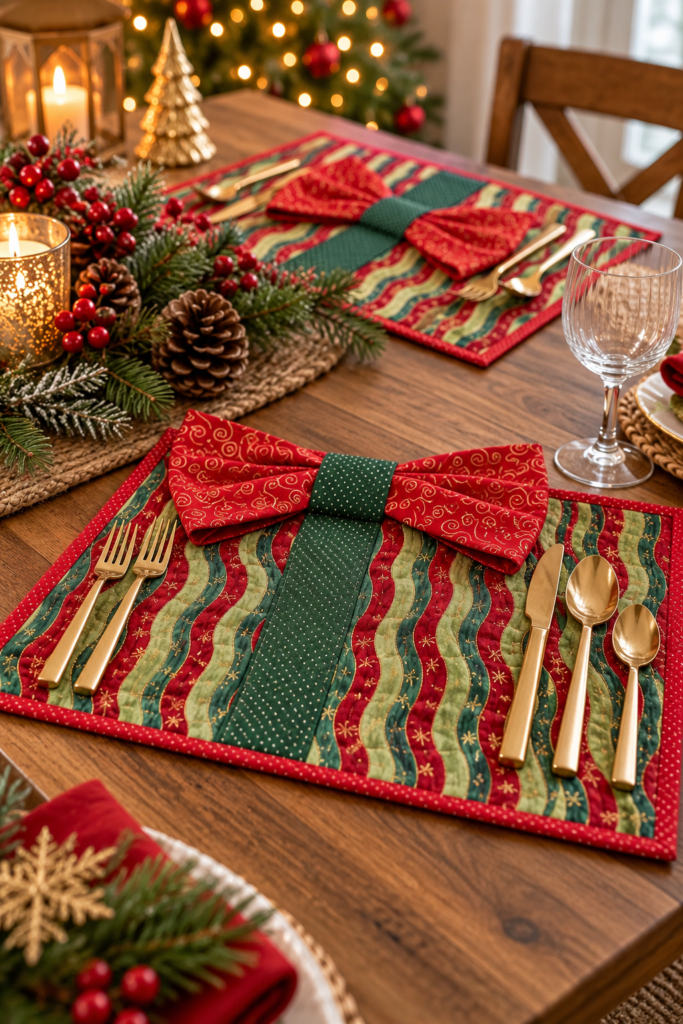
The photograph on page 1 shows just how effective this simple idea can be. Red-and-green striped fabric forms the main mat, a deep green band runs vertically through the center, a red patterned napkin creates the oversized bow, and narrow red binding frames the entire placemat.
It’s festive without requiring complicated patchwork.
If you enjoy holiday sewing projects that are both decorative and useful, this is a lovely one to make for your own Christmas table.
About the Bow Tie Placemat Project
The original Bow Tie Placemats were designed by Linda Turner Griepentrog.
Rather than piecing together a complicated quilt block, the project starts with one rectangular piece of main fabric.
That fabric is layered with:
batting
and
backing fabric.
The three layers are quilted together, creating a padded placemat.
Next comes the clever accent strip.
A contrasting strip runs vertically across the center of the mat. Most of it is stitched flat against the placemat, but the upper portion remains open to create a loop.
A handmade fabric napkin is folded and tucked through that loop.
Once pulled through and arranged, the napkin resembles a big fabric bow.
The source describes the idea as a quilted placemat that looks like a package, complete with a bow-tie napkin held by an accent loop. CCS0521-026674M
Bow Tie Christmas Placemats at a Glance
Project: Bow Tie Placemats
Technique: Sewing
Designer: Linda Turner Griepentrog
Skill Level: Beginner
Crafting Time: Approximately one evening
Quantity: Makes 2 placemats
Finished Size: 14″ × 20″ / 35.56 × 50.80 cm
Main Feature: Built-in fabric napkin loop
Quilting: Metallic thread
Seam Allowance: ¼” / 0.64 cm
Finishing: Fabric binding with mitered corners
What You’ll Need
The original materials list makes:
2 placemats.
You will need:
- Coats Metallic Thread
- Coats Dual Duty XP All-Purpose Thread
- ½ yard / 45.72 cm main mat fabric
- ½ yard / 45.72 cm backing fabric
- ⅛ yard / 11.43 cm accent fabric
- ⅝ yard / 57.15 cm napkin fabric
- ⅓ yard / 30.48 cm binding fabric
- ½ yard / 45.72 cm batting
- Metallic needle
The pattern’s page 1 photograph uses a strongly traditional Christmas palette with red, green and metallic accents, although the instructions themselves are based on fabric roles rather than requiring those exact prints. CCS0521-026674M
You’ll also naturally need your normal sewing equipment, such as a sewing machine, iron, ironing board, pins, scissors or rotary-cutting tools, and measuring tools. Those are practical additions rather than items explicitly listed in the source.
Choosing Fabrics for Your Christmas Placemats
The photograph on page 1 is useful inspiration when selecting fabric.
The main mat has a multicolored Christmas stripe.
The center accent band is darker green.
The napkin is a brighter red print.
And the binding is red.
This creates plenty of contrast, which is important because you want the bow-shaped napkin to stand out.
For a similar effect, choose:
Main Fabric
A festive print with enough visual interest to cover the large 14-by-20-inch surface.
Accent Fabric
A coordinating fabric that clearly contrasts with the main print.
Napkin Fabric
Choose something that will become the visual star of the place setting.
Binding
A print or solid that frames the placemat and ties the colors together.
You don’t have to reproduce the photographed fabrics exactly, but keeping strong contrast between these components will help preserve the package-and-bow effect.
Cutting Instructions
Accuracy during cutting will make assembly much easier.
The source provides all measurements for a set of two.
From the Main Mat Fabric
Cut:
2 rectangles measuring 14″ × 20″
or:
35.56 × 50.80 cm.
These determine the final dimensions of the placemats.
From the Backing Fabric
Cut:
2 rectangles measuring 16″ × 22″
or:
40.64 × 55.88 cm.
From the Batting
Cut:
2 rectangles measuring 16″ × 22″
or:
40.64 × 55.88 cm.
Notice that both the backing and batting begin larger than the main fabric.
You’ll trim the excess away after quilting.
From the Accent Fabric
Cut:
2 strips measuring 3″ × 16″
or:
7.62 × 40.64 cm.
Also cut:
2 rectangles measuring 3″ × 5″
or:
7.62 × 12.70 cm.
The long strip forms the vertical accent band, while the small rectangle helps create the finished napkin-loop section at the top.
From the Napkin Fabric
Cut:
2 squares measuring 18″
or:
45.72 cm square.
From the Binding Fabric
Cut:
4 strips measuring 2½” × width of fabric.
The metric width is:
6.35 cm × WOF.
The source specifies a standard seam allowance of:
¼” / 0.64 cm. CCS0521-026674M
Step 1: Make the Placemat Quilt Sandwich
Begin with one set of:
- backing,
- batting,
- and main mat fabric.
Layer these pieces together with:
wrong sides together.
The backing is on the bottom.
The batting sits in the middle.
The main mat fabric is on top.
Pin the three layers securely.
Remember that your backing and batting are deliberately larger than your 14-by-20-inch mat top at this point.
Repeat for the second placemat.
Step 2: Quilt the Placemat
Now quilt through all three layers.
The original project specifically recommends using:
metallic thread
for a little holiday sparkle.
If your main fabric contains obvious design lines, the source suggests following those lines while quilting.
Otherwise, quilt your preferred pattern across the mat.
The quilting lines should be approximately:
2–3 inches / 5.08–7.62 cm apart
across the entire placemat width. CCS0521-026674M
This secures all three layers together and adds texture without making the project unnecessarily complicated.
Once quilting is complete, trim the excess:
batting and backing
so both are even with the main mat top.
Your placemat should now return to approximately its original 14-by-20-inch rectangular shape.
Why Metallic Thread Works So Well
Metallic thread is one of the details that elevates this otherwise simple project.
Instead of adding sequins, beads or other decorations that could interfere with plates and flatware, the metallic stitching adds a subtle shimmer directly into the quilted surface.
The project is specifically presented as featuring Coats Metallic Thread for “extra dazzle.” CCS0521-026674M
That makes it particularly suitable for evening Christmas dinners, when candlelight and holiday lights can catch those little metallic details.
Step 3: Create the Accent Band and Napkin Loop
Now you’ll make the feature that transforms an ordinary quilted placemat into a bow-tie design.
Take:
one 3″ × 5″ accent rectangle
and:
one 3″ × 16″ accent strip.
With:
right sides together
sew the small accent rectangle to one end of the longer accent piece.
Leave the ends open.
Turn the joined piece:
right side out.
Press the edges carefully.
Then press under:
¼” / 0.64 cm
along both long edges of the accent strip.
The faced section you created at the top becomes:
the napkin loop. CCS0521-026674M
This little construction detail is the heart of the entire project.
Step 4: Position the Accent Band
Center the finished accent band across the:
width of the placemat.
The page 1 photograph shows the band running vertically through the middle of the place setting when the placemat is positioned horizontally on the table.
Pin the band in place.
Match the upper and lower raw edges.
One detail is especially important:
The accent band is longer than the placemat.
Measure:
12″ / 30.48 cm
up from the lower edge of the placemat.
Place a pin across the width at this point. CCS0521-026674M
This measurement tells you where to stop stitching the flat portion so that the upper section can remain available as the napkin loop.
Step 5: Sew the Accent Strip in Place
Edgestitch along:
both long edges
of the accent strip.
Continue until you reach the mark:
12 inches above the lower placemat edge.
Then stitch:
across the width of the accent strip.
Next, stitch across the:
upper placemat edge
while leaving the looped area free. CCS0521-026674M
This is what allows you to slide the folded napkin through later.
Make sure you don’t accidentally stitch the entire accent band flat.
If you do, you’ll lose the loop that creates the signature bow-tie effect.
Step 6: Prepare the Binding
Now the placemat needs a clean finished edge.
Take your binding strips.
Sew the strip ends together using:
diagonal seams.
Press those seams:
open.
Next, fold the completed binding strip:
in half lengthwise
with:
wrong sides together.
Press.
This creates the folded binding you’ll use around the outer edge.
Step 7: Bind the Placemat
Apply the binding around the placemat edges.
At each corner:
miter the corner.
Mitered corners give the finished project the neat framed appearance visible in the page 1 photograph.
Once the binding has been sewn to the front edge, turn it around to:
the underside of the placemat.
Hand-stitch the folded edge securely into place. CCS0521-026674M
Repeat the entire process for the second placemat.
Step 8: Sew the Matching Fabric Napkins
The napkins themselves are beautifully simple.
You already cut:
two 18-inch squares.
For each square, press under a:
double ¼-inch / 0.64 cm hem
along all four edges.
A double-fold hem hides the raw fabric edge inside the fold.
Once everything is pressed evenly:
stitch the hem in place.
Press the finished napkin again.
That’s it.
No complicated napkin construction is required. CCS0521-026674M
Step 9: Create the Bow-Tie Look
Now comes the most satisfying part.
Fold your finished napkin into a shape that can slide through the accent loop.
Tuck the center of the folded napkin through:
the placemat loop.
Then gently spread and arrange the fabric on either side.
Those two sections become the sides of your bow.
The accent loop becomes the center knot.
The source simply instructs you to fold the napkin as desired and tuck it through the loop so that it looks like a bow. CCS0521-026674M
That means you can experiment until you get the fullness and shape you like.
How to Make the Napkin Look Like a Full Bow
The pattern doesn’t specify one mandatory folding method, so you have some creative freedom here.
For a full bow similar to the page 1 photograph, avoid folding the napkin into a very narrow strip.
Instead, create a wider folded section and gather it slightly through the center.
Push that gathered center through the fabric loop.
Then fluff the two exposed sides.
The goal isn’t perfect symmetry.
A slightly relaxed fabric bow looks natural and inviting on a holiday table.
Understanding the “Wrapped Gift” Design
The idea behind these placemats becomes much clearer when you look at the page 1 photograph.
The rectangular placemat acts like:
the gift box.
The contrasting center band resembles:
ribbon wrapped around a present.
And the folded napkin becomes:
the bow.
It’s a simple visual trick, but it makes each individual place setting feel like its own little Christmas package.
That’s why choosing contrasting fabrics is so effective.
If the center band disappears into the main fabric, the wrapped-package illusion becomes less noticeable.
Tips for Sewing Beautiful Bow Tie Placemats
Pre-Press Your Fabric
Smooth fabric makes accurate cutting, quilting and binding much easier.
Keep Your ¼-Inch Seam Allowance Consistent
The source specifies a:
¼” / 0.64 cm seam allowance.
Consistency will help the accent pieces fit as intended.
Don’t Trim the Backing Too Soon
Your backing and batting begin at:
16 × 22 inches
while the main top is:
14 × 20 inches.
Quilt first.
Trim afterward.
Use the Fabric Print as a Quilting Guide
If your Christmas fabric has stripes, waves, geometric lines or other repeated motifs, following those lines can simplify the quilting step.
This technique is specifically suggested in the original instructions.
Don’t Sew the Napkin Loop Closed
The top section needs to remain open.
Before moving on to binding, test that you can slide fabric through the loop.
Press Frequently
Pressing isn’t just a finishing step in sewing.
Press the accent band after turning it.
Press its long edges.
Press the binding seams.
Press the folded binding.
Press the napkin hems.
These small steps will help the finished project look much cleaner.
Take Your Time With the Binding Corners
The source specifically calls for:
mitered corners.
They’re highly visible on a rectangular placemat, so neat folds are worth the extra attention.
Can Beginners Make These Christmas Placemats?
Yes.
The original project is rated:
Beginner.
It also estimates the crafting time as:
an evening. CCS0521-026674M
That said, a complete beginner may find the binding the most challenging portion, especially mitering the corners and hand-sewing the underside.
The rest of the project is very approachable.
There is no complex patchwork pattern to piece.
The mat itself is one rectangle.
The accent is one simple strip construction.
And the napkin is just a hemmed square.
Frequently Asked Questions
What are Bow Tie Placemats?
They are quilted fabric placemats with a center accent band that includes an open loop.
A folded fabric napkin is inserted through the loop so it resembles a bow, making the whole placemat look like a wrapped gift.
Who designed this project?
The original Bow Tie Placemats were designed by:
Linda Turner Griepentrog.
What skill level is the pattern?
The source rates it:
Beginner.
How long does the project take?
The source lists the crafting time as:
an evening.
How many placemats does the pattern make?
The listed supplies make:
2 placemats.
What is the finished placemat size?
Each finished placemat measures:
14″ × 20″
or:
35.56 × 50.80 cm.
What size should I cut the main fabric?
Cut two rectangles:
14″ × 20″.
What size should I cut the backing and batting?
Cut two of each:
16″ × 22″.
They’re intentionally larger than the main fabric and are trimmed after quilting.
What size is the accent strip?
For each placemat, cut:
one 3″ × 16″ strip
and:
one 3″ × 5″ rectangle.
What size are the napkins?
Begin with:
18-inch squares.
What seam allowance should I use?
Use:
¼” / 0.64 cm.
How far apart should the quilting lines be?
The source recommends quilting approximately:
2–3 inches / 5.08–7.62 cm apart
across the entire width.
Why is the accent band longer than the placemat?
Part of the band is used to create the free loop at the top that holds the napkin.
Where do I stop edgestitching the accent strip?
Measure:
12 inches / 30.48 cm
from the placemat’s lower edge.
Edgestitch to this point, then stitch across the accent band.
How are the placemat edges finished?
They’re finished with fabric binding.
The corners are:
mitered
and the binding is turned to the underside and hand-stitched in place.
How do I finish the napkin edges?
Press a:
double ¼-inch hem
around every edge.
Stitch and press.
How does the napkin become a bow?
Fold it as desired and tuck its center through the open accent loop.
Arrange the two sides until they resemble a bow.
Can I Make These for Other Holidays?
The source presents this specifically as a holiday dining project, and the page 1 example is clearly styled for Christmas.
However, the construction itself isn’t Christmas-specific.
Using different fabrics would be a creative adaptation.
For example, softer floral fabrics could make a spring table setting, while warm rust and mustard fabrics could create an autumn version.
For the original Christmas appearance, though, red, green and metallic details work beautifully.
Why This Is Such a Clever Christmas Sewing Project
What I especially like about this design is that nothing decorative is added just for decoration.
The quilting makes the mat sturdy.
The binding protects and finishes the edges.
The accent strip holds the napkin.
The napkin is functional.
And yet when all those practical pieces are combined, they create something that looks deliberately festive.
You don’t need to sew a separate stuffed bow.
You don’t need elaborate appliqué.
You don’t need embroidery.
The napkin itself becomes the decoration.
Final Thoughts
The Bow Tie Christmas Placemats are a wonderful example of how one clever sewing detail can completely transform a simple project.
Start with a basic:
14 × 20-inch fabric rectangle.
Layer it with batting and backing.
Quilt the layers together using metallic thread for a little Christmas sparkle.
Then add the contrasting center band.
At first, it simply looks like a decorative strip running across the placemat.
But leave that upper section open, sew a matching 18-inch fabric napkin, and tuck the folded napkin through the loop.
Suddenly the entire design makes sense.
The placemat becomes a package.
The accent band becomes the ribbon.
And the napkin becomes the oversized bow.
Finish everything with neat binding and mitered corners, place your dinnerware around it, and you have a handmade holiday place setting that looks far more elaborate than the actual sewing requires.
The page 1 photograph shows how beautiful the finished idea can be when paired with Christmas greenery, candles, gold flatware and traditional red-and-green fabrics.
Best of all, the project is rated Beginner and designed to be completed in an evening.
Make the original pair for an intimate Christmas dinner, or repeat the project to create enough matching placemats for the entire table.
Either way, these are the kind of handmade Christmas decorations that are not only pretty—they’re useful enough to come back to the table year after year.
Happy sewing and Merry Christmas!