Simple Ribbed Crochet Beanie Pattern

There are some crochet projects that you want to make once just for the experience, and then there are those wonderfully practical patterns you find yourself returning to again and again.
This Simple Ribbed Crochet Beanie definitely belongs in the second group.
It has everything I love about a handmade winter hat: a cozy ribbed texture, a classic rounded shape, a thick folded cuff, and a simple construction that doesn’t require complicated shaping or working in the round.
In fact, one of the best things about this pattern is that the beanie is worked sideways.
Instead of beginning at the crown and increasing outward, you crochet a long textured rectangle. One edge is subtly shaped with five single crochet stitches, while the rest of the row uses half double crochet worked into a special horizontal bar. Once the rectangle reaches the correct width, you gather one edge tightly, sew the back seam, fold up the cuff—and your rectangle becomes a beanie.
The original pattern is rated Easy, is written in one adult size, and uses a 5 mm crochet hook with Caron Simply Soft Marled yarn. CAC0116-030684M
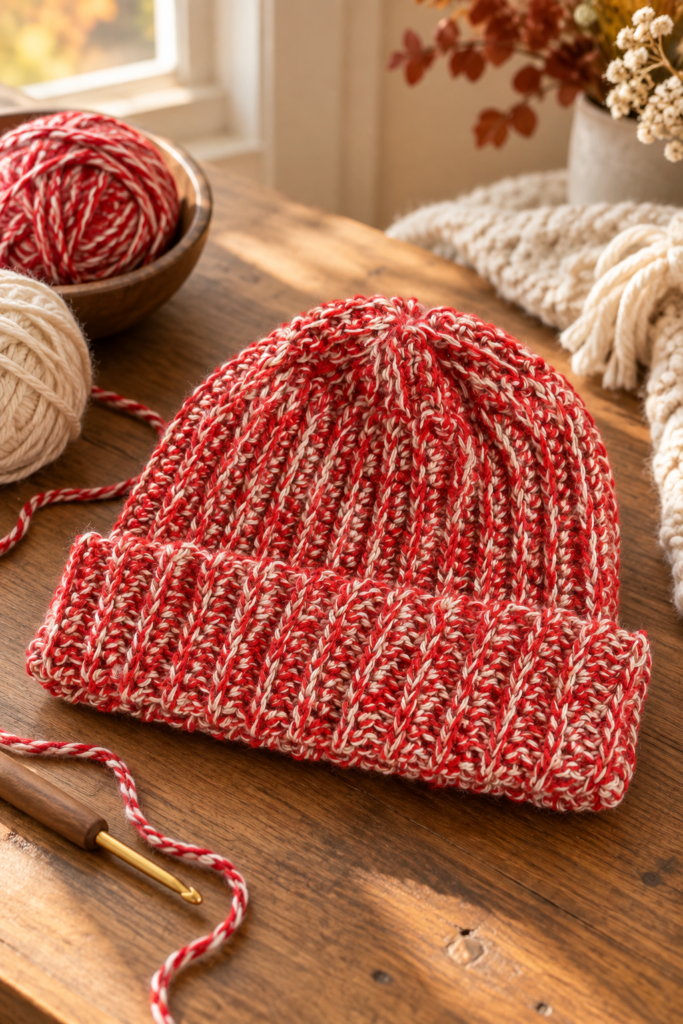
The finished example shown on the pattern page uses Harvest Red Marl, which gives the hat a beautiful mix of red and lighter fibers. Combined with the strong vertical ribs, it creates a cozy handmade texture that looks much more elaborate than the actual construction.
If you’ve been looking for a straightforward crochet hat pattern that still has plenty of texture and style, this one is a lovely project to try.
About the Simple Ribbed Crochet Beanie

The most important thing to understand before starting is that this hat is not crocheted from the bottom upward.
It is worked:
sideways.
You begin with a foundation chain that determines the height of the hat from crown to lower edge.
Then you crochet back and forth in rows until the piece measures approximately 20 inches across at its widest point when slightly stretched.
One end of every row contains five single crochet stitches worked through the back loop only.
Those stitches create the section that will eventually be gathered together at the crown.
The remaining stitches are half double crochet worked into the horizontal bar below the normal loops.
This unusual stitch placement is what gives the body of the hat its strong ribbed appearance.
Once enough rows are complete, there are no decreases to work and no complicated crown-shaping rounds.
You simply gather the top edge and sew the rectangle closed.
Pattern at a Glance
Project: Simple Ribbed Crochet Beanie
Skill Level: Easy
Size: One size to fit an adult
Construction: Worked sideways in rows
Yarn: Caron Simply Soft Marled
Color Used: Harvest Red Marl
Hook: 5 mm / U.S. H-8
Main Stitches: Single crochet and half double crochet
Special Techniques: Single crochet in back loop only and half double crochet into the horizontal bar
Finished Width Before Assembly: Approximately 20″ / 51 cm when slightly stretched
Finishing: Gather crown, sew back seam and turn up cuff
Why This Crochet Beanie Is So Beginner-Friendly
A traditional crochet beanie often requires you to understand increasing, decreasing, stitch counts, crown shaping, and working continuously or in joined rounds.
This design approaches the problem differently.
You’re essentially making a textured rectangular piece.
There are only two repeating rows.
Once you understand where to place your stitches, you continue alternating those two rows until the fabric is wide enough.
That makes the project wonderfully repetitive.
The shaping happens during finishing rather than through complicated decreases.
This also makes it a useful pattern for crocheters who are comfortable working flat pieces but haven’t yet tried making many wearable accessories.
Materials You’ll Need
The original pattern uses:
Caron Simply Soft Marled
Each ball contains:
5 oz / 141 g
and approximately:
240 yds / 219 m.
For the beanie, you need:
1 ball of Harvest Red Marl (0005)
or approximately:
214 yds / 196 m.
You will also need:
- 5 mm / U.S. H-8 crochet hook
- Yarn needle
The pattern notes that you can change the hook size if necessary to obtain the correct gauge. CAC0116-030684M
What Size Is the Crochet Beanie?
The original pattern is written in:
one size to fit an adult.
There aren’t separate Small, Medium, and Large instructions.
Instead, the crocheted fabric is worked until it reaches the specified measurement.
That makes checking the measurement before finishing especially important.
Crochet Gauge
The required gauge is:
13 single crochet stitches = 4″ / 10 cm
and
14 rows = 4″ / 10 cm. CAC0116-030684M
Although the hat has stretch because of its ribbed construction, gauge still affects both fit and overall proportions.
If your stitches are considerably tighter than the pattern gauge, your beanie may end up smaller or stiffer.
If they’re too loose, the finished fabric may be larger and less structured.
Crochet Abbreviations
Here are the abbreviations used in the original pattern:
Approx – Approximately
Beg – Beginning
Ch – Chain(s)
Hdc – Half double crochet
Rep – Repeat
RS – Right side
Sc – Single crochet
Scbl – Single crochet in back loop only
St/Sts – Stitch/Stitches
WS – Wrong side
Before You Start: Understanding the Two Main Textures
Although this is a simple pattern, it uses two stitch-placement techniques that are worth understanding before you begin.
Single Crochet in the Back Loop Only
A normal crochet stitch has two loops along its top.
When the pattern says:
scbl
you insert your hook through only the back loop.
Working this way leaves the front loop untouched and creates a visible ridge.
Only five stitches at one end of each row are worked this way.
Half Double Crochet in the Horizontal Bar
The remaining section uses half double crochet worked into the:
horizontal bar created below each stitch in the previous row.
The pattern illustration specifically shows this from the wrong side of the work, helping you identify the bar below the loops you would normally crochet into. CAC0116-030684M
This stitch placement contributes heavily to the vertical ribbed appearance visible in the finished hat photograph.
How to Crochet the Simple Ribbed Beanie
Now we’re ready to begin.
One detail matters before you make your first chain:
Leave a 24-inch / 61 cm yarn tail.
Do not trim this tail.
You’ll use it later for finishing and seaming.
Foundation Chain
Chain:
44
while leaving that long 24-inch tail.
This chain establishes the height of your hat.
Foundation Row
With the right side facing:
Work:
1 hdc in the third chain from your hook.
Continue working:
1 hdc in every chain
until only five chains remain.
Now work:
1 sc in each of the final 5 chains.
You should have:
42 stitches.
Turn your work. CAC0116-030684M
This foundation row already establishes the two different sections of the hat.
Most of the row is half double crochet.
The final five stitches are single crochet.
Crochet Row 1
You are now working on the:
wrong side.
Chain:
1
Work:
1 scbl in each of the first 5 stitches.
Remember that scbl means single crochet in the back loop only.
After those first five stitches, you’ll switch to half double crochet.
Instead of inserting your hook through the usual top loops, locate the:
horizontal bar created below each stitch in the previous row.
Work:
1 hdc into each horizontal bar
across the remainder of the row.
Turn.
Crochet Row 2
Chain:
2
The pattern specifically states that this beginning chain 2:
does not count as a half double crochet. CAC0116-030684M
Now work:
1 hdc in the horizontal bar below each stitch
across until you reach the final five stitches.
In those final five stitches, work:
1 scbl in each stitch.
Turn.
That’s it.
You have now learned the entire repeating pattern.
Continue Repeating Rows 1 and 2
Repeat:
Rows 1 and 2
over and over.
As your fabric grows, you’ll notice strong vertical ribs developing.
One end will contain the narrower single crochet section.
The other portion will form the main body and folded cuff of the hat.
Continue until the piece, measured at its widest point, reaches approximately:
20″ / 51 cm
when:
slightly stretched.
Then fasten off. CAC0116-030684M
Why You Measure the Hat Slightly Stretched
The ribbed stitch pattern creates elastic fabric.
If you measure the piece completely relaxed and continue until it reaches a full adult head circumference, the finished hat could end up too loose.
The source therefore specifically tells you to measure it:
when slightly stretched.
The target is approximately:
20 inches / 51 cm.
This gives the ribbing the opportunity to stretch naturally when the finished hat is worn.
How to Finish the Crown
Remember the long yarn tail you left before making the foundation chain?
Now it’s time to use it.
Thread that end onto your yarn needle.
The pattern tells you to weave the yarn through the:
last scbl of each row.
In other words, work along the narrow single-crochet edge of the rectangle.
Pass the yarn through those stitches across the entire edge.
Once you reach the end:
gather tightly.
As you pull the yarn, the flat edge begins closing inward.
This creates the rounded crown of your beanie without requiring traditional crochet decrease rounds. CAC0116-030684M
Sew the Back Seam
After gathering the crown, sew the:
back seam.
Bring the two short sides of the crocheted rectangle together and use your yarn needle to secure them.
Take your time here.
A neat seam helps the ribbing appear more continuous around the finished hat.
Secure the yarn carefully once you reach the opposite edge.
Weave in your remaining ends.
Create the Folded Cuff
The final instruction is wonderfully simple:
Turn back the cuff as shown.
Fold the lower portion of the hat upward.
The photograph on the pattern page shows a substantial folded cuff around the bottom of the beanie.
This makes the hat look thicker and cozier around the ears while giving it the familiar classic winter-beanie silhouette.
And with that, your Simple Ribbed Crochet Beanie is complete.
Understanding the Construction
If you’re new to crochet hats, it can help to visualize what is happening structurally.
You begin with:
44 chains.
Those chains travel vertically from one end of the hat toward the other.
After the foundation row, you have:
42 stitches.
You don’t increase or decrease those 42 stitches.
Instead, you keep crocheting sideways.
Every completed row adds a little more circumference.
Eventually your crochet resembles a long ribbed rectangle.
When that rectangle reaches approximately 20 inches wide while slightly stretched, it is wide enough to wrap around an adult head.
The narrow scbl edge becomes the crown.
The opposite portion becomes the lower part of the hat.
Gather one side, sew the rectangle into a tube, fold the lower edge upward, and you have a beanie.
It is wonderfully simple construction.
Why the First Five Stitches Are Different
You might wonder why the pattern doesn’t simply use half double crochet across every stitch.
Those five single crochet stitches serve a structural purpose.
Single crochet stitches are shorter than half double crochet stitches.
By keeping a short scbl section at one end, the fabric behaves differently near the future crown.
The back-loop-only technique also keeps that section flexible and strongly ribbed.
Once all those row ends are gathered, they form the top of the beanie.
Tips for Making a Beautiful Ribbed Crochet Beanie
Leave the Long Starting Tail
The pattern specifically asks for:
24 inches / 61 cm.
Don’t accidentally weave it in or cut it short.
You’ll need it during finishing.
Count Your Foundation Row
You should have:
42 stitches.
Establishing the correct count immediately helps keep the edges consistent.
Remember That Chain 2 Doesn’t Count
At the beginning of the appropriate rows, chain 2 is simply used to bring your hook to the correct height.
It does:
not
count as an hdc.
Learn to Recognize the Horizontal Bar
This is probably the most unfamiliar part of the pattern for many beginners.
Look beneath the normal top loops of the previous stitch.
The small diagram on the pattern page shows the horizontal bar from the wrong side and indicates exactly where your hook should enter.
Once you’ve completed several rows, identifying it should become much more natural.
Don’t Forget the Last Five Stitches
The five scbl stitches need to remain consistent at the designated end of each row.
They form the crown edge.
Measure With Gentle Stretch
Don’t aggressively pull the fabric.
The instruction says:
slightly stretched.
You want to approximate how the ribbed fabric will naturally expand when worn.
Gather the Crown Firmly
When finishing, pull the yarn through all those scbl row stitches and gather the opening tightly.
A loose gather can leave an unnecessarily large opening at the top.
Yarn Substitution Tips
The source specifically uses Caron Simply Soft Marled, so any substitution would be a modification rather than part of the original instructions.
If you do substitute yarn, the most important thing is maintaining the stated gauge and a fabric with enough flexibility for a comfortable hat.
The beautiful marled appearance isn’t required for the construction, but it does add visual interest to the simple ribbed texture.
A solid yarn would make the stitch definition more obvious, while a softly variegated or marled yarn would create an effect closer to the photographed sample.
Styling Your Finished Crochet Beanie
The sample photograph shows the hat worn with the cuff folded upward and the crown sitting comfortably above the head.
Because the design itself is so simple, it works particularly well as an everyday cold-weather accessory.
The ribbed texture gives it enough visual interest that it doesn’t need additional decoration.
The Harvest Red Marl used in the original creates a warm, casual look, but the same silhouette could look completely different depending on the yarn color chosen.
Frequently Asked Questions
Is this crochet beanie beginner-friendly?
Yes.
The original pattern rates it:
Easy. CAC0116-030684M
The most unusual technique is working half double crochet into the horizontal bar below the normal stitch loops.
What size does the beanie fit?
The pattern provides:
one size to fit an adult.
What yarn is used?
The original uses:
Caron Simply Soft Marled
in:
Harvest Red Marl (0005).
How much yarn do I need?
The pattern calls for approximately:
214 yards / 196 meters
or one ball of the specified yarn.
What crochet hook do I need?
Use:
5 mm / U.S. H-8
or the size required to obtain gauge.
What is the gauge?
The source specifies:
13 sc and 14 rows = 4″ / 10 cm.
Is the hat crocheted in the round?
No.
This is one of the most important features of the pattern.
The hat is:
worked sideways in rows.
It is seamed only during finishing.
How many chains do I start with?
Chain:
44.
Remember to leave a:
24-inch / 61 cm tail
before beginning.
How many stitches are in the foundation row?
You should finish with:
42 stitches.
Does the beginning chain 2 count as a stitch?
No.
The pattern explicitly states that the chain 2 at the beginning of rows does not count as a half double crochet.
What does SCBL mean?
SCBL means:
single crochet in back loop only.
How wide should the rectangle be?
Continue repeating the two pattern rows until the hat measures approximately:
20 inches / 51 cm
at its widest point when slightly stretched.
How is the crown shaped?
There are no traditional decrease rounds.
Instead, the long starting yarn tail is woven through the last scbl stitch of each row.
The yarn is then pulled tightly to gather the edge and create the crown.
How do I close the hat?
After gathering the crown, sew the back seam.
How do I make the cuff?
Once the hat is assembled, simply:
turn back the cuff
as shown in the source photograph.
Can I Make This Beanie in Different Colors?
The source provides the pattern specifically in Harvest Red Marl, but color changes are an easy creative modification because they don’t affect the construction.
A cream or oatmeal version could emphasize the ribs beautifully.
Charcoal or navy would give the hat a classic everyday look.
Soft pink, burgundy, forest green, mustard, or icy blue could make lovely seasonal versions.
A marled yarn, however, creates the closest appearance to the original sample.
Why This Is a Great Repeat Project
Once you’ve made the first hat, there isn’t much pattern-reading required to make another.
The entire body is essentially:
Foundation row → Row 1 → Row 2 → repeat.
There are no complicated color charts.
No separate pieces.
No intricate crown decreases.
No long assembly process.
That makes this type of beanie particularly appealing when you want a relaxing crochet project with a useful finished result.
Final Thoughts
The Simple Ribbed Crochet Beanie proves that a good crochet pattern doesn’t need complicated construction to produce a beautiful finished accessory.
You start with just:
44 chains.
Work across to create 42 stitches.
Then settle into two repeating rows.
Five back-loop single crochets create one section, while half double crochets worked into the horizontal bars build that gorgeous ribbed body.
Row by row, your little strip grows into a wide rectangle.
Once it reaches approximately 20 inches when slightly stretched, the crochet itself is essentially finished.
Then comes the satisfying transformation.
Thread that long starting tail through the crown edge.
Pull.
The flat edge gathers into the top of a hat.
Sew one seam.
Turn up the cuff.
And suddenly that simple ribbed rectangle becomes the cozy beanie shown in the original pattern photograph.
It’s approachable enough for someone building confidence with crochet accessories, repetitive enough to make while relaxing, and classic enough that the finished hat won’t feel tied to a passing trend.
If you’re making it for the first time, focus on identifying that horizontal bar correctly and keeping the five scbl stitches consistent. Once those two details click, the rest of the pattern becomes wonderfully repetitive.
One ball of yarn, one hook, two repeating rows, and a little finishing are all it takes.
Happy crocheting!