Textured Star Stitch Crochet Headband

There are certain crochet projects I come back to every autumn and winter, and a cozy handmade headband will always be one of them.
Maybe it is because they are quick enough to make over a quiet weekend. Maybe it is because you can actually wear them almost immediately after weaving in that final yarn tail. Or perhaps it is simply the satisfaction of turning one little ball of yarn into something beautiful, warm, and genuinely useful.
This Textured Star Stitch Headband has all of those things.
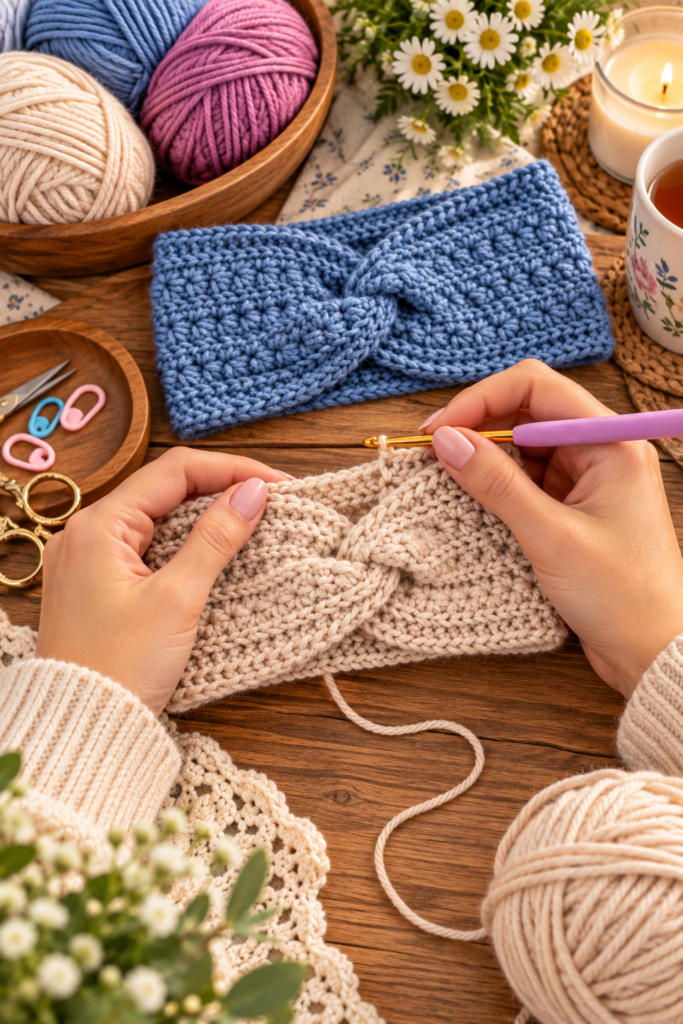
It combines gorgeous raised star stitches with subtle knit-look edging and a beautiful twist at the front. The texture looks intricate and impressive, but once you understand how the star stitch is constructed, the rhythm becomes surprisingly enjoyable.
The headband itself is not crocheted in the round.
Instead, we are going to crochet one flat rectangle, working the special star stitches into the back loops to create those wonderful raised horizontal ridges. Once the rectangle is finished, the short ends are folded, interlocked, and sewn together.
Turn it right side out and that simple seam transforms into the pretty twisted front.
If you have been looking for a crochet ear warmer that feels a little more special than basic ribbing, grab your hook and favorite Aran yarn.
Let’s make one together.
About the Textured Star Stitch Headband

This crochet headband is designed around a beautifully raised version of the classic star stitch.
The star stitches are worked through the back loops only (BLO).
That small change makes a surprisingly big difference.
Working through the back loops creates raised horizontal ridges between the star stitch rows, giving the fabric additional depth and texture.
The edges use yarn-over slip stitches, which create a neat, almost knitted appearance.
When everything is finished, you have a wonderfully textured crochet fabric that looks much more complicated than its simple rectangular construction suggests.
Pattern at a Glance
Skill Level: Intermediate
Construction: Worked flat in rows and seamed at the short ends
Size: Adult – One Size, adjustable
Yarn Weight: Medium / Aran
Hook Size: 4.5 mm
Yarn Needed: Approximately 37 g / 74 m / 81 yd
Finished Circumference: Approximately 19¼” / 49 cm unstretched
Finished Width: Approximately 4″ / 10 cm
The headband is intentionally stretchy and designed with negative ease so it sits comfortably and securely around the head.
The sample size comfortably fits approximately a 21¼” / 54 cm head circumference.
Why I Love This Crochet Headband
There are plenty of simple crochet headbands out there, but the texture is what makes this one stand out.
The stars give the center of the headband a decorative appearance without needing multiple colors or complicated embellishments.
It is also a wonderfully practical project.
You don’t need to crochet complicated shaping or continuously check increases and decreases.
Once your foundation chain is established, you are essentially creating a rectangle.
The magic happens when you seam it.
That makes this a satisfying project for an intermediate crocheter who wants something interesting without committing to a huge blanket or garment.
Supplies You’ll Need
Gather everything before starting so you can settle into the stitch pattern without interruption.
Yarn
The original project uses:
Infinity Hearts Lily – Medium / Aran weight
Fiber content:
- 70% cotton
- 30% Superwash Merino wool
Each ball contains approximately:
50 g / 100 m / 109.3 yd
One headband uses approximately:
37 g / 74 m / 81 yd
The sample colors are:
- 23 Denim Blue
- 02 Light Powder
You don’t need to use these exact colors.
Choose whichever shade makes you happy.
This pattern looks beautiful in soft neutrals, dusty pastels, rich autumn colors, or deeper winter shades.
Additional Supplies
You will also need:
- 4.5 mm crochet hook
- Yarn needle
- Scissors
- Optional stitch markers
Stitch markers can be particularly helpful at the beginning and end of your rows.
Yarn Substitutions
You can substitute another yarn as long as you choose a Medium / Aran weight yarn that allows you to achieve the correct gauge.
Your substitute yarn should also produce a comfortable and stretchy fabric.
Possible alternatives include yarns such as Cascade Yarns Cantata or Juniper Moon Farm Cotton + Merino.
However, yarns can behave surprisingly differently.
Fiber content, twist, thickness, and elasticity can all affect your finished headband.
That is why checking your gauge before beginning is important.
Finished Size and Fit
The finished adult headband measures approximately:
19¼” / 49 cm circumference
and
4″ / 10 cm wide
These measurements are taken while the headband is unstretched.
The fabric has plenty of stretch and is intended to be worn with negative ease.
How to Adjust the Headband Size
Need your headband slightly larger or smaller?
Adjust the number of foundation chains in multiples of 2.
The number of working stitches needs to remain an odd number—a multiple of 2 plus 1—for the Textured Star Stitch.
At the stated gauge, changing the pattern by 2 stitches changes the finished length by approximately:
½” / 1.25 cm
This makes it relatively easy to customize the fit.
Crochet Gauge
Before beginning the full headband, check your gauge.
The pattern gauge is:
8 star stitches = 4″ / 10 cm
and
3 complete Textured Star Stitch rows = 2¾” / 7 cm
One complete Textured Star Stitch row actually consists of two crochet rows:
- One Star Stitch row
- One half double crochet row
Gauge matters especially when making a fitted accessory.
If your stitches are significantly tighter or looser, the headband may not fit as intended.
Crochet Terms and Abbreviations
This pattern uses US crochet terminology.
ch – chain
hdc – half double crochet
st – stitch
sts – stitches
yo – yarn over
BLO – back loop only
RS – right side
WS – wrong side
Special Crochet Stitches and Techniques
Before beginning the headband, there are a few techniques worth understanding.
Yarn Over Slip Stitch – yo-slst
Yarn over.
Insert your hook into the indicated stitch.
Yarn over again and pull up a loop.
You should now have 3 loops on your hook.
Pull the first loop on your hook through the remaining 2 loops.
Your yarn-over slip stitch is complete.
Yarn Over Slip Stitch Back Loop Only – yo-slst-blo
Work the stitch exactly as described above, except insert your hook into the back loop only of the indicated stitch.
Working through the back loop helps create the subtle ribbed texture around the headband.
Working Into the Back Bump of a Foundation Chain
Instead of inserting your crochet hook beneath the usual top loops of your foundation chain, turn the chain slightly and locate the little bump running along its back.
Insert your hook into this bump.
Working into the back bumps creates a cleaner-looking foundation edge.
Textured Star Stitch
The star stitch is the feature that gives this headband its beautiful decorative appearance.
For this project, the star stitches are worked into the back loops only.
This creates the raised horizontal ridges between each section of stars.
The stitch is worked over an odd number of stitches—a multiple of 2 plus 1.
Important Pattern Notes
Before starting, keep these details in mind.
The headband is worked flat in rows.
The short ends are eventually folded and seamed together to create the front twist.
The ch 1 and ch 2 at the beginning of rows do not count as stitches.
However, the ch 3 at the beginning of each Star Stitch row forms part of the first star stitch.
Beginning with Row 2, work the final stitch of every row through both loops.
This includes the stitch worked into the top of the ch 3 at the end of the hdc rows.
Using stitch markers at the first and last stitches can help prevent accidentally losing stitches along the edges.
Textured Star Stitch Crochet Headband Instructions
Now we are ready to begin.
Use your 4.5 mm crochet hook.
Foundation Chain
Chain 80.
Turn.
Row 1 – Wrong Side
Working into the back bump of the foundation chains:
Yo-slst in the second chain from your hook.
Continue working one yo-slst into each chain across.
Turn.
79 stitches
Row 2 – Right Side
Chain 1.
Remember that this chain does not count as a stitch.
Work one yo-slst-blo into each stitch across.
Work the final yo-slst through both top loops of the last stitch.
Turn.
79 stitches
Row 3 – Wrong Side
Repeat Row 2.
79 stitches
You now have the neat edging that will frame the textured star section.
Row 4 – Textured Star Stitch Row
This row is worked on the right side and through the back loops only.
This is where the beautiful stars begin appearing.
Make the First Star Stitch
Chain 3.
Insert your hook into the second chain from your hook and pull up a loop.
Insert your hook into the third chain from your hook and pull up another loop.
Now insert your hook into the BLO of each of the first 3 stitches of the row, pulling up one loop from each stitch.
You should now have 6 loops on your hook.
Yarn over and pull through all 6 loops.
Chain 1 to close the star.
Your first star stitch is complete.
Make the Second Star Stitch
Insert your hook into the ch-1 at the top of the previous star and pull up a loop.
Insert your hook into the last leg of the previous star and pull up another loop.
Insert your hook into the BLO of the same stitch where the final leg of the previous star was made and pull up another loop.
Then insert your hook into the BLO of each of the next 2 stitches, pulling up one loop from each.
You should again have 6 loops on your hook.
Yarn over and pull through all 6 loops.
Chain 1 to close the star.
Continue the Star Stitches
Continue across the row using the same sequence.
For each new star:
Pull up a loop from:
- The ch-1 of the previous star
- The final leg of the previous star
- The BLO of the same stitch
- The BLO of each of the next 2 stitches
Once you have 6 loops on your hook:
Yarn over and pull through all 6 loops.
Chain 1 to close the star.
Continue until you approach the end of the row.
Before beginning your final star, you should have 2 unworked stitches remaining.
Complete the final star following the same method.
Finish the row by working 1 hdc through both top loops of the final stitch. This is the same stitch where the last leg of the final star was made.
Turn.
You should have:
39 stars
Row 5 – Half Double Crochet Row
This row is worked on the wrong side.
Chain 2.
The chain does not count as a stitch.
Work 2 hdc into the ch-1 space at the top of the first star.
Continue across, working 2 hdc into the ch-1 space at the top of every remaining star.
At the end of the row, work 1 hdc through both loops of the top of the ch 3.
Turn.
79 stitches
Rows 4 and 5 together create one complete Textured Star Stitch row.
The decorative texture will be visible on the right side.
Rows 6–9
Repeat Rows 4 and 5 twice.
After completing Row 9, you should have:
3 complete Textured Star Stitch rows.
Take a moment to spread your crochet rectangle flat.
You should now clearly see those lovely raised stars framed by the subtle ribbed edging.
Row 10 – Right Side
Repeat Row 2.
79 stitches
Row 11 – Wrong Side
Repeat Row 2 again.
79 stitches
Once Row 11 is complete, cut your yarn.
But don’t cut the tail too short!
Leave a long yarn tail because you will use it to sew the short ends of the rectangle together.
How to Create the Twisted Front
This is the clever little finishing technique that transforms our simple crochet rectangle into a stylish twisted ear warmer.
Place the finished crochet rectangle flat with the right side facing upward.
Step 1 – Bring the Ends Together
Bring both short ends toward the center.
The wrong sides of these ends should now be facing you.
Step 2 – Fold the First End
Fold one short end in half so that it forms a small V shape.
Step 3 – Fold the Other End
Fold the opposite short end in the same way.
You should now have two folded ends.
Step 4 – Interlock Them
Slide the two folded ends into one another.
Think of the layers alternating.
When positioned correctly, you should have four alternating layers.
This interlocking arrangement is what creates the twist when the headband is turned right side out.
Step 5 – Sew Through All Four Layers
Thread the long yarn tail onto your yarn needle.
Sew securely across all four layers.
Make sure your needle actually catches every layer as you work across the seam.
Otherwise, part of the twist may come apart when the headband stretches.
Step 6 – Reinforce the Seam
For additional security, sew back across the seam one more time.
Fasten off securely.
Finishing Your Crochet Headband
Weave in any remaining yarn tails.
Now turn your headband right side out.
This is the satisfying part.
As you turn the seam, the interlocked folds reveal the beautiful twist at the front.
Straighten the surrounding fabric gently and arrange the star stitches so they sit evenly.
Your Textured Star Stitch Headband is finished!
Tips for a Beautiful Star Stitch Headband
Don’t Skip the Gauge Check
This headband relies on stretch and negative ease.
Even if you normally skip gauge for accessories, checking it here will help you achieve a much better fit.
Use Stitch Markers at the Edges
Star stitches can make it slightly harder to recognize the first and last stitch.
Marking these stitches can prevent your stitch count from gradually decreasing.
Remember the Last Stitch Rule
Beginning with Row 2, the final stitch is worked through both loops, even when the other stitches are worked through the back loops.
This helps produce a more stable edge.
Don’t Make Your Star Stitches Too Tight
Pulling the loops too tightly can make working through all six loops frustrating.
Try to keep the loops even and relaxed.
Check the Twist Before Sewing
Before permanently sewing the four layers together, hold them in place and gently open the headband.
Make sure the twist forms correctly.
It is much easier to reposition the layers before sewing.
Frequently Asked Questions
Is the Textured Star Stitch Headband beginner-friendly?
This pattern is rated intermediate.
A confident beginner who understands basic crochet stitches may still enjoy trying it, but you should be comfortable identifying stitches and working into back loops.
The Textured Star Stitch requires a little concentration at first.
What yarn weight should I use?
Use a Medium / Aran weight yarn or another yarn that allows you to match the stated gauge.
How much yarn do I need?
The original headband uses approximately 37 g or 74 m / 81 yd of yarn.
What crochet hook size do I need?
Use a 4.5 mm crochet hook, or adjust your hook size if necessary to obtain the correct gauge.
How wide is the finished headband?
The finished headband is approximately 4″ / 10 cm wide.
This provides comfortable coverage around the ears.
How long is the headband?
The unstretched circumference is approximately 19¼” / 49 cm.
Because the crochet fabric is stretchy, it is designed to be worn with negative ease.
How can I make the headband bigger?
Add foundation chains in multiples of 2.
At the stated gauge, every additional 2 stitches adds approximately ½” / 1.25 cm to the finished length.
Remember that your working stitch count needs to remain odd for the Textured Star Stitch.
What does BLO mean in crochet?
BLO means back loop only.
Instead of inserting your hook through both loops at the top of the stitch, insert it only through the back loop.
This technique creates the raised texture used throughout this headband.
Why does my star stitch look flat?
Make sure you are working the star stitches through the back loops only.
Those unworked front loops help form the raised horizontal ridges that make this variation of star stitch so textured.
Can I make this headband wider?
Yes, but increasing the width means adding additional pattern rows rather than foundation chains.
Remember that one complete Textured Star Stitch section consists of a Star Stitch row followed by an hdc row.
Final Thoughts
There is something so satisfying about a crochet project that looks intricate but starts from such a simple shape.
For most of this project, all you have is a rectangle sitting in your lap.
Then the star stitches begin to appear.
Row by row, those little raised stars create a wonderfully textured fabric. The ribbed edges frame everything beautifully, and suddenly that simple rectangle already looks like something special.
But my favorite moment comes right at the end.
You fold the short edges.
You interlock the four layers.
You sew across the seam.
And then you turn the headband right side out and that beautiful little twist appears at the front.
It feels almost like a crochet magic trick.
Whether you make yours in a soft neutral shade, a rich winter color, or a cheerful pastel, this is the kind of handmade accessory that can become a regular part of your cold-weather wardrobe.
And once you understand the Textured Star Stitch, don’t be surprised if you start imagining all the other projects where you could use that gorgeous raised texture.
Take your time with the first few stars, keep an eye on your stitch count, and enjoy watching the texture grow.
Happy crocheting!