Teddiursa Amigurumi Crochet Pattern

There is something incredibly comforting about turning a simple ball of yarn into a tiny character with a personality of its own. It still amazes me how a crochet hook, a little stuffing, and a handful of stitches can slowly become something you want to keep sitting on your shelf forever.
And this little Teddiursa is exactly that kind of project.
With its round golden body, tiny ears, sweet muzzle, little claws, and recognizable moon marking, this amigurumi is full of adorable details. It is a wonderful project for anyone who loves character-inspired crochet, handmade plushies, or simply wants a slightly more interesting amigurumi project to work on.
The construction may look complicated when you first see the finished bear, but it becomes much easier when you break it down into individual pieces. We will begin with the muzzle, crochet the head and body as one continuous piece, and then create the arms, tail, feet, and ears separately before assembling everything.
So grab your yarn, settle somewhere comfortable, and let’s make this sweet little crochet bear one stitch at a time.
About This Teddiursa Amigurumi Project
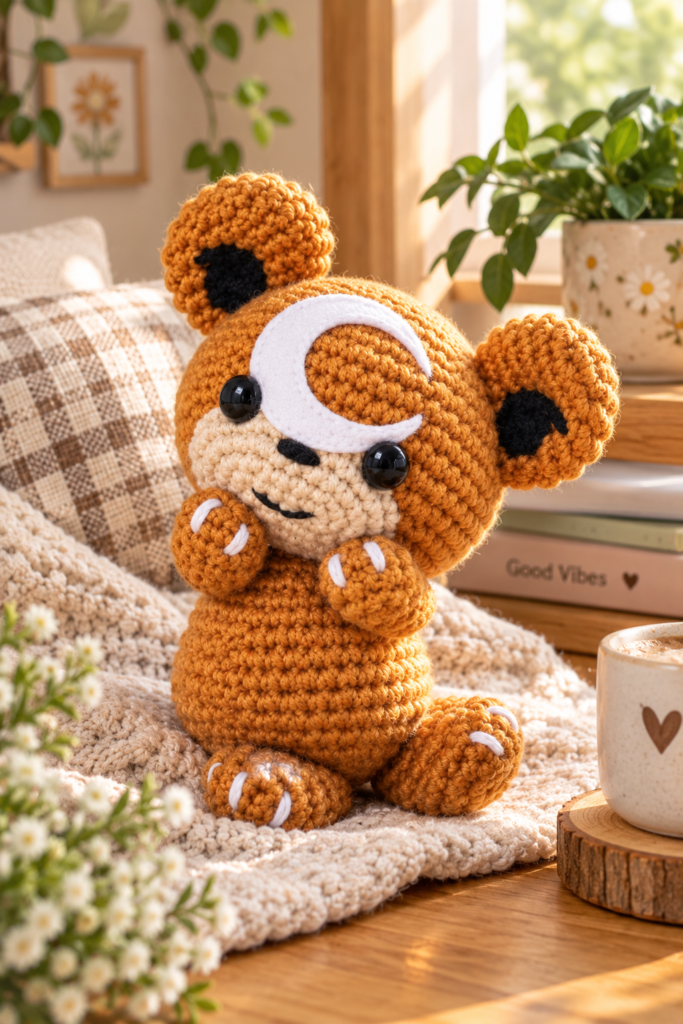
This crochet project creates a stuffed Teddiursa-inspired amigurumi using mostly simple crochet stitches worked in rounds.
One of my favorite things about this design is that the head and body are crocheted continuously. Instead of creating two large pieces and sewing them together, you work directly from the head into the body.
That means fewer seams and a cleaner finished shape.
The smaller pieces—the muzzle, arms, tail, feet, and ears—are made separately and sewn onto the finished body.
Felt is then used to create the recognizable moon marking on the forehead and the dark details on the ears.
Skill Level
I would consider this an advanced beginner to intermediate amigurumi project.
You should be comfortable with:
- Working in a magic ring
- Crocheting in continuous rounds
- Increasing
- Decreasing
- Counting stitches
- Stuffing amigurumi
- Sewing crochet pieces together
- Working around a foundation chain
- Basic embroidery
The individual stitches are not particularly difficult. The biggest challenge is careful counting and positioning the facial features and limbs.
Materials You Will Need
Before beginning, gather everything you need so you can work through the project without constantly stopping.
Yarn and Crochet Supplies
You will need:
- 2 mm crochet hook
- DK yarn in gold
- DK yarn in cream
- DK yarn in stone or a similar neutral shade
- 9 mm black safety eyes
- White felt
- Black felt
- Fabric glue
- Black embroidery floss
- Polyester toy stuffing
- Pins
- Darning or tapestry needle
- Stitch markers
Scrap yarn can also work wonderfully as a simple stitch marker.
A Note About Colors
The original design uses gold as the main body color, cream for small details such as the claws, and stone for the muzzle.
You do not have to match the exact yarn perfectly.
Choose shades that give you the same overall appearance and contrast.
Crochet Abbreviations
This pattern uses UK crochet terminology.
dc – double crochet
sl st – slip stitch
st/sts – stitch/stitches
inc – work 2 dc into one stitch
dec – decrease
rs – right side
ws – wrong side
ch – chain
sk – skip
For the decrease, insert your hook into the front loops of the next two stitches, yarn over and pull through both loops, then yarn over again and complete the stitch.
This turns two stitches into one.
Before You Start
Amigurumi becomes much easier when you count carefully.
Place a stitch marker at the beginning of each round and move it upward as you work. Since many sections are worked continuously, it can be surprisingly easy to lose track of where one round finishes and another begins.
Stuff gradually rather than waiting until the very end.
You want the toy to feel firm enough to maintain its shape without stretching the stitches so much that the filling becomes visible.
How to Crochet the Teddiursa Amigurumi
Crochet the Muzzle
Use your stone-colored yarn.
Chain 6.
You will work around both sides of the chain to create an oval.
Round 1
Increase in the second chain from your hook.
Dc in each of the next 3 chains.
Increase in the final chain.
Turn your work so you can continue along the opposite side of the foundation chain.
Increase in that same end chain, dc across the next 3 chains, and increase in the final chain.
14 stitches
Round 2
Increase in the first 2 stitches.
Dc 3.
Increase in each of the next 4 stitches.
Dc 3.
Increase in the final 2 stitches.
22 stitches
Round 3
Increase in the first 2 stitches.
Dc 7.
Increase in each of the next 4 stitches.
Dc 7.
Increase in the final 2 stitches.
30 stitches
Round 4
Dc around.
30 stitches
Fasten off and leave a long yarn tail because you will use it later to sew the muzzle onto the face.
Crochet the Head and Body
The head and body are created as one continuous piece from top to bottom.
Use your gold yarn.
Head
Round 1: 6 dc into a magic ring. (6)
Round 2: Inc around. (12)
Round 3: (dc, inc) × 6. (18)
Round 4: (2 dc, inc) × 6. (24)
Round 5: (3 dc, inc) × 6. (30)
Round 6: (4 dc, inc) × 6. (36)
Round 7: (5 dc, inc) × 6. (42)
Round 8: Dc around. (42)
Round 9: (6 dc, inc) × 6. (48)
Round 10: Dc around. (48)
Round 11: (7 dc, inc) × 6. (54)
Rounds 12–14: Dc around. (54)
Round 15: (7 dc, dec) × 6. (48)
At this point, pay special attention to the beginning of Rounds 15 and 16 because these rounds will help you position the safety eyes.
Round 16: Dc around. (48)
Round 17: (6 dc, dec) × 6. (42)
Round 18: Dc around. (42)
Round 19: (5 dc, dec) × 6. (36)
Round 20: (4 dc, dec) × 6. (30)
Round 21: (3 dc, dec) × 6. (24)
Round 22: (2 dc, dec) × 6. (18)
The head is now complete.
Do not fasten off.
Begin stuffing the head before continuing into the body.
Crochet the Body
The increases in the body are positioned slightly differently to create a more oval shape.
Round 23: Dc 6, inc 3 times, repeat twice total. (24)
Rounds 24–25: Dc around. (24)
Round 26: Dc 6, (dc, inc) × 3, repeat twice total. (30)
Rounds 27–28: Dc around. (30)
Round 29: Dc 6, (2 dc, inc) × 3, repeat twice total. (36)
Rounds 30–31: Dc around. (36)
Before closing the body, stop here to position the eyes and muzzle.
How to Position the Eyes
Locate Rounds 15 and 16.
The safety eyes should sit between these rounds.
Starting from the beginning of the round, count approximately 23 stitches and insert your first eye.
Count another 7 stitches and place the second eye around the 30th stitch.
Do not tighten the safety-eye washers completely yet.
You still need enough flexibility to position the muzzle.
Attach the Muzzle
Place one of the long sides of your crocheted muzzle underneath the two eyes.
The upper edge of the muzzle should line up approximately between Rounds 14 and 15.
Pin it first.
Take a moment to look at the face from several angles before sewing. Small adjustments at this stage can dramatically change the final expression.
Once you are happy with the position, sew the muzzle securely to the head.
You can now tighten the washers on your safety eyes.
Continue stuffing the head and body.
Finish the Body
Round 32: Dc 6, (2 dc, dec) × 3, repeat twice total. (30)
Round 33: Dc 6, (dc, dec) × 3, repeat twice total. (24)
Round 34: Dc 6, dec 3 times, repeat twice total. (18)
Round 35: (dc, dec) × 6. (12)
Finish stuffing the body firmly and evenly.
Round 36: Dec × 6. (6)
Fasten off and neatly sew in the remaining yarn end.
Creating Teddiursa’s Face
The facial details are what really bring this little crochet character to life.
Make the White Moon
Using white felt, carefully cut out the moon-shaped marking.
It helps to look at a reference image while shaping this piece.
Make the moon wide enough that approximately 1–2 mm on either side can tuck underneath the safety eyes.
Do not glue it down immediately.
First, use its position to help determine where the nose and mouth should go.
Embroider the Nose and Smile
Thread your needle with black embroidery floss.
The nose can be embroidered approximately between Rounds 3 and 4 of the muzzle, just below the moon.
Then embroider the mouth around the center of the muzzle.
Keep the stitches neat but do not worry about making them mathematically perfect. A slightly handmade expression often gives amigurumi more personality.
Crochet the Arms
Use gold yarn.
Make 2.
Round 1: 6 dc into a magic ring. (6)
Round 2: Inc around. (12)
Rounds 3–4: Dc around. (12)
Round 5: (4 dc, dec) × 2. (10)
Round 6: Dc around. (10)
Round 7: (3 dc, dec) × 2. (8)
Round 8: Dc around. (8)
The remaining stitches are worked in rows.
Row 9, RS: Dc 5, turn. (5)
Row 10, WS: Dc 5, turn. (5)
Row 11, RS: Skip the base stitch, dc 2, skip one stitch, dc into the final stitch. (3)
Fasten off and leave a long tail for sewing.
Stuff each arm very lightly.
Using scraps of cream yarn, sew three small claws onto each arm.
Crochet the Tail
Use gold yarn.
Round 1: 6 dc into a magic ring. (6)
Round 2: Inc around. (12)
Round 3: (dc, inc) × 6. (18)
Round 4: Dc around. (18)
Round 5: (2 dc, inc) × 6. (24)
Round 6: (2 dc, dec) × 6. (18)
Add polyester stuffing.
Round 7: Dc around. (18)
Round 8: (dc, dec) × 6. (12)
Round 9: Dec × 6. (6)
Fasten off and leave a long tail for sewing.
Crochet the Feet
Use gold yarn.
Make 2.
Chain 3.
Round 1: Dc in the second chain from the hook, inc in the next stitch, work along the opposite side of the chain, dc, then inc in the final chain. (6)
Round 2: (inc, inc, dc) × 2. (10)
Rounds 3–7: Dc around. (10)
Round 8: Dec × 5. (5)
Fasten off and leave a long sewing tail.
Add three little cream yarn claws to each foot.
Crochet the Ears

Use gold yarn.
Make 2.
Round 1: 6 dc into a magic ring. (6)
Round 2: Inc around. (12)
Round 3: (dc, inc) × 6. (18)
Rounds 4–7: Dc around. (18)
Round 8: (dc, dec) × 6. (12)
Fasten off and leave a long tail for sewing.
Shape the Ears
Lightly stuff each ear, concentrating the filling on only one side.
The stuffed portions should eventually face toward the center of the head.
Pinch the outward-facing side of each ear so it becomes flatter.
Cut two rounded shapes from black felt. They should have a slightly pointed or quotation-mark-like appearance.
Position these felt pieces on the flattened outer portions of the ears with the pointed areas facing outward.
How to Assemble Your Teddiursa
Assembly is the stage where all those separate little crochet pieces suddenly become a recognizable character.
The muzzle should already be attached, and your eyes, nose, and smile should also be completed.
Before permanently sewing anything else, use pins to temporarily position the arms, feet, ears, and tail.
Look at your Teddiursa from the front, sides, and back.
Adjust the pieces until everything looks balanced.
Sew the feet securely toward the bottom of the body.
Position and sew the tail onto the back.
Attach both ears to the top of the head, making sure the stuffed sides face inward.
Attach the arms to the sides of the body.
One arm can be folded upward toward the face to recreate Teddiursa’s cute characteristic pose.
Finally, attach the white felt moon with fabric glue.
Carefully tuck the lower edges of the moon underneath the safety eyes before securing it.
Allow the glue to dry completely.
Tips for Getting the Best Result
Keep Your Tension Consistent
Amigurumi usually looks best with relatively tight stitches because this prevents stuffing from showing through.
If your stitches have large gaps, consider using a slightly smaller hook.
Do Not Overstuff the Limbs
The arms and ears only need light stuffing.
Overstuffing can make them stiff and difficult to position.
Pin Everything Before Sewing
This is one of the easiest ways to improve your finished amigurumi.
Pin both ears, both feet, the tail, and the arms before sewing anything permanently.
Check the Face Frequently
Facial placement has a huge effect on character.
Before tightening the eyes or gluing felt pieces, place everything temporarily and check the face from several angles.
Frequently Asked Questions
Is this Teddiursa crochet pattern beginner-friendly?
A confident beginner who already understands magic rings, increases, decreases, and working in continuous rounds should be able to complete it.
The assembly and facial placement require a little more patience.
What yarn should I use?
DK-weight yarn works well for this project. Gold is used for most of the body, with cream and stone shades providing contrasting details.
Why is the head crocheted directly into the body?
Working the head and body continuously eliminates a major seam and helps create a smooth, sturdy shape.
How firmly should I stuff the amigurumi?
The head and body should be firmly but evenly stuffed.
The smaller pieces, especially the arms and ears, should be stuffed more lightly.
Can I embroider the eyes instead of using safety eyes?
Yes.
Embroidered eyes can be used if you prefer not to use plastic safety eyes.
This is particularly worth considering if the finished item may be given to a very young child.
Why should I use pins before sewing the pieces together?
Pins let you experiment with placement before committing.
Even moving an ear or arm a few millimeters can noticeably change the appearance of an amigurumi.
Can I make a larger Teddiursa?
Yes. Using thicker yarn and an appropriately larger crochet hook should produce a larger finished toy while allowing you to follow the same general stitch counts.
Your final size will depend on your yarn, hook, tension, and stuffing.
Final Thoughts
There is something especially satisfying about finishing an amigurumi project like this.
At the beginning, you are simply crocheting circles, increases, decreases, and tiny separate pieces. Then the muzzle goes on. The eyes find their place. The little ears appear. You add the arms, feet, tail, moon, nose, and smile—and suddenly that pile of yarn has become an adorable little Teddiursa.
Take your time with the finishing details.
Perfectly even stitches are lovely, but handmade toys do not need to look factory-made. Tiny differences in the ears, a slightly crooked smile, or small variations in your embroidery are part of what makes your finished crochet creation uniquely yours.
Whether you make this Teddiursa for your own collection, as a handmade gift, or simply because you wanted a fun new amigurumi challenge, I hope you enjoy watching this sweet little bear come together.
Happy crocheting!