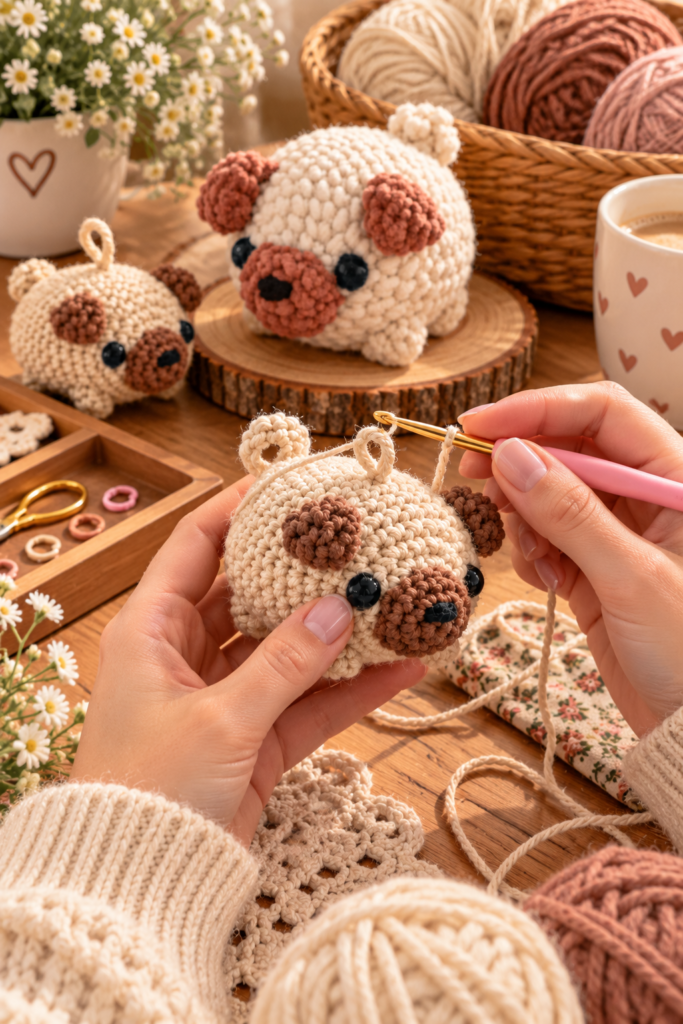
Free Pug Dog Amigurumi Pattern

Following the same beloved formula as their pig, cat, and mouse patterns, DIY Fluffies (mariskavos.nl) brings us a round, wrinkly-faced Pug Mini Dog Keychain, a free crochet pattern built for speed and simplicity. As the introduction explains, “this is a small crochet project that you can make in about one hour,” and just like its animal-keychain siblings, “it is a great pattern for left over yarn, because it is so small.”
The designer’s fondness for this style of project comes through clearly: “I love making keychain amigurumi, because they just take a little bit of time to create a very cute gift.” The sample pug shown was made in sport-weight cotton yarn for a compact size, but exactly as with the earlier patterns in this series, switching to a bulkier yarn — like plush chenille — turns the same instructions into a bigger, extra-huggable version instead.
Below is the complete pattern, reorganized with clear headings for the Body, Ears, Snout, Legs, and Tail, along with the full materials list across all three suggested yarn weights, supplies, abbreviations, and a set of tips and frequently asked questions.
About This Pattern
Source: DIY Fluffies (mariskavos.nl)
A full companion video on YouTube walks through every step of crocheting this pattern, which is especially useful for two trickier visual details: embroidering the eyes accurately, and sewing the four legs onto the body with the correct spacing.
If you’re new to crocheting, the designer’s beginner-friendly basic stitches tutorial, complete with instructional videos, covers everything needed to make your own amigurumi stuffed animal.
Materials
These are the materials used in the original pattern. Feel free to substitute other materials — if you’d like a larger or smaller pug, simply use a thicker or thinner yarn paired with a matching hook size. The designer’s website also has a materials page if you need help choosing.
Cotton Version — 6 cm / 2 inch
- Beige: Catania cotton, color 404
- Brown: Catania cotton, color 157
- Black: Catania cotton, color 110
- Synthetic poly filling
- Crochet hook size B/1 (2.5mm)
Velvet Bulky Version — 10 cm / 4 inch
- Beige durable velvet yarn
- Brown durable velvet yarn
- Black durable velvet yarn
- Synthetic poly filling
- Crochet hook size E/4 (3.5mm)
Chenille Super Bulky Version — 12 cm / 5 inch
- Beige chenille yarn
- Brown chenille yarn
- Black chenille yarn
- Synthetic poly filling
- Crochet hook size H/8 (5.0mm)
Tip for chenille, velvet, or similar plush yarns: the body may look a bit too oval while you’re still crocheting it — don’t worry about this. It will even out and look correct once you add the stuffing.
Supplies
- Scissors
- Tapestry needles with a blunt point, size 16 or 17
- Pins
- Crochet hook: 2.5mm (US 4/0) for the cotton version, 3.5mm (US E) for the velvet version, or 5.0mm (US H) for the chenille version
If you’re using blanket yarn instead, the designer recommends an 8.0mm crochet hook.
Abbreviations (U.S. Terms)
All abbreviations are explained in more detail in the designer’s basic stitches tutorial.
| Abbreviation | Meaning |
|---|---|
| Rnd | Round |
| st | Stitch |
| sc | Single crochet |
| sl st | Slip stitch |
| dec | Decrease |
| inc | Increase |
| ch | Chain stitch |
Crocheting the Body
Use beige yarn.
- Rnd 1: Start with 6 sc in a magic ring (6).
- Rnd 2: inc 6 times (12).
Mark the beginning of Round 3 with a piece of yarn if you haven’t already, so you can count your stitches accurately as you go.
- Rnd 3: (sc, inc in next st) repeat 6 times (18).
- Rnd 4: (sc in next 2 st, inc in next st) repeat 6 times (24).
- Rnd 5: (sc in next 7 st, inc in next st) repeat 3 times (27).
- Rnd 6–13: sc in all 27 st (27).
Optional keychain loop: if you’d like to turn the dog into a keychain, sew two strands of folded yarn into the top of the body between Rows 9 and 10, securing it on the inside of the body before continuing.
Embroidering the eyes: add the eyes onto the body between Rows 3 and 4, positioned at the 5th and 14th stitch, matching the placement shown in the pattern’s reference photos. If you need help sewing on the eyes accurately, the designer’s companion video for this pattern demonstrates the technique.
- Rnd 14: (sc in next 7 st, dec) repeat 3 times (24).
- Rnd 15: (sc in next 2 st, dec) repeat 6 times (18).
Stuff the head with filling at this point.
- Rnd 16: (sc in next st, dec) repeat 6 times (12).
- Rnd 17: dec 6 times (6).
Finish the head by taking the last strand of yarn and sewing it through the front loops of every crochet stitch made in the last round. Pull the yarn tight to close the hole completely. Stick your needle under the hole and weave in the yarn end to hide it.
Crocheting the Ears (Make 2)
Use brown yarn.
- Rnd 1: Start with 4 sc in a magic ring (4).
- Rnd 2: (sc, inc in next st) repeat 2 times (6).
- Rnd 3–4: sc in all 6 st (6).
Fasten off, leaving a long tail for sewing. Flatten each ear before attaching.
Sew Round 4 of each ear onto Round 7 of the body, leaving 6 stitches of space between the two ears. Fold the ears and sew the tips down onto the body, giving them the characteristic soft, floppy pug-ear shape shown in the reference photos.
Crocheting the Snout
Use brown yarn.
- Rnd 1: Start with 6 sc in a magic ring (6).
- Rnd 2: (sc, inc in next st) repeat 3 times (9).
- Rnd 3: (sc in next 2 st, inc in next st) repeat 3 times (12).
Fasten off, leaving a long tail for sewing.
Embroider a nose onto the snout using black yarn, positioned between Rounds 1 and 2.
Sew the finished snout onto the body, with the top of the snout sitting just below Round 2, and the bottom of the snout sitting just above Round 5 — this placement is what gives the pug its characteristically short, flat-faced profile.
Crocheting the Legs (Make 4)
Use beige yarn.
- Rnd 1: Start with 6 sc in a magic ring (6).
Fasten off, leaving a long tail for sewing.
Sew the legs onto the bottom of the body, leaving 4 stitches between the two front legs and 4 stitches between the two hind legs, with 4 rows of space separating the front legs from the hind legs. The designer’s companion video shows exactly how to sew the legs onto the dog with this precise spacing.
Crocheting the Tail
Use beige yarn.
Chain 9.
- Row 1: Starting in the 2nd chain from the hook, slip stitch in the next 8 st (8).
Fasten off, leaving a long piece of yarn for sewing. Twist the tail between your fingers to create a curl — the signature spiraled pug tail.
Sew the finished, curled tail onto the top of the body, positioned between Rounds 15 and 16.
Finishing
Now your dog is done! With the ears, snout, four legs, and curled tail all attached, your finished pug amigurumi is ready as a keychain, a small plush, or a shelf companion.
Tips for Crocheting the Pug Dog Amigurumi
- Mark Round 3 right away. As the pattern itself suggests, placing a stitch marker at the start of Round 3 makes it far easier to count stitches accurately on later rounds, since this small piece grows quickly.
- Don’t worry about an oval body with plush yarn. If you’re working in chenille or velvet, the designer specifically notes the body may look misshapen while you’re still crocheting — this corrects itself once stuffing goes in, so resist the urge to add extra shaping rounds to compensate.
- Watch the video for leg placement. Because the four legs need to be spaced with specific stitch and row counts (4 stitches between front legs, 4 between hind legs, 4 rows between the two pairs), the designer’s linked video is a genuinely useful visual check before you commit to sewing.
- Position the snout carefully for that pug profile. The instruction to place the top of the snout just below Round 2 and the bottom just above Round 5 is what creates the pug’s distinctively short, scrunched muzzle — take care with this placement, since it defines the whole character of the face.
- Twist the tail while the yarn still has memory. Curling the tail with your fingers right after finishing the row, rather than after it’s had time to relax, will give you a tighter, more defined spiral that holds its shape better once sewn on.
Frequently Asked Questions
Where does this pattern come from? This free Pug Mini Dog Keychain pattern is from DIY Fluffies (mariskavos.nl), with a companion video tutorial available on YouTube covering every step.
How long does this project take to make? The pattern describes it as a project you can complete in about an hour, making it a quick option for a handmade gift or keychain.
Can I make a bigger version of this pug? Yes. Three yarn weight options are given: a cotton version with a 2.5mm hook makes a 6 cm dog, a velvet bulky version with a 3.5mm hook makes a 10 cm dog, and a chenille Super Bulky version with a 5.0mm hook makes a 12 cm dog, all using the same written instructions.
Is the head a separate piece I sew on? No — like the designer’s other keychain patterns, the body and head are worked as one single continuous piece from Round 1 through Round 17, with the shaping simply narrowing at the top to close the head.
How do I turn this pug into an actual keychain? During Rows 9–10 of the body, sew two strands of folded yarn into the top of the piece and secure the loop on the inside of the body before continuing with the remaining rounds.
Where exactly do the eyes go? The eyes are embroidered directly onto the body between Rows 3 and 4, positioned at the 5th and 14th stitch of that section.
How many legs does this dog have, and how are they spaced? There are 4 legs total (2 front, 2 hind), each a simple 6-stitch magic ring circle. They’re sewn onto the bottom of the body with 4 stitches of space between the front legs, 4 stitches between the hind legs, and 4 rows separating the two pairs.
What gives this dog its pug-like appearance? Primarily the snout placement — positioned with its top just below Round 2 and its bottom just above Round 5 of the body — combined with the folded, flattened ears sewn onto Round 7, which together create the short, flat-faced silhouette characteristic of a pug.
A Pug Worth Keeping on Your Keys
Between its quick one-hour build time, scalable sizing across three yarn weights, and a snout placement specifically engineered to capture that classic pug profile, this little dog amigurumi is another satisfying addition to the DIY Fluffies keychain family. Whether it ends up clipped to a backpack, holding your house keys, or simply sitting on a shelf, this pug proves that a whole lot of personality can come from a surprisingly short list of crocheted pieces.
There are many more free crochet patterns available on the DIY Fluffies website, so you can keep the keychain collection growing.