Free Cat Amigurumi Pattern

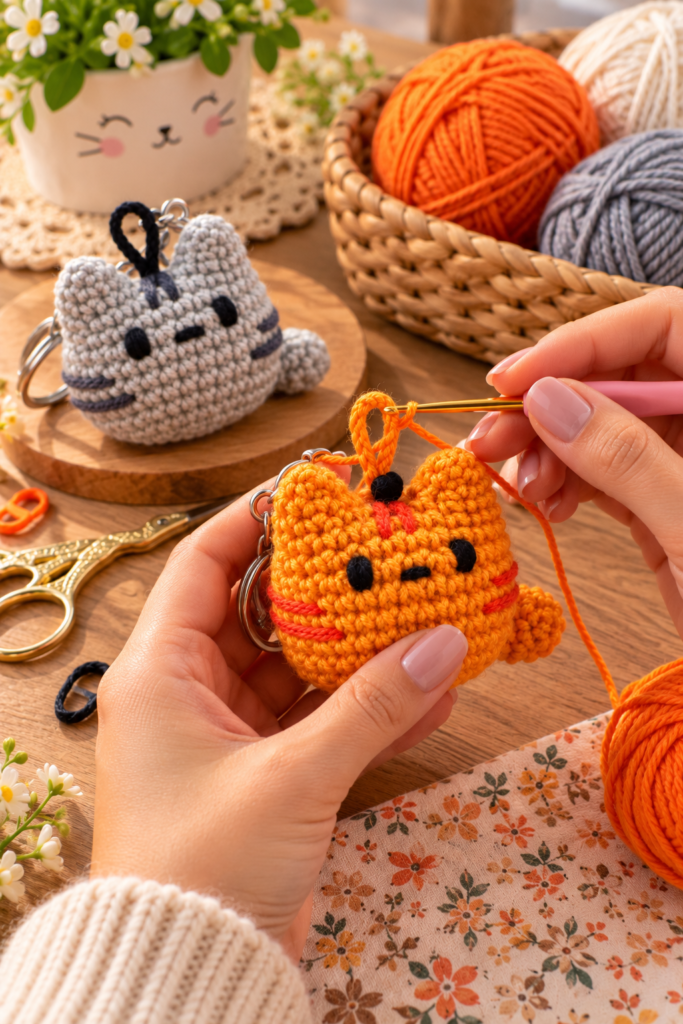
Some patterns become popular for a reason, and this one has the numbers to prove it: the Free Cat Amigurumi Keychain from DIY Fluffies (mariskavos.nl) is described by its creator as “my most popular YouTube video tutorial.” It’s easy to see why — a small, round-headed cat with pointed ears, a curled tail, and simple embroidered stripes, built from a genuinely beginner-friendly set of instructions that don’t demand much yarn at all.
As the pattern’s introduction explains, “this is an easy beginner crochet pattern, you do not need much yarn to make this cat. It is perfect for leftover yarn, because of it’s small size.” The original keychain version was made with sport-weight cotton yarn and a small 2.5mm hook, but exactly like the designer’s companion pig pattern, this one scales beautifully — switch to a plush Super Bulky chenille yarn and a bigger hook, and you get a noticeably larger, huggable cat from the exact same set of instructions. A full video walks through every step, which is especially handy for the trickier two-ear construction described below.
Below is the complete pattern, reorganized with clear headings for every component, along with the full materials list for both suggested yarn weights, supplies, and a set of tips and frequently asked questions.
About This Pattern

Source: DIY Fluffies (mariskavos.nl)
If you’re new to crochet, the designer recommends checking their basic stitches tutorial before starting.
A note on chenille/velvet yarn: if you’re using a plush yarn like chenille or velvet, the body may look a bit too oval while you’re crocheting it — don’t worry about this. The designer notes it will even out and look correct once you add the stuffing.
Materials
These are the materials used in the original pattern. You’re free to substitute other materials, and if you’d like a larger or smaller cat, simply switch to a thicker or thinner yarn and a matching hook size. The designer’s website also has a dedicated materials page if you need help choosing.
Cotton Sport Weight Version — 5 cm / 2 inch
- Grey: Catania cotton, color 172
- Dark grey: Catania cotton, color 429
- Black: Catania cotton, color 110
- Synthetic poly filling
Chenille Super Bulky Version — 10 cm / 4 inch
- Grey chenille yarn
- Dark grey chenille yarn
- Black chenille yarn
- Synthetic poly filling
If you’d like to find a chenille yarn similar to the one used here, the designer suggests searching for a comparable option on YarnSub.
Supplies
- Scissors
- Tapestry needles with a blunt point, size 16 or 17
- Pins
- Crochet hook: 2.5mm (US size 4/0) for the cotton version, or 5.0mm (US size H) for the chenille version
Crocheting the Tail
Use grey yarn.
- Rnd 1: Start with 6 sc in a magic ring (6).
- Rnd 2: (sc, inc in next st) repeat 3 times (9).
- Rnd 3–5: sc in all 9 st (9).
- Rnd 6: (sc in next st, dec) repeat 3 times (6).
- Rnd 7–10: sc in all 6 st (6).
Fasten off, leaving a long tail for sewing. Stuff the tail with fiber filling before setting it aside — you’ll attach it to the finished body later.
Crocheting the Body (Starting with the Ears)
Unlike the tail, the body doesn’t begin as a simple circle — it starts with two separately shaped ears that are joined together as you go, forming the recognizable pointed-ear silhouette right from the base of the head. A companion video specifically covers how to make the ears, which can be a helpful visual reference for this trickier section.
First Ear
Use grey yarn.
- Rnd 1: Start with 4 sc in a magic ring (4).
- Rnd 2: inc 4 times (8).
- Rnd 3: sc in all 8 st (8).
Fasten off with a slip stitch.
Second Ear
Use grey yarn.
- Rnd 1: Start with 4 sc in a magic ring (4).
- Rnd 2: inc 4 times (8).
- Rnd 3: sc in all 8 st (8).
- Rnd 4: sc in the next 4 st, chain 3. Continue crocheting in the first ear, starting in the first stitch of its last round: sc in all 8 st of the first ear, then sc in the 3 chains connecting the two ears. Continue into the second ear: sc in the next 4 st (22).
This joining round is what merges the two separately started ears into a single continuous piece, forming the base of the cat’s head.
Mark the beginning of each round with a piece of contrasting yarn so you can count your stitches accurately as you continue. Use one long piece of yarn for this marker, rather than repositioning a small scrap each round — the designer’s video demonstrates this marking technique if you’re unfamiliar with it.
Continuing the Head and Body
- Rnd 5–6: sc in all 22 st (22).
- Rnd 7: (sc in next 10 st, inc in next st) repeat 2 times (24).
- Rnd 8: (sc in next 3 st, inc in next st) repeat 6 times (30).
- Rnd 9–12: sc in all 30 st (30).
Adding the Face and Stripes
With the main body shape established, it’s time to add the cat’s facial features and markings before continuing the shaping.
- Sew one eye onto Round 8, positioned between stitches 5 and 6.
- Sew the nose between Rounds 8 and 9, at stitch 8, leaving 2 stitches of space between the nose and the first eye.
- Sew the second eye onto Round 8 as well, positioned 2 stitches from the nose on the opposite side, so that both eyes sit symmetrically with 2 stitches of space between the nose and each eye.
- Sew the stripes onto the body between Rounds 9–10 and Rounds 10–11. The front and back top stripes (between Rounds 9–10) are 3 stitches wide, while the front and back bottom stripes (between Rounds 10–11) are 4 stitches wide.
- Sew two additional top stripes onto the body at Rounds 5–6, on both the front and back of the cat.
A companion video specifically demonstrates how to sew the eyes, nose, and stripes onto the finished cat amigurumi, which can be especially useful for getting the spacing and symmetry right.
Optional keychain loop: if you’d like to turn this cat into a keychain, sew two strands of folded yarn into the top of the body and secure the loop on the inside of the body.
Finishing the Shaping
- Rnd 13: (sc in next 3 st, dec) repeat 6 times (24).
- Rnd 14: (sc in next 2 st, dec) repeat 6 times (18).
Stuff the body with fiber filling at this point.
- Rnd 15: (sc in next st, dec) repeat 6 times (12).
- Rnd 16: dec 6 times (6).
Finish the body by taking the last strand of yarn and sewing it through the front loops of every crochet stitch made in the last round. Pull the yarn tight to close the hole completely. Stick your needle under the hole and weave in the yarn end to hide it.
Attaching the Tail
Sew the finished, stuffed tail onto Round 12 of the body, positioned as shown in the reference photos.
Finishing
Now your cat is done! With the ears formed right into the head, the stripes and face embroidered on, and the curled tail attached, your finished cat amigurumi is ready as a keychain, a small plush, or a decorative shelf companion.
Tips for Crocheting the Cat Amigurumi Keychain
- Watch the ear-joining video before starting the body. Since the two ears are crocheted separately and then merged together mid-round (a technique that’s genuinely easier to follow visually than to read), watching the designer’s linked video for this specific section before you begin can save you from having to unpick a confusing join.
- Use one long yarn marker, not a repositioned scrap. The pattern specifically recommends marking the beginning of each round with one continuous long piece of yarn rather than moving a small stitch marker up each time — this is a slightly different technique than typical amigurumi marking, so it’s worth watching the linked demonstration if it’s new to you.
- Don’t panic about an oval-shaped body if using chenille or velvet. The designer specifically notes that plush yarns can make the body look a bit misshapen while you’re still crocheting it, but stuffing will correct this — resist the urge to add extra increase or decrease rounds to “fix” the shape early.
- Plan your face placement before sewing. Because the eyes, nose, and four separate stripes are all positioned relative to specific stitch numbers and rounds, it can help to lightly pin each element in place first and step back to check symmetry before committing to permanent stitches.
- Decide on the keychain loop before finishing the body. The optional loop needs to be sewn in and secured while the top of the body is still accessible, so make this decision before you reach the final closing rounds.
Frequently Asked Questions
Where does this pattern come from? This is a free pattern from DIY Fluffies (mariskavos.nl), and according to the designer, it’s the subject of their most popular YouTube video tutorial to date.
Is this pattern good for someone new to crochet? Yes — the pattern is specifically described as an easy beginner pattern that doesn’t require much yarn, making it a great low-commitment first amigurumi project.
Can I make a bigger version of this cat? Absolutely. The cotton sport-weight version with a 2.5mm hook makes a compact 5 cm cat, while switching to Super Bulky chenille yarn with a 5.0mm hook produces a much larger 10 cm cat, using the same written instructions throughout.
Why does the body look oval instead of round while I’m still crocheting it? This is expected, particularly with plush yarns like chenille or velvet. The designer notes not to worry about this odd shape, since it corrects itself once the piece is stuffed.
How are the ears actually constructed? The two ears are crocheted as separate small pieces first. The first ear is fastened off once its 3 rounds are complete, while the second ear continues into a 4th round that joins both ears together with a small 3-chain bridge, merging them into the base of the head.
Where exactly do the eyes, nose, and stripes go? The eyes are sewn onto Round 8 (between stitches 5–6 for one eye, and 2 stitches from the nose for the other). The nose sits between Rounds 8–9 at stitch 8. The main stripes are sewn between Rounds 9–10 (3 stitches wide) and Rounds 10–11 (4 stitches wide), with two additional stripes added at Rounds 5–6.
How do I turn this cat into an actual keychain? Sew two strands of folded yarn into the top of the body and secure the loop on the inside before completing the final closing rounds — this creates the loop seen in the finished photos, ready for a keyring.
Where does the tail attach? The separately crocheted and stuffed tail is sewn onto Round 12 of the finished body.
A Cat Worth Making Again and Again
Between its clever joined-ear construction, hand-embroidered stripes, and a scalable size range from a tiny 5 cm keychain to a plush 10 cm companion, it’s easy to understand why this cat amigurumi became the designer’s most popular tutorial. It’s forgiving enough for a first-time amigurumi maker, quick enough to finish with minimal yarn, and detailed enough in its finishing touches to feel like a genuinely polished project once it’s done.
If you enjoyed crocheting this free cat amigurumi pattern, be sure to check out the many other free amigurumi patterns available on the DIY Fluffies website.