Nezuko Amigurumi

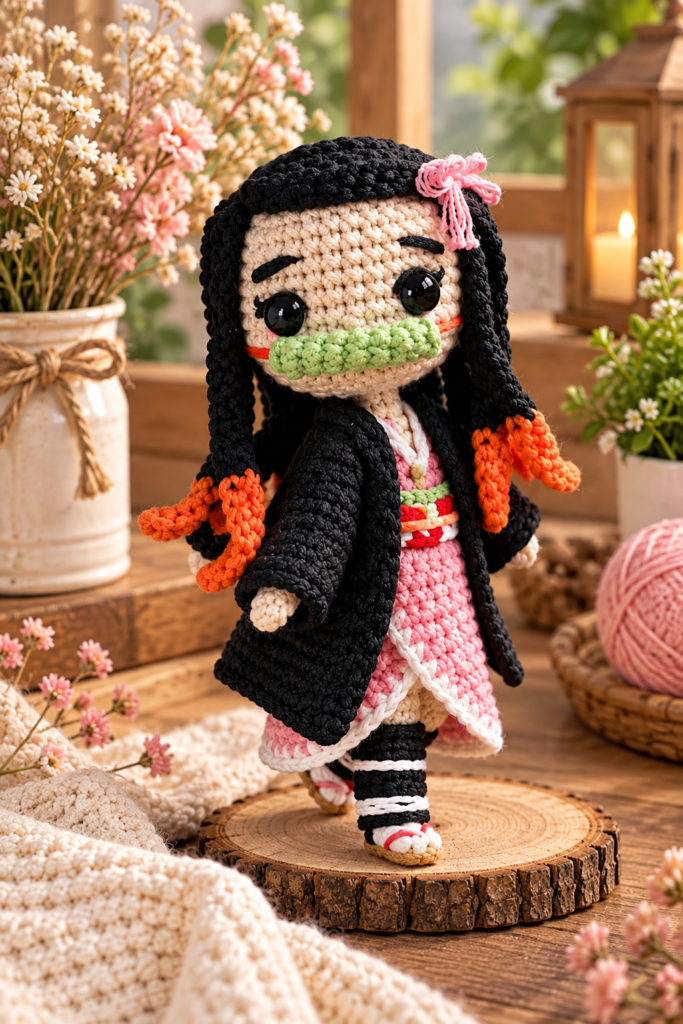
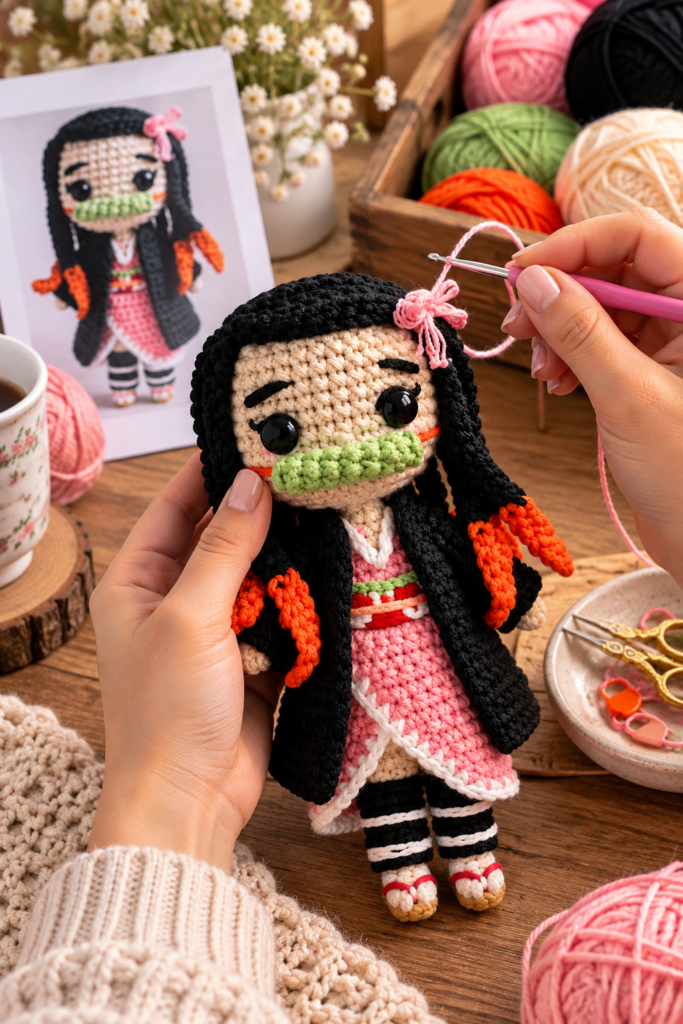
Few anime characters carry as much quiet strength as Nezuko Kamado — the bamboo muzzle, the pink kimono, the fierce eyes that soften the moment she’s around family. The Nezuko Amigurumi, designed by nix.amigurumi, brings her to life in yarn form, with a layered pink kimono, an obi sash, striped leggings, a green bamboo mouth cover, a flowing black coat, and long twin-braided hair finished with a delicate pink bow.
As the pattern’s introduction describes it, this is meant to be an approachable project — “it’s easy to crochet the free amigurumi doll pattern step by step” — but don’t let that fool you into thinking it’s simple in scope. Between the body, head, arms, kimono, obi, leggings, mouth cover, hair, and a fully separate coat with its own sleeves, this is a project made up of many small, satisfying pieces that all come together at the very end. As the designer puts it, “we will crochet all parts of the amigurumi doll separately. After the parts are completed, we will sew it to the body part.”
Below is the complete pattern, reorganized with clear headings for every component, along with the full materials list, abbreviations, and a set of tips and frequently asked questions to help you through the assembly.
About This Pattern
Designer: nix.amigurumi
Abbreviations
| Abbreviation | Meaning |
|---|---|
| sc | Single crochet |
| inc | Increase of single crochet |
| dec | Decrease of single crochet |
| hdc | Half double crochet |
| slst | Slip stitch |
| BLO | Back loop only |
Materials and Tips
- Yarn colors: beige for skin, pink, white, black, orange, and light brown
- Two hooks: crochet the legs, body, head, and arms with a hook 0.25mm smaller than the one used for the clothes and hair
- 9mm security eyes
- Yarn needle and scissors
- Optional: hot glue for attaching the hair
- A stitch marker for counting rows — place the marker at the beginning of each row; a purchased marker, a scrap of thread, or a safety pin all work
- Fiberfill stuffing
Crocheting the Legs (Make 2)
Start with light brown, crocheting in a spiral.
- Rnd 1: sc in a magic ring (6).
Change to white.
- Rnd 2: sc, 1 inc (7).
- Rnd 3–6: 7 sc (7).
Change to beige (skin color).
- Rnd 7–8: 7 sc (7).
- Rnd 9: 6 sc, 1 inc (8).
- Rnd 10: 8 sc (8).
- Rnd 11: 7 sc, 1 inc (9).
- Rnd 12–13: 9 sc (9).
Cut the yarn and fasten off the first leg. On the second leg, do not cut the yarn — you’ll continue directly into joining the two legs together.
Joining the Legs and Starting the Body
On the second leg, change to pink.
- Rnd 14: 2 sc, 2 chains, join to the first leg with 1 sc, 8 sc, 2 sc across the chains, 7 sc on the second leg (22).
Body
- Rnd 15: 22 sc (22).
- Rnd 16: 22 sc, then make 3 additional sc and move the marker. Continue counting stitches from this new point onward.
- Rnd 17: 4 sc, 1 dec, 10 sc, 1 dec, 4 sc (20).
- Rnd 18: (3 sc, 1 dec) x4 (16).
- Rnd 19: 16 sc (16).
- Rnd 20: 3 sc, 1 dec, 7 sc, 1 dec, 2 sc (14).
- Rnd 21: 14 sc (14).
- Rnd 22: 3 sc, 1 dec, 2 sc, change to skin color 1 sc, change to pink 2 sc, 1 dec, 2 sc (12).
- Rnd 23: 6 sc, change to skin color 2 sc, change to pink 4 sc. Make 1 additional sc, then move the marker and continue counting from this new point.
- Rnd 24: 2 dec, change to skin color 2 dec, change to pink 2 dec (6 sc).
Change to skin color.
- Rnd 25–26: 6 sc (6).
Crocheting the Head
- Rnd 27: 6 inc (12).
- Rnd 28: 12 inc (24).
- Rnd 29: (3 sc, 1 inc) x6 (30).
- Rnd 30: 2 sc, 1 inc, (4 sc, 1 inc) x5, 2 sc (36).
- Rnd 31–39: 36 sc (36).
Place the security eyes between Rounds 34 and 35, 7 stitches apart.
- Rnd 40: 2 sc, 1 dec, (4 sc, 1 dec) x5, 2 sc (30).
- Rnd 41: (3 sc, 1 dec) x6 (24).
- Rnd 42: 1 sc, (2 sc, 1 dec) x5, 2 sc (18).
- Rnd 43: (1 sc, 1 dec) x6 (12).
- Rnd 44: 6 dec (6).
Cut the thread and fasten off.
Crocheting the Arms (Make 2)
Skin color, crocheting in a spiral.
- Rnd 1: 6 sc in a magic ring (6).
- Rnd 2: 6 sc (6).
Change to pink.
- Rnd 3–10: 6 sc (6).
- Rnd 11: 3 slst, 3 hdc (6).
Crocheting the Kimono (Clothes)
At the end of each row, chain 1, turn the work, and continue. Pink color.
- Rnd 1: 25 chains, starting on the 2nd chain from the hook: 2 sc, (4 sc, 1 inc) x4, 2 sc (28).
- Rnd 2–3: 28 sc (28).
- Rnd 4: 1 dec, 24 sc, 1 dec (26).
- Rnd 5–6: 26 sc (26).
- Rnd 7: 1 dec, 22 sc, 1 dec (24).
- Rnd 8–9: 24 sc (24).
- Rnd 10: 1 dec, 20 sc, 1 dec (22).
- Rnd 11: 22 sc (22).
- Rnd 12: 1 dec, 18 sc, 1 dec (20).
- Rnd 13: 1 dec, 16 sc, 1 dec (18).
Cut the thread and fasten off.
In white, work a row of single crochet around the outer edge of the piece — along the sides and across the bottom, but not across the part that will sit at the waist.
Crocheting the Obi
The obi has a lot of color changes throughout, so it’s written here as one continuous set of instructions, with the stitches worked in whatever color corresponds to that section as you go.
- Row 1: 20 chains plus 1 chain. Starting on the 2nd chain from the hook: 1 sc, 1 inc, (2 sc, 2 sc) x4, 1 inc, 1 sc (22).
Cut the thread and fasten off. Instead of turning the work, insert the hook into the first stitch of Row 1.
- Row 2: 1 sc, 1 sc, 1 inc, (2 sc, 2 sc) x4, 1 sc, 1 inc, 1 sc.
Cut the yarn, leaving a long thread for sewing the obi to the body later.
Crocheting the Leggings (Make 2)
At the end of each row, close with a slip stitch and make one chain. The slip stitch and the chain do not count as stitches. Black color.
- Rnd 1: 10 chains, slip stitch into the first chain to form a circle, then continue crocheting in rounds: 10 sc (10).
- Rnd 2: 8 sc, 1 dec (9).
- Rnd 3–5: 9 sc (9).
Sew on two white strips to finish the leggings’ striped look.
Crocheting the Mouth Cover
Green color, crocheted in a spiral.
- Rnd 1: 5 sc in a magic ring (5).
- Rnd 2: BLO, 5 sc (5).
- Rnd 3–8: 5 sc (5).
Cut the thread. With a needle, pass the thread through the back loops only of the 5 sc from Round 8. Pull to close and fasten off.
Pass an orange thread through the mouth cover — this will be used later to sew it onto the head.
Crocheting the Hair
Black color, crocheted in a spiral.
- Rnd 1: 6 sc in a magic ring (6).
- Rnd 2: 6 inc (12).
- Rnd 3: (1 sc, 1 inc) x6 (18).
- Rnd 4: 1 sc, 1 inc, (2 sc, 1 inc) x5, 1 sc (24).
- Rnd 5: (3 sc, 1 inc) x6 (30).
Now you’ll begin working the individual hair strands directly off of Round 5.
- Strand 1: In black, chain 26. In orange, chain 8, then starting on the 2nd chain from the hook: 1 slst, 6 sc. Switch back to black and work 26 sc, then slip stitch into the front loop of the first sc of Round 5.
- Strand 2: In black, chain 26. In orange, chain 8, then starting on the 2nd chain from the hook: 1 slst, 6 sc. Switch back to black and work 26 sc, then slip stitch into the back loop only of the first sc of Round 5 (this joins into the same stitch as Strand 1, but through the back loop).
- Strand 3: In black, chain 18. In orange, chain 8, then starting on the 2nd chain from the hook: 1 slst, 6 sc. Switch back to black and work 18 sc, then slip stitch into the next stitch of Round 5.
- Strands 4–12: In black, chain 18. In orange, chain 8, then starting on the 2nd chain from the hook: 1 sc, 6 hdc. Switch back to black and work 18 hdc, then skip one stitch of Round 5 and slip stitch into the next stitch.
Once all twelve strands are complete, 10 sc of Round 5 will remain without strands attached. Cut the thread. If you plan to sew the hair on, leave a long thread; if you plan to glue it, fasten off instead.
Crocheting the Coat
At the end of each row, chain 1, turn the work, and continue. Black color.
- Rnd 1: 13 chains, starting on the 2nd chain from the hook: 1 sc, 1 inc, (2 sc, 1 inc) x3, 1 sc (16).
- Rnd 2: 1 sc, 1 inc, 3 sc, 1 inc, 4 sc, 1 inc, 3 sc, 1 inc, 1 sc (20).
- Rnd 3: 1 sc, 1 inc, 3 chains, skip 5 stitches, 1 inc, 4 sc, 1 inc, 3 chains, skip 5 stitches, 1 inc, 1 sc (20).
- Rnd 4: 6 sc, 1 inc, 6 sc, 1 inc, 6 sc (22).
- Rnd 5: 22 sc (22).
- Rnd 6: 3 sc, 1 inc, 14 sc, 1 inc, 3 sc (24).
- Rnd 7: 24 sc (24).
- Rnd 8: 4 sc, 1 inc, 14 sc, 1 inc, 4 sc (26).
- Rnd 9: 26 sc (26).
- Rnd 10: 5 sc, 1 inc, 14 sc, 1 inc, 5 sc (28).
- Rnd 11: 28 sc (28).
- Rnd 12: 6 sc, 1 inc, 14 sc, 1 inc, 6 sc (30).
- Rnd 13: 30 sc (30).
- Rnd 14: 7 sc, 1 inc, 14 sc, 1 inc, 7 sc (32).
- Rnd 15–17: 32 sc.
Cut the thread and fasten off.
Coat Sleeves (Make 2)
Insert the hook into the hole left open at Row 3 of the coat. You’ll crochet in a spiral around this hole; it doesn’t matter exactly where you first insert the hook, as long as you follow the stitch counts given below.
- Row 1: In whatever order works for your piece, make 5 sc across the stitches skipped at Row 3, plus 1 additional sc on one side, 3 sc across the chains, and 1 additional sc on the other side (10 total).
- Row 2–4: 10 sc (10).
- Row 5: Work 9 sc and 1 inc; the increase should land at the middle-bottom part of the sleeve. For example, this could be worked as 7 sc, 1 inc, 2 sc, or as 8 sc, 1 inc, 1 sc — the exact placement within the row doesn’t matter as long as the increase lands at that middle-bottom point.
- Row 6: Work 10 sc and 1 inc, again placing the increase at the same middle-bottom point used in the previous row.
- Row 7: Work 11 sc and 1 inc, again placing the increase at the same middle-bottom point.
- Row 8: Work 12 sc and 1 inc, again placing the increase at the same middle-bottom point.
Cut the thread and fasten off. Repeat for the second sleeve.
Assembling the Doll
Once every individual piece is complete, it’s time to bring Nezuko together:
- Sew the facial details in place.
- Sew the arms on, positioned just below the neck round.
- Sew on the kimono: cross the piece in the middle and sew it between Rounds 18 and 19 of the body.
- Sew the obi in place between Round 19 of the body and the first row of the kimono piece. Sew an orange thread above the obi for a decorative accent.
- Chain 13 and pull the chain closed into a small loop; sew this into place to form the collar of the kimono.
- Put the leggings onto the legs.
- Sew the orange thread from the mouth cover onto the back part of the head to secure it around the face.
- Place the hair with pins before sewing anything permanently. Position Strands 3 and 14 at both sides of the head. Strands 4 through 13 go between them, filling in the back and sides. Strands 1 and 2 become the front bangs.
- Arrange Strands 1 and 2 to the side and tie them off with a small pink thread to form a delicate lace-like tie — this is what creates Nezuko’s signature side bow detail.
- Once everything is positioned to your liking, sew the hair in place, or glue it strand by strand if you prefer.
Tips for Crocheting the Nezuko Amigurumi
- Use two hook sizes as instructed. A smaller hook for the legs, body, head, and arms creates a firm, stuffable fabric, while the slightly larger hook for the clothes and hair keeps those layered pieces soft enough to fit comfortably over the body.
- Pin the hair strands before committing to glue or stitches. Because this doll’s hair involves twelve individual strands of varying lengths and colors, laying them all out with pins first — following the placement guide in the assembly section — will save you from having to unpick and reposition strands after they’re permanently attached.
- Keep your color-change notes visible while working the body and obi. Both the body (Rounds 22–24) and the obi involve several quick color switches within a single round. Sticking a small note nearby, or simply reading two rounds ahead before starting, will help prevent a missed color change.
- Don’t worry about exact stitch placement on the coat sleeves. The pattern explicitly notes that the order of stitches within several sleeve rows doesn’t matter, only that the increase lands consistently at the middle-bottom point of the sleeve each time — this flexibility makes the sleeves more forgiving than they might first appear.
- Leave a long tail if you plan to sew rather than glue. Several components — the obi, the mouth cover, and the hair — specifically note leaving a long thread if you intend to sew that piece into place, so plan your fastening-off method in advance rather than cutting the yarn short and having to rejoin it later.
Frequently Asked Questions
Who designed this pattern? The Nezuko Amigurumi was designed by nix.amigurumi and shared as a free pattern.
What yarn colors do I need? You’ll need beige (for the skin), pink (for the kimono, body accents, and hair tie), white (for the leg cuffs and legging stripes), black (for the hair and coat), orange (for the hair accents and mouth cover thread), and light brown (for the top of the legs).
Why are there two different hook sizes used? A smaller hook is used for the legs, body, head, and arms to create a firm fabric that holds its shape well when stuffed, while a slightly larger hook is used for the clothes and hair, keeping those pieces looser and easier to fit over the body underneath.
How is the hair constructed — is it one crocheted cap? No. The hair starts as a small crocheted base (Rounds 1–5), and then twelve individual strands of varying chain lengths and colors are worked directly off that base, one at a time, creating the long, textured, two-tone (black and orange) strands seen on the finished doll.
What is the green piece over the face? That’s the mouth cover, worked as a small flat green disc with an orange thread passed through it. It represents the bamboo muzzle Nezuko wears in the source material and is sewn onto the front of the head during assembly.
Do I need security eyes, or can I embroider them instead? The pattern specifies 9mm security eyes, inserted between Rounds 34 and 35 of the head while there’s still enough of an opening to attach the backing washers from inside. Embroidered eyes could be substituted, though the finished look may differ from the designer’s original.
How is the coat different from the kimono? The kimono is the pink layered garment worked in rows and sewn crossed at the front, secured with the obi sash. The coat is a completely separate black outer layer with its own set of sleeves, crocheted afterward and layered over the kimono during assembly.
Is this pattern beginner-friendly? The pattern’s introduction describes it as easy to follow step by step, and the individual stitches used (single crochet, increases, decreases, half double crochet, slip stitch, and back loop only) are all fairly standard. That said, the number of separate pieces, frequent color changes, and detailed assembly sequence make this a more involved project overall, well suited to someone with some prior amigurumi experience.
A Character Worth the Careful Stitching
Between the two-tone hair strands, the layered pink kimono, the tied obi, and the small bamboo mouth cover, this Nezuko amigurumi captures an impressive amount of detail from the source character in a doll small enough to sit on a shelf. It’s a project built from many small, careful decisions — where each hair strand lands, how the kimono crosses, how the obi ties in — but the result is a doll any Demon Slayer fan will recognize instantly.
For more free amigurumi and crochet patterns like this one, be sure to check out Lovelycraft.com.