The Christmas Character Crochet Blanket
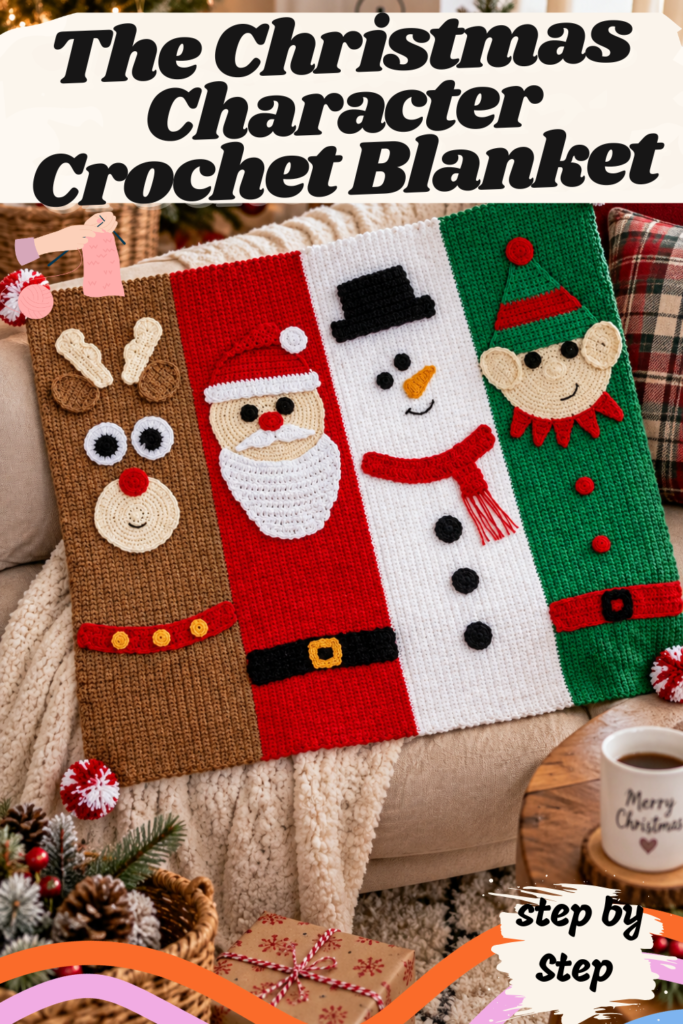
Some holiday blankets settle for a simple striped pattern or a repeating snowflake motif. This one goes much further. The Christmas Character Crochet Blanket from Bernat, designed by Sarah Zimmerman of the beloved blog Repeat Crafter Me, transforms a classic striped afghan into a genuine holiday cast of characters — Rudolph the reindeer, Santa Claus, a cheerful snowman, and a pointy-hatted elf, each occupying their own vertical panel, each built from dozens of individually crocheted, sewn-on facial features and accessories.
Rated Skill Level: Easy despite its impressive finished look, this blanket is really four separate mini-projects combined into one: a base blanket worked in four color-blocked stripes, and then four distinct sets of embellishments (antlers, hats, beards, buttons, scarves, and more) that get sewn on afterward to bring each character to life. The result, at approximately 35″ x 40″, is a genuinely show-stopping holiday throw that’s just as fun to make as it is to display.
In this article, we’ll walk through the entire pattern in an easy-to-follow written format — materials, gauge, notes, and the complete construction for the base blanket and all four character panels — followed by the finishing steps and a full FAQ section to help with the trickier embellishment techniques.
Let’s get festive.
Why This Blanket Is a Holiday Showstopper
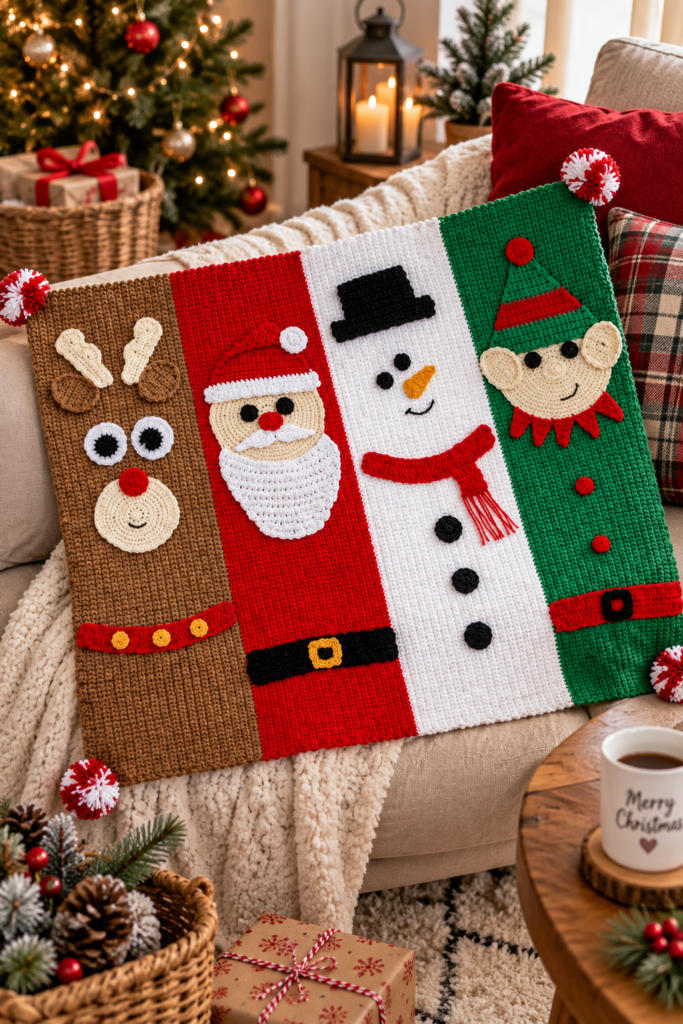
What sets this pattern apart from a typical crocheted throw is its embellishment-heavy construction. Rather than relying on colorwork or intricate stitch patterns to create its characters, the blanket’s base is refreshingly simple — just single crochet worked flat in four solid-colored stripes. All of the real personality comes from dozens of small, individually crocheted pieces: antlers, ears, eyes, a nose, a snout, and a collar with bells for Rudolph; a hat, pompom, bearded head, eyes, nose, mustache, belt, and buckle for Santa; a hat, eyes, nose, buttons, and a fringed scarf for the Snowman; and a hat, pompom, fringed head and neck detail, eyes, buttons, ears, nose, and belt for the Elf.
This modular approach means you can work through each character’s pieces at your own pace, and it also means every single embellishment is a small, satisfying, quick win — perfect for keeping momentum going on a project of this scale.
Project Overview
- Designed by: Sarah Zimmerman of Repeat Crafter Me
- Skill Level: Easy
- Finished Measurements: Approx 35″ x 40″ (89 x 101.5 cm)
Materials and Tools
This pattern uses a Medium (4) weight yarn — specifically Bernat® Super Value™, sold in 7 oz / 197 g balls yielding approximately 440 yards (402 meters) each.
Yarn Colors Needed
You’ll need 1 ball each of the following seven colors:
| Color Label | Shade Name |
|---|---|
| A | Walnut (07483) |
| B | True Red (53707) |
| C | White (07391) |
| D | Kelly (00609) |
| E | Bright Yellow (00608) |
| F | Black (07421) |
| G | Dark Heather (53022) |
Tools
- Size U.S. H/8 (5mm) crochet hook, or the size needed to obtain gauge
- A yarn needle, for sewing all the embellishments onto the finished blanket panels
Gauge
Gauge for this pattern is given as:
- 13 sc and 14 rows = 4″ (10 cm)
Since this project is built from a large base panel plus dozens of individually shaped small pieces, gauge matters most for making sure your base blanket panels come out at the intended finished size.
Important Notes Before You Begin
- The blanket is worked in 4 stripes, side to side, with each stripe becoming the background for one character panel.
- Chain 2 at the beginning of a row or round does not count as a stitch.
- Chain 3 at the beginning of a row or round does count as a stitch.
- Rounds are joined with a slip stitch to the first stitch.
Abbreviations Used in This Pattern
- Approx – Approximately
- Beg – Begin(ning)
- Ch – Chain(s)
- Cont – Continue(ity)
- Dc – Double crochet
- Dc2tog – (Yarn over hook [yoh] and draw up a loop in the next stitch) twice, then yoh and draw through all loops on the hook
- Hdc – Half double crochet
- Rem – Remain(ing)
- Rep – Repeat
- Rnd(s) – Round(s)
- RS – Right side
- Sc – Single crochet
- Sc2tog – Draw up a loop in each of the next 2 stitches, then yoh and draw through all loops on the hook
- Sl st – Slip stitch
- St(s) – Stitch(es)
- Tr – Treble crochet
- Yoh – Yarn over hook
Crocheting the Base Blanket
With Color A, chain 113.
1st row (RS): Work 1 sc into the 2nd chain from the hook, then 1 sc in each chain across to the end. Turn. You should have 112 sc.
2nd row: Chain 1, then work 1 sc in each stitch to the end of the row. Turn.
3rd to 40th rows: Repeat the 2nd row. Break Color A and join Color B.
41st to 80th rows: With Color B, continue working as the 2nd row. Break Color B and join Color C.
81st to 120th rows: With Color C, continue working as the 2nd row. Break Color C and join Color D.
121st to 160th rows: With Color D, continue working as the 2nd row. Fasten off.
This creates the blanket’s four solid-colored vertical stripes — brown (Rudolph), red (Santa), white (Snowman), and green (Elf) — each one serving as the background panel for its corresponding character.
Panel I — Rudolph
Left Antler
With Color G, chain 17.
1st row (RS): Work 1 sc into the 2nd chain from the hook, then 1 sc in each chain across to the end. Turn. You should have 16 sc.
2nd row: Chain 1, then work 1 sc in each stitch to the end of the row. Turn.
3rd round: Chain 1. Work 1 sc in each of the first 5 stitches. Skip the next 2 stitches. Work 7 dc into the next stitch. Skip the next 2 stitches. Work 1 sc in the next stitch. Skip the next 2 stitches. Work 8 dc into the next stitch. Skip the next 2 stitches. Do not turn. Work 1 round of sc evenly along the top, side, and bottom of the antler. Join with a slip stitch to the first sc. Fasten off.
Right Antler
Work the identical section given for the Left Antler (chain 17, work the identical 1st and 2nd rows).
3rd row: Chain 1. Skip the first 2 stitches. Work 8 dc into the next stitch. Skip the next 2 stitches. Work 1 sc in the next stitch. Skip the next 2 stitches. Work 7 dc into the next stitch. Skip the next 2 stitches. Work 1 sc in each of the last 5 stitches. Do not turn. Work 1 round of sc evenly along the bottom, side, and top of the antler. Join. Fasten off.
This mirrored shaping between the Left and Right Antler (with the dc clusters positioned on opposite sides) is what gives Rudolph’s antlers their naturally branching, asymmetrical look.
Ears (Make 2)
With Color A, chain 5.
1st row: Work 1 sc into the 2nd chain from the hook, then 1 sc in each chain across. Turn. You should have 4 sc.
2nd row: Chain 1. Work 2 sc into the first stitch, 1 sc in each of the next 2 stitches, then 2 sc into the last stitch. Turn. You should have 6 sc.
3rd row: Chain 1. Work 2 sc into the first stitch, 1 sc in each of the next 4 stitches, then 2 sc into the last stitch. Turn. You should have 8 sc.
4th to 8th rows: Chain 1, then work 1 sc in each stitch to the end of the row. Turn.
9th row: Chain 1. Work an sc2tog, then 1 sc in each of the next 4 stitches, then another sc2tog. Turn. You should have 6 sc.
10th row: Chain 1. Work an sc2tog, then 1 sc in each of the next 2 stitches, then another sc2tog. Turn. You should have 4 sc.
11th row: Chain 1. Work sc2tog twice. You should have 2 sc.
12th round: Chain 1. Work an sc2tog. Do not turn. Work 1 round of sc evenly around the entire ear. Join. Fasten off, leaving a long tail for sewing later.
Eyes (Make 2)
With Color F, begin using the magic loop method.
1st round: Chain 1. Work 8 sc into the loop. Join.
2nd round: Chain 1. Work 2 sc into each stitch around. Join. You should have 16 stitches. Break Color F and join Color C.
3rd round: Chain 1. Work 2 sc into each of the first 4 stitches. Work 2 hdc into the next stitch. Work 2 dc into each of the next 6 stitches. Work 2 hdc into the next stitch. Work 2 sc into each of the last 4 stitches. Join. Fasten off, leaving a long tail for sewing.
Nose
With Color B, begin using the magic loop method.
1st round: Chain 1. Work 10 sc into the loop. Join.
2nd round: Chain 1. Work 2 sc into each stitch around. Join. You should have 20 stitches. Fasten off, leaving a long tail for sewing.
Snout
With Color G, begin using the magic loop method.
1st round: Chain 1. Work 10 sc into the loop. Join.
2nd round: Chain 1. Work 2 sc into each stitch around. Join. You should have 20 stitches.
3rd round: Chain 1. *Work 2 sc into the next stitch, then 1 sc in the next stitch; repeat from * around. Join. You should have 30 stitches.
4th round: Chain 1. Work 1 sc in each stitch around. Join.
5th round: Chain 1. *Work 2 sc into the next stitch, then 1 sc in each of the next 2 stitches; repeat from * around. Join. You should have 40 stitches.
6th round: Chain 1. *Work 2 sc into the next stitch, then 1 sc in each of the next 3 stitches; repeat from * around. Join. You should have 50 stitches.
7th round: Chain 2. *Work 1 dc into each of the first 15 stitches, 1 hdc in the next stitch, 1 sc in each of the next 18 stitches, 1 hdc in the next stitch, then 1 dc in each of the last 15 stitches. Join. Fasten off, leaving a long tail for sewing.
Optional detail: Using a strand of Color F, backstitch a small smile between the 3rd and 4th rounds of the snout, as shown in the original pattern’s reference photo.
Collar
A quick construction note: the starting chain for the collar is worked tightly, which helps shape the finished piece into its gently curved silhouette.
With Color B, chain 34.
1st row: Work 1 dc into the 3rd chain from the hook (this counts as your first dc), then 1 sc in each chain across to the end. Turn. You should have 32 stitches.
2nd row: Chain 2, then work 1 dc in each stitch to the end of the row. Fasten off.
Collar Bells (Make 3)
With Color E, begin using the magic loop method.
1st round: Chain 1. Work 10 sc into the loop. Join. Fasten off, leaving a long tail for sewing.
Assembling Rudolph
Stitch the Nose onto the Snout. Then stitch the Antlers, Ears, Nose/Snout, Collar, and Bells onto the brown panel of the blanket, positioned as shown in the original pattern’s reference photo.
A quick sewing note: whenever sewing pieces onto the blanket throughout this entire pattern, work your stitches through the tops/fronts of the stitches for the cleanest finish.
Panel II — Santa
Hat
With Color C, chain 25.
1st row: Work 1 sc into the 2nd chain from the hook, then 1 sc in each chain across. Turn. You should have 24 stitches.
2nd and 3rd rows: Chain 1, then work 1 sc in each stitch to the end of the row. Turn. Break Color C and join Color B.
4th row: With Color B, chain 1. Work an sc2tog, then 1 sc in each stitch to the last 2 stitches, then another sc2tog. Turn. You should have 22 stitches.
5th row: Chain 1. Work 1 sc in each stitch across. Turn.
6th to 23rd rows: Repeat the 4th and 5th rows 9 more times, bringing you down to 4 stitches.
24th and 25th rows: Work as the 5th row.
26th row: Chain 1. Work (sc2tog) twice. You should have 2 stitches.
27th row: Chain 1. Work 1 sc in each stitch to the end of the row. Fasten off.
Hat Pompom
With Color C, begin using the magic loop method.
1st round: Chain 1. Work 10 sc into the loop. Join.
2nd round: Chain 1. Work 2 sc into each stitch around. Join. You should have 20 stitches. Fasten off.
Santa Head with Beard
With Color G, begin using the magic loop method.
1st round: Chain 1. Work 10 sc into the loop. Join.
2nd round: Chain 1. Work 2 sc into each stitch around. Join. You should have 20 stitches.
3rd round: Chain 1. *Work 2 sc into the first stitch, then 1 sc in the next stitch; repeat from * around. Join. You should have 30 stitches.
4th round: Chain 1. Work 1 sc in each stitch around. Join.
5th round: Chain 1. *Work 2 sc into the first stitch, then 1 sc in each of the next 2 stitches; repeat from * around. Join. You should have 40 stitches.
6th round: Chain 1. *Work 2 sc into the first stitch, then 1 sc in each of the next 3 stitches; repeat from * around. Join. You should have 50 stitches.
7th round: Work as the 4th round.
8th round: Chain 1. *Work 2 sc into the first stitch, then 1 sc in each of the next 4 stitches; repeat from * around. Join. You should have 60 stitches.
9th round: Work as the 4th round.
10th round: Chain 1. *Work 2 sc into the first stitch, then 1 sc in each of the next 5 stitches; repeat from * around. Join. You should have 70 stitches.
11th and 12th rounds: Work as the 4th round. Break Color G and join Color C.
13th row: Chain 2. Work 1 dc into each of the next 26 stitches. Turn, leaving the remaining stitches unworked.
14th row: Chain 2. Work a dc2tog, then 1 dc in each stitch to the last 2 stitches, then another dc2tog. Turn. You should have 24 stitches.
Repeat the 14th row until only 10 stitches remain. Fasten off, leaving a long tail for sewing — this white section forms Santa’s fluffy beard.
Santa Eyes (Make 2)
With Color F, begin using the magic loop method.
1st round: Chain 1. Work 10 sc into the loop. Join with a slip stitch to the first sc. Fasten off.
Santa Nose
With Color B, begin using the magic loop method.
1st round: Chain 2. Work (3 dc in the loop, 1 hdc in the loop, 1 sc in the loop, 1 hdc in the loop) twice. Join. Fasten off, leaving a long tail for sewing.
Santa Mustache
With Color C, chain 18.
1st row: Work 1 slip stitch into the 2nd chain from the hook. Work 1 slip stitch into the next chain. Work 1 sc into the next chain. Work 1 dc into each of the next 2 chains. Work 1 tr into each of the next 2 chains. Work 1 dc into the next chain. Work 1 slip stitch into the next chain. Work 1 dc into the next chain. Work 1 tr into each of the next 2 chains. Work 1 dc into each of the next 2 chains. Work 1 sc into the next chain. Work 1 slip stitch into each of the last 2 chains. Fasten off, leaving a long tail for sewing.
This dramatically varied stitch-height sequence — moving from slip stitches up through sc, dc, and tr and back down again — is what creates the mustache’s two curled, symmetrical points.
Santa Belt
With Color F, chain 34.
1st row: Work 1 dc into the 4th chain from the hook (this counts as 2 dc), then 1 dc in each chain across to the end. Turn. You should have 32 stitches.
2nd and 3rd rows: Chain 2, then work 1 dc in each stitch to the end of the row. Turn. Fasten off, leaving a long tail for sewing.
Belt Buckle
With Color E, begin using the magic loop method.
1st round: Chain 1. Work (5 sc into the ring, chain 2) a total of 4 times. Join with a slip stitch to the first sc. Fasten off loosely.
Finishing Santa’s Panel
Stitch all of Santa’s embellishments — the Hat, Head with Beard, Eyes, Nose, Mustache, Belt, and Buckle — onto the red panel of the blanket as shown in the original pattern’s reference photo.
Panel III — Snowman
Hat
With Color F, chain 25.
1st row (RS): Work 1 sc into the 2nd chain from the hook, then 1 sc in each chain across. Turn. You should have 24 stitches.
2nd to 4th rows: Chain 1, then work 1 sc in each stitch to the end of the row. Turn. Break Color F.
5th row: Join Color F into the 5th stitch. Chain 1. Work 1 sc in each of the next 16 stitches. Turn, leaving the remaining stitches unworked. This offset restart is what creates the hat’s characteristic upturned brim shape.
6th to 13th rows: Chain 1, then work 1 sc in each stitch across. Turn. Fasten off, leaving a long tail for sewing.
Eyes (Make 2)
With Color F, begin using the magic loop method.
1st round: Chain 1. Work 10 sc into the ring. Join with a slip stitch to the first sc. Fasten off, leaving a long tail for sewing.
Nose
With Color E, chain 10.
1st row: Work 1 sc into the 2nd chain from the hook. Work 1 hdc into each of the next 2 stitches. Work 1 dc into each of the next 3 stitches. Work 1 tr into each of the last 3 stitches. Chain 3. Join to the base of the last tr. Fasten off, leaving a long tail for sewing.
This gradually increasing stitch height (sc through hdc, dc, and finally tr) is what tapers the nose into its recognizable carrot shape.
Buttons (Make 3)
With Color F, begin using the magic loop method.
1st round: Chain 1. Work 10 sc into the loop. Join with a slip stitch to the first sc.
2nd round: Chain 1. Work 2 sc into each stitch around. Join. You should have 20 stitches. Fasten off.
Scarf
With Color B, chain 34.
1st row: Work 1 dc into the 3rd chain from the hook (this counts as 2 dc), then 1 dc in each chain across to the end. Turn. You should have 32 stitches.
2nd and 3rd rows: Chain 2, then work 1 dc in each stitch to the end of the row. Turn. Break Color B.
4th row: Join Color B into the 8th stitch. Chain 2. Work 1 dc into each of the next 5 stitches. Turn, leaving the remaining stitches unworked — this offset section creates the draped, hanging tail of the scarf.
5th and 6th rows: Chain 2, then work 1 dc in each stitch to the end of the row. Turn. Fasten off.
Scarf Fringe
Cut several strands of Color B, each 6″ (15 cm) long. Fold each strand in half and knot it into place along the bottom edge of the hanging scarf tail to create a fringe. Trim the fringe evenly once all the strands are attached.
Finishing the Snowman’s Panel
Stitch the Hat, Eyes, Nose, and Scarf onto the white panel of the blanket as shown in the reference photo. Using a strand of Color F, backstitch a simple smile onto the snowman’s face, again referring to the photo for placement.
Panel IV — Elf
Hat
With Color D, chain 25.
1st row: Work 1 sc into the 2nd chain from the hook, then 1 sc in each chain across. Turn. You should have 24 stitches.
2nd and 3rd rows: Chain 1, then work 1 sc in each stitch to the end of the row. Turn.
4th row: Chain 1. Work an sc2tog, then 1 sc in each stitch to the last 2 stitches, then another sc2tog. Turn. You should have 22 stitches.
5th row: Chain 1. Work 1 sc in each stitch to the end of the row. Turn.
6th row: Chain 1. Work an sc2tog, then 1 sc in each stitch to the last 2 stitches, then another sc2tog. Turn. You should have 20 stitches.
7th row: Chain 1. Work 1 sc in each stitch to the end of the row. Turn. Break Color D and join Color B.
8th to 13th rows: Repeat the 6th and 7th rows. You should have 14 stitches. Break Color B and join Color D.
14th row: Chain 1. Work an sc2tog, then 1 sc in each stitch to the last 2 stitches, then another sc2tog. Turn. You should have 12 stitches.
15th row: Chain 1. Work 1 sc in each stitch to the end of the row. Turn.
16th to 23rd rows: Repeat the 14th and 15th rows. You should have 4 stitches.
24th and 25th rows: Work as the 15th row. Turn.
26th row: Chain 1. Work (sc2tog) twice. Turn. You should have 2 stitches.
27th row: Work as the 15th row. Fasten off, leaving a long tail for sewing.
This alternating color pattern (D, then B, then back to D) is what creates the striped effect along the elf’s pointed hat.
Hat Pompom
With Color B, begin using the magic loop method.
1st round: Chain 1. Work 10 sc into the loop. Join.
2nd round: Chain 1. Work 2 sc into each stitch around. Join. Fasten off, leaving a long tail for sewing.
Head and Neck (with Fringe Collar)
With Color G, begin using the magic loop method.
1st round: Chain 1. Work 10 sc into the loop. Join with a slip stitch to the first sc.
2nd round: Chain 1. Work 2 sc into each stitch around. Join. You should have 20 stitches.
3rd round: Chain 1. *Work 2 sc into the next stitch, then 1 sc in the next stitch; repeat from * around. Join. You should have 30 stitches.
4th round: Chain 1. Work 1 sc in each stitch around. Join.
5th round: Chain 1. *Work 2 sc into the next stitch, then 1 sc in each of the next 2 stitches; repeat from * around. Join. You should have 40 stitches.
6th round: Chain 1. *Work 2 sc into the next stitch, then 1 sc in each of the next 3 stitches; repeat from * around. Join. You should have 50 stitches.
7th round: Work as the 4th round.
8th round: Chain 1. *Work 2 sc into the next stitch, then 1 sc in each of the next 4 stitches; repeat from * around. Join. You should have 60 stitches.
9th round: Work as the 4th round.
10th round: Chain 1. *Work 2 sc into the next stitch, then 1 sc in each of the next 5 stitches; repeat from * around. Join. You should have 70 stitches.
11th and 12th rounds: Work as the 4th round. Break Color G and join Color B.
13th row: *Chain 8. Work 1 sc into the 2nd chain from the hook. Work 1 hdc into each of the next 2 chains. Work 1 dc into each of the next 2 chains. Work 1 tr into each of the last 2 chains. Skip the next 3 stitches from the 12th round. Slip stitch into the next stitch. Repeat from * a total of 4 more times. Fasten off.
This final row creates a series of pointed, jagged fringe elements around the edge of the head/neck piece, mimicking the elf’s characteristic collar.
Ears (Make 2)
With Color G, chain 5.
1st row: Work 1 sc into the 2nd chain from the hook, then 1 sc in each chain across. Turn. You should have 4 stitches.
2nd row: Chain 1. *Work 2 sc into the first stitch, 1 sc in each stitch to the last stitch, then 2 sc into the last stitch. Turn. You should have 6 stitches.
3rd row: Work as the 2nd row. You should have 8 stitches.
4th to 8th rows: Chain 1, then work 1 sc in each stitch to the end of the row. Turn.
9th row: Chain 1. *Work an sc2tog, then 1 sc in each stitch to the last 2 stitches. Turn. You should have 6 stitches.
10th row: Work as the 9th row.
11th row: Chain 1. Work (sc2tog) twice. You should have 2 stitches.
12th round: Chain 1. Work an sc2tog. Chain 1. Work 1 round of sc evenly around the edge of the ear. Join. Fasten off.
Eyes and Buttons (Make 2 in Color F and 2 in Color B)
Begin using the magic loop method.
1st round: Chain 1. Work 10 sc into the loop. Join. Fasten off, leaving a long tail for sewing.
Nose
With Color G, begin using the magic loop method.
1st round: Chain 2. Work [(3 dc, 1 hdc, 1 sc, 1 hdc) twice] all into the loop. Join. Fasten off, leaving a long tail for sewing.
Belt
With Color B, chain 34.
1st row: Work 1 dc into the 4th chain from the hook, then 1 dc in each chain across to the end. Turn. You should have 32 stitches.
2nd and 3rd rows: Chain 2, then work 1 dc in each stitch to the end of the row. Turn. Fasten off, leaving a long tail for sewing.
Belt Buckle
With Color F, begin using the magic loop method.
1st round: Chain 1. Work (5 sc into the ring, chain 2) a total of 4 times. Join with a slip stitch to the first sc. Fasten off loosely.
Finishing the Elf’s Panel
With Color F and your yarn needle, backstitch a face onto the elf as shown in the reference photo. Stitch the Buckle onto the Belt. Stitch the Pompom onto the Hat. Stitch the Hat, Eyes, and Ears onto the Head. Finally, stitch the Buttons, Belt, Hat, Collar, and Head onto the green panel of the blanket, referring to the photo for exact placement throughout.
Finishing the Entire Blanket
Optional Corner Pompoms (Make 4)
Wind Colors B and C held together around 4 fingers approximately 30 times. Remove the wound yarn from your fingers and tie tightly through the center. Cut through each side of the resulting loops, then trim the pompom into a smooth, round shape. Attach one finished pompom to each corner of the blanket.
A note on yarn amounts: the pattern notes that making these optional pompoms may require additional yarn beyond the base materials list.
Final Assembly
With all four character panels’ embellishments stitched into place, and the optional corner pompoms attached if desired, weave in any remaining loose ends throughout the blanket for a clean, finished look.
Reading the Reference Photo
The final page of the original pattern shows the completed blanket in full, with all four character panels — Rudolph on brown, Santa on red, the Snowman on white, and the Elf on green — displayed side by side, along with the red-and-white pompoms attached at each corner. This full reference image is especially valuable for confirming exact placement of every embellishment relative to its neighboring pieces, since the written instructions describe each component individually but the photo shows how they all come together as a finished whole.
Frequently Asked Questions
Q: This pattern has so many small pieces — is there a recommended order to work through them? Since each character panel’s embellishments are self-contained, many crocheters find it easiest to complete one entire character (all of Rudolph’s pieces, for example) before moving on to the next, rather than jumping between different characters. This keeps color changes and yarn tails more organized as you go.
Q: What is the magic loop method mentioned throughout this pattern? The magic loop (also called a magic ring) is a technique for starting a piece worked in the round without leaving a visible hole at the center — you wrap the yarn into an adjustable loop, work your first round of stitches into it, and then pull the tail to cinch the loop closed once that round is complete. It’s used throughout this pattern for the many small round pieces like eyes, noses, and pompoms.
Q: Why do some pieces (like the Elf’s Hat) switch colors partway through? This is a deliberate design choice to create striping or color-blocking within a single embellishment — the Elf’s hat, for example, alternates between Color D and Color B to create a candy-cane-like striped effect along its pointed shape.
Q: My embellishments don’t sit flat when I try to sew them on. Any tips? Since many of these pieces (like the various heads and snouts) are worked with increases to create a slightly domed or rounded shape, this dimensional quality is intentional — when sewing them onto the flat blanket panel, work through the tops/fronts of the stitches as the pattern notes, and consider lightly stuffing rounder pieces if you want extra dimension, though the pattern as written doesn’t call for stuffing.
Q: How much yarn should I expect to have left over for the optional pompoms? Since the pompoms are explicitly noted as optional and may require yarn beyond the base materials list, it’s worth purchasing an extra ball of Colors B and C if you plan to include this detail, rather than assuming your leftover yarn from the main pattern will be sufficient.
Q: Can I make just one character panel instead of the full four-panel blanket? While the pattern is designed as a complete four-panel blanket, there’s nothing stopping you from adapting just one character’s construction (say, only the Snowman) into a smaller standalone project, like a pillow panel or wall hanging, by working a shorter base stripe and attaching just that character’s embellishments.
Q: What’s the easiest way to keep track of which yarn color is which throughout such a long materials list? Since the pattern consistently refers to colors by letter (A through G) rather than by name in the instructions, it can help to write yourself a quick reference key at the start of your project, translating each letter back to its color name, so you’re not constantly flipping back to the materials page.
Q: How long does this entire project typically take to complete? Given the sheer number of individual components — four base panel stripes plus dozens of small embellishment pieces across four characters — this is realistically a multi-week project for most crocheters, especially if it’s worked in shorter sessions. The base blanket panels alone (160 total rows) represent a significant portion of the overall time investment.
Q: Is this pattern really “Easy” given how many pieces are involved? The individual techniques used throughout — single crochet, double crochet, basic increases and decreases, and simple magic loop rounds — are all genuinely beginner-friendly. What makes this project feel more involved is simply the sheer quantity of small pieces rather than the difficulty of any single technique, which is likely why it’s still rated Easy despite its impressive scale.
Final Thoughts
The Christmas Character Crochet Blanket is a wonderful example of how simple techniques, applied patiently across many small pieces, can add up to something genuinely spectacular. From Rudolph’s branching antlers to Santa’s fluffy beard, the Snowman’s fringed scarf, and the Elf’s striped pointed hat, every embellishment adds another layer of holiday charm to this already impressive four-panel afghan.
Grab your seven colors of Bernat® Super Value™, your H/8 hook, and get ready to build a holiday blanket that’s guaranteed to become a treasured annual tradition.